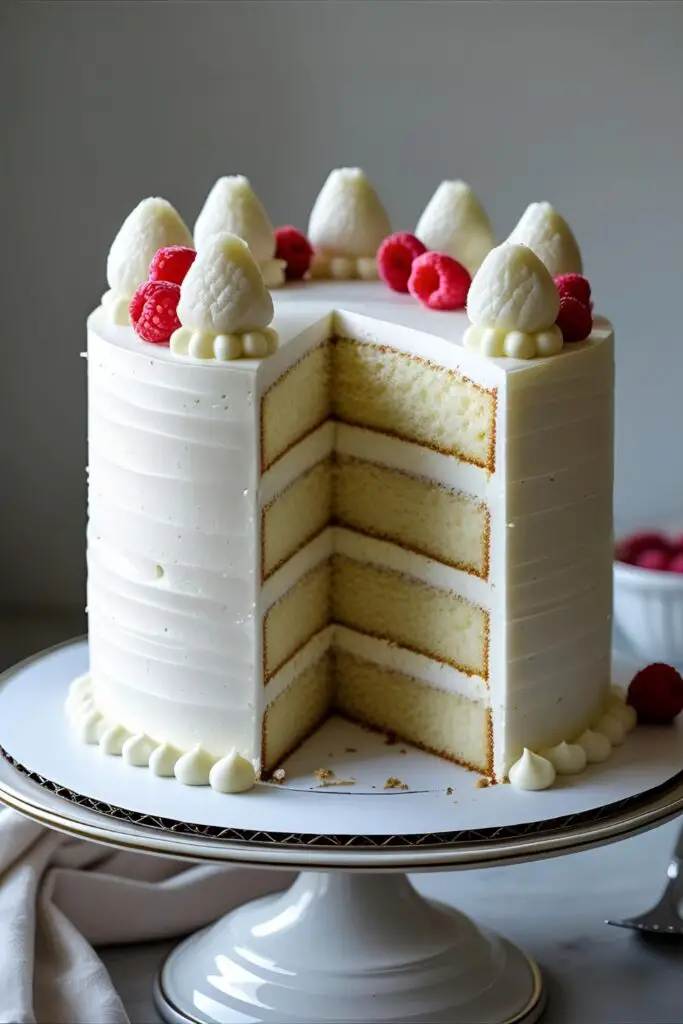
The Only White Birthday Cake Recipe You’ll Ever Need
Let’s be honest. You’ve been burned before. You were promised a majestic, snow-white cake, a pristine canvas for your glorious birthday frosting. Instead, you got a dry, crumbly, vaguely yellow-ish brick that tasted like sweet cardboard. We’ve all been there. It’s a tragedy that has ruined countless birthday parties. But what if I told you the search is over? What if the perfect white birthday cake—fluffy, impossibly moist, and brilliantly white—was actually within your grasp?
I’m talking about a cake so tender it practically melts in your mouth. A cake with a delicate, tight crumb and a pure, unadulterated vanilla flavor that doesn’t hide behind anything. This isn’t just another recipe; this is the recipe. The one you’ll memorize, the one your friends will beg you for, and the one that will make you swear off store-bought cakes forever.
This is the ultimate white birthday cake, and you’re about to become a legend for making it.
Why This White Birthday Cake Recipe Is a Game-Changer
So, what makes this white birthday cake recipe the GOAT? Three little words: Flavor, Texture, and Simplicity.
First, the flavor. We’re using a secret weapon combo: clear vanilla extract and a hint of almond extract. This power couple delivers that classic, nostalgic bakery flavor without adding the brownish tint of regular vanilla. It’s pure, clean, and tastes like a celebration.
Next, the texture. Oh, the texture! This cake is unbelievably soft and plush. We achieve this by using cake flour and only egg whites, which keeps the crumb light, airy, and—you guessed it—white. No dense, heavy, or dry cake here, thank you very much. This is the cloud-like texture dreams are made of.

Finally, it’s surprisingly easy. Don’t let the stunning results fool you. The steps are straightforward, and I’ll walk you through every single one. You don’t need to be a pastry chef to nail this. You just need a little patience and the right ingredients. Ready to wow everyone?
Ingredients You’ll Need
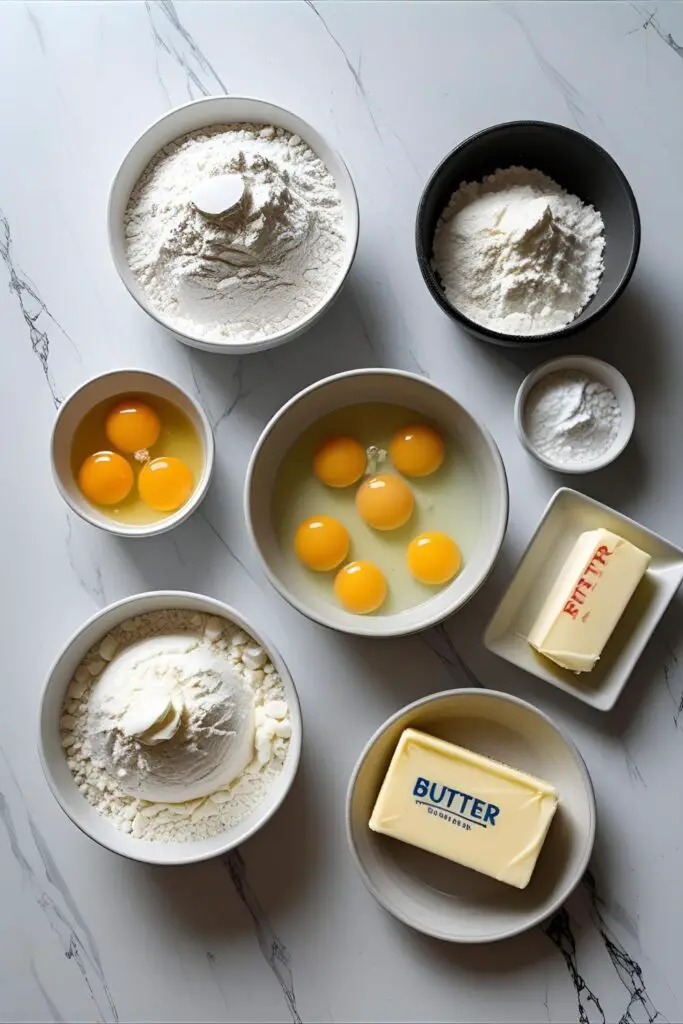
Let’s get our mise en place (that’s fancy talk for “get your stuff together”) sorted. Using the right ingredients is half the battle, so don’t skimp!
- For the Cake:
- 2 ¾ cups cake flour, spooned and leveled (Do not substitute with all-purpose unless you want a sad, dense cake. I warned you.)
- 1 ½ cups granulated sugar
- 1 tablespoon baking powder
- ¾ teaspoon salt
- 1 cup (2 sticks) unsalted butter, softened to room temperature (Seriously, let it soften. Cold butter is the enemy of a smooth batter.)
- 6 large egg whites, at room temperature (This is non-negotiable for a white cake.)
- 1 cup buttermilk, at room temperature
- 2 teaspoons clear vanilla extract
- ½ teaspoon almond extract (optional, but highly recommended for that “bakery” flavor)
- For a Simple Vanilla Buttercream:
- 1 ½ cups (3 sticks) unsalted butter, softened
- 4-5 cups powdered sugar, sifted
- ¼ cup heavy cream or milk
- 2 teaspoons clear vanilla extract
- Pinch of salt
Key Substitutions: If you absolutely MUST use all-purpose flour, for every cup of cake flour, use 1 cup of AP flour minus 2 tablespoons, then add 2 tablespoons of cornstarch. For buttermilk, you can make your own by adding 1 tablespoon of lemon juice or white vinegar to 1 cup of regular milk and letting it sit for 5 minutes.
Tools & Kitchen Gadgets Used
To make this masterpiece, you’ll need a few trusty sidekicks. Having these on hand will make the process a whole lot smoother.
- Stand Mixer with paddle and whisk attachments (or a good Hand Mixer)
- Two 9-inch Round Cake Pans
- Parchment Paper
- Flour Sifter or a fine-mesh sieve
- Multiple Mixing Bowls (you’ll need them for dry and wet ingredients)
- Rubber Spatula
- Wire Cooling Rack
- Cake Leveler or a long serrated knife
- Offset Spatula for frosting
- Cake Turntable (optional, but makes frosting a million times easier)
Step-by-Step Instructions: Let’s Bake a Cake!
Alright, let’s do this thing. Follow these steps, and you’ll be on your way to cake nirvana.
H3: Prep Like a Pro
- Preheat & Prep Pans: First things first, get your oven preheating to 350°F (175°C). Grease and flour two 9-inch round cake pans. For extra insurance against sticking, trace the bottom of the pan on parchment paper, cut it out, and place it in the bottom of the greased pan.
- Mix Dry Ingredients: In a medium bowl, sift or whisk together the cake flour, baking powder, and salt. Sifting is annoying, I know, but it makes for a lighter cake. Just do it.
H3: Create the Perfect Batter
- Cream Butter & Sugar: In the bowl of your stand mixer with the paddle attachment, beat the softened butter on medium speed until it’s smooth and creamy. Gradually add the granulated sugar and beat on medium-high for a solid 3-4 minutes. You want it to be super light, fluffy, and pale in color. This step whips air into the batter, which is crucial for a light texture. Don’t rush it!
- Add the Egg Whites: With the mixer on low, add the room-temperature egg whites one at a time, letting each one fully incorporate before adding the next. Scrape down the sides of the bowl as needed. The mixture might look a little curdled. Don’t panic; it’s normal.
- Combine Wet Ingredients: In a separate small bowl or liquid measuring cup, stir together the buttermilk, clear vanilla extract, and almond extract.
- Alternate Dry & Wet: Now for the magic. With the mixer on low speed, add about one-third of the dry ingredient mixture to the butter/sugar mix, followed by about half of the buttermilk mixture. Repeat this, ending with the last of the dry ingredients. Mix only until just combined. Overmixing develops gluten and leads to a tough cake. We want tender, remember?
H3: Bake and Cool
- Divide and Conquer: Pour the glorious batter evenly between your two prepared cake pans. Use a spatula to smooth the tops.
- Bake It: Place the pans in the preheated oven and bake for 30-35 minutes. The cakes are done when a toothpick inserted into the center comes out clean or with a few moist crumbs attached. The tops should be lightly golden and spring back when you gently press them.
- Cool Down: Let the cakes cool in their pans on a wire rack for about 15 minutes. Then, carefully run a knife around the edges and invert the cakes onto the rack to cool completely. And I mean completely. Frosting a warm cake is a recipe for a melty, soupy disaster.
Calories & Nutritional Info
Let’s get this out of the way. This is a white birthday cake. It’s not a health food. But for those who are curious, here’s a rough estimate for one slice (assuming 12 slices per cake, with buttercream).
- Calories: Approximately 550-650 kcal per slice
- Fat: Around 30-35g
- Carbohydrates: Roughly 60-70g
- Sugar: A glorious 45-55g
- Protein: About 5g

Note: This is a celebratory treat, not your daily breakfast. Enjoy it, savor it, and don’t feel guilty for one second. You earned it.
Common Mistakes to Avoid (Or, How Not to Screw This Up)
I’ve seen it all. Learn from the mistakes of others so your cake can be perfect.
- Using Cold Ingredients: I can’t stress this enough. Using cold butter, eggs, or buttermilk will result in a lumpy, curdled batter that won’t rise properly. Set everything out on the counter an hour before you start.
- Overmixing the Batter: You mixed the butter and sugar for ages, great. But once the flour goes in, you need to be gentle. Mixing too much after adding the flour will give you a tough, chewy cake instead of a light, tender one. Mix until just combined.
- Using Whole Eggs: Want a truly white birthday cake? You have to ditch the yolks. The fat and color in the yolks will weigh your cake down and turn it yellow. Save the yolks for a crème brûlée or some homemade mayo.
- Opening the Oven Door: Are we there yet? Don’t be that person. Opening the oven door repeatedly lets heat escape and can cause your beautiful cakes to sink in the middle. Wait until the minimum baking time before you even think about peeking.
Variations & Customizations
Once you’ve mastered the classic, why not get a little wild? This white birthday cake is the perfect base for creativity.
- Lemon Blueberry Dream: Add the zest of two lemons to the sugar before creaming it with the butter. Gently fold in 1 cup of fresh or frozen (don’t thaw!) blueberries tossed in a tablespoon of flour into the finished batter. Pair with a lemon cream cheese frosting.
- Funfetti Explosion: Nothing says “party” like sprinkles. Gently fold ¾ cup of rainbow jimmies (not nonpareils, they’ll bleed color everywhere!) into the finished batter. This is a kid-favorite for a reason.
- Almond Raspberry Elegance: Amp up the almond extract to a full teaspoon and skip the vanilla. When assembling the cake, spread a thin layer of seedless raspberry jam between the layers before adding the frosting. It’s sophisticated and delicious.
FAQ: Your Burning Cake Questions Answered
You’ve got questions, I’ve got answers. Here are some common queries from the internet about making the perfect white birthday cake.
H3: What is the difference between white cake, yellow cake, and vanilla cake?
A white cake is made using only egg whites to keep it bright white and give it a light, airy texture. A yellow cake uses whole eggs, including the yolks, which adds richness, a denser crumb, and a distinct yellowish color. “Vanilla cake” is a more general term that can refer to either, but it often means a yellow cake.
H3: Why isn’t my white cake white?
Two main culprits: using whole eggs instead of just the whites, and using regular brown vanilla extract. For a truly pure white birthday cake, you need egg whites only and a clear vanilla extract. Some butters are also more yellow than others, which can have a slight effect.
H3: Can I use all-purpose flour instead of cake flour?
You can, but it won’t be the same. Cake flour has a lower protein content, which results in a much more tender, delicate crumb. If you’re in a pinch, you can approximate it (see my substitution note in the ingredients list), but for the best results, stick with cake flour.
H3: How do I make my cake extra moist?
This recipe is already designed to be super moist, thanks to the buttermilk and the specific ratio of ingredients. The biggest key to a moist cake is not overbaking it. Check it at the 30-minute mark. The second a toothpick comes out clean, it’s done.
H3: Can I make this recipe into cupcakes?
Absolutely! This recipe will make about 24 cupcakes. Line your muffin tin with paper liners and fill them about two-thirds full. Bake at 350°F (175°C) for about 18-22 minutes, or until a toothpick comes out clean.
H3: Why did my cake sink in the middle?
Sinking cakes are usually caused by a few things: opening the oven door too early, underbaking it, or overmixing the leavening agents (baking powder) which causes them to lose their power. Be patient and trust the process!
H3: How far in advance can I bake this cake?
You can bake the cake layers up to two days in advance. Let them cool completely, then wrap them tightly in plastic wrap and store them at room temperature. You can also freeze the wrapped layers for up to a month. The frosting can be made and stored in an airtight container in the fridge for a week.
Final Thoughts: You’re a Cake Boss Now
There you have it. You are now armed with the knowledge and power to create a flawless white birthday cake. No more dry, disappointing cakes. No more last-minute grocery store runs. You are now the master of celebrations, the hero of birthdays, the baker of legends.
So go forth and bake! And when your friends and family are speechless with awe, just give them a little wink and say, “Oh, this old thing?” Welcome to the club. You’ll never go back.