The Ultimate Construction Theme Cake Recipe (That’s Actually Easy!)
Ever find yourself staring down the barrel of a child’s birthday party, having made a rash promise you now deeply regret? You know, something like, “Of course, I can make you a birthday cake that looks like a real construction site!” Suddenly, you’re googling how to sculpt a bulldozer from fondant at 2 AM. Been there. Let’s put down the professional sculpting tools and back away slowly. I’m here to tell you that you absolutely can create a show-stopping construction theme cake, and you don’t need an art degree or a pact with a baking demon to do it.
This recipe is your new best friend. It’s the secret weapon that makes you look like a Pinterest-perfect parent, even if you, like me, consider successfully not burning toast a major culinary win. Forget complicated techniques. We’re talking about a ridiculously moist chocolate cake, sinfully good buttercream, and the clever use of cookies and candy. It’s construction, but make it delicious.
So, are you ready to build the best cake of your life? Let’s get our hard hats on.
Why This Recipe is Awesome
Honestly? Because it’s maximum-impact for minimum-effort. Here’s the deal:
- It’s Practically Foolproof: The chocolate cake is a one-bowl wonder that stays moist for days. It’s so forgiving, you could probably forget an ingredient and it would still be delicious. (Don’t test that theory, though. Or do. I’m not your supervisor.)
- The “Wow” Factor is HUGE: People will think you spent hours meticulously decorating. They don’t need to know your main decorating tools were a Ziploc bag and your kid’s favorite (and thoroughly washed) toy trucks.
- It Tastes Incredible: This isn’t one of those cakes that looks better than it tastes. It’s a rich, decadent chocolate cake with creamy chocolate frosting. The crushed cookie “dirt” and chocolate “boulders” just add to the fun and flavor.
Ingredients
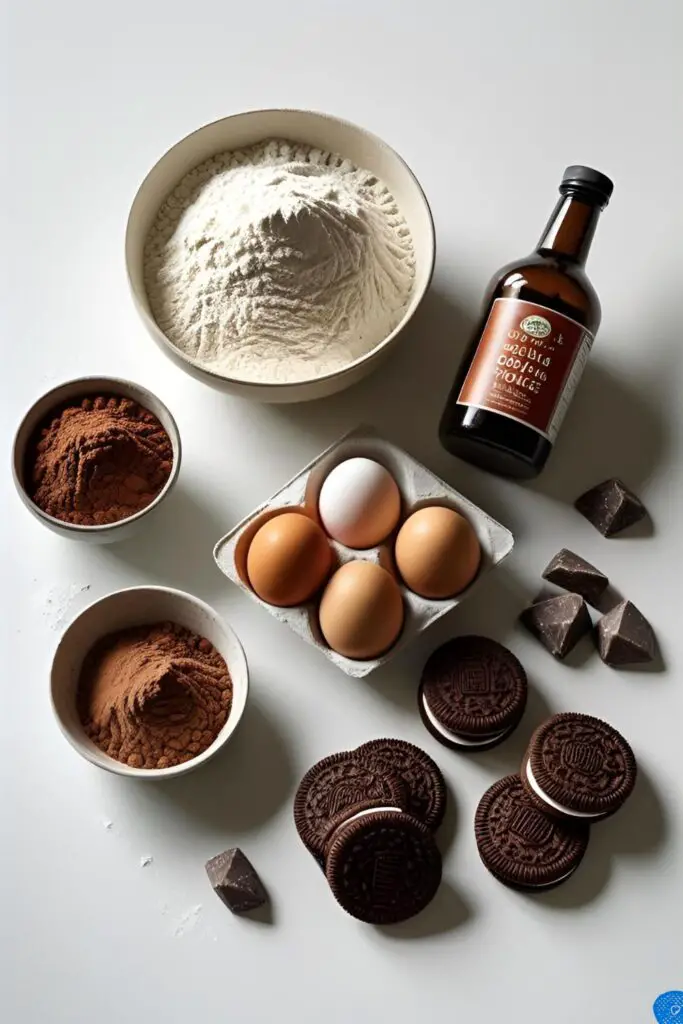
Let’s gather our building materials. No substitutions unless you want to risk a structural collapse, okay? (Just kidding… mostly.)
For the Chocolate “Foundation” Cake:
- 2 cups all-purpose flour
- 2 cups granulated sugar
- ¾ cup unsweetened cocoa powder (the good stuff, please)
- 2 teaspoons baking soda
- 1 teaspoon baking powder
- 1 teaspoon salt
- 1 cup buttermilk (or 1 cup milk + 1 tbsp white vinegar, let sit for 5 mins)
- ½ cup vegetable oil
- 2 large eggs, at room temperature
- 1 teaspoon vanilla extract
- 1 cup boiling water

For the Chocolate “Mortar” Buttercream:
- 1 cup (2 sticks) unsalted butter, softened
- 3 ½ cups powdered sugar
- ½ cup unsweetened cocoa powder
- ½ cup heavy cream or milk
- 1 teaspoon vanilla extract
- A pinch of salt
For the “Work Site” Decorations:
- 1 package (about 15 oz) of Oreo cookies or similar chocolate sandwich cookies
- Chocolate rocks, chocolate-covered raisins, or Buncha Crunch for “boulders”
- Pirouette cookies or Kit Kat bars for “logs” or “beams”
- Brand new, clean toy construction vehicles (dump trucks, excavators, bulldozers are perfect)
Tools & Kitchen Gadgets Used
To properly equip your construction crew, you’ll need the following gear. This isn’t just a list; it’s your path to success.
- Stand Mixer or a reliable Hand Mixer (for that fluffy buttercream)
- 9×13 inch Baking Pan (The perfect rectangular “site”)
- Large Mixing Bowls
- Whisk
- Silicone Spatula (for scraping every last delicious bit)
- Measuring Cups and Spoons
- Food Processor (for turning cookies into “dirt” in seconds) or a Ziploc bag and a rolling pin for some therapeutic smashing.
- Offset Spatula (for professional-looking frosting swirls)
- Wire Cooling Rack
Step-by-Step Instructions
Alright, crew, it’s go-time. Follow these steps, and you’ll have a standing structure in no time.
Step 1: Lay the Foundation (Bake the Cake) Preheat your oven to 350°F (175°C). Grease and flour your 9×13 inch pan. Don’t skimp on this part unless you enjoy chiseling cake out of a pan. In a large bowl (or the bowl of your stand mixer), whisk together the flour, sugar, cocoa powder, baking soda, baking powder, and salt. Break up any lumps. This is your dry mix.
Step 2: Mix the Concrete In a separate bowl, whisk together the buttermilk, oil, eggs, and vanilla. Pour the wet ingredients into the dry ingredients and mix on low speed until just combined. It will be thick, don’t panic.

Step 3: The Secret Ingredient Now, carefully pour the boiling water into the batter while mixing on low. The batter will be very thin. This is correct! It feels wrong, but trust the process. This is what makes the cake insanely moist. Pour the batter into your prepared pan.
Step 4: Bake & Cool Bake for 35-40 minutes, or until a toothpick inserted into the center comes out clean. Let the cake cool in the pan for about 15 minutes before transferring it to a wire rack to cool completely. And I mean completely. Frosting a warm cake is a crime against humanity.
Step 5: Whip Up the “Mortar” (Frosting) While the cake cools, make the buttercream. In your mixer, beat the softened butter until creamy. Sift in the powdered sugar and cocoa powder, then mix on low until it’s incorporated. Add the heavy cream, vanilla, and salt. Crank the mixer up to medium-high and beat for 3-5 minutes until it’s light and fluffy.
Step 6: The Fun Part – DECORATE! Place your Oreo cookies in a food processor and pulse until they look like fine dirt. If you don’t have one, pop them in a sturdy Ziploc bag and crush them with a rolling pin. It’s cheaper than therapy.
Step 7: Assemble the Site Once the cake is cool, slather it with a generous layer of chocolate buttercream. You don’t have to be neat! It’s a construction site, after all. Create a “pile” of dirt by mounding up some extra frosting in one corner and covering it with about two-thirds of your crushed Oreo “dirt.” Sprinkle the rest of the dirt lightly over the remaining cake.
Step 8: Final Touches Now, deploy the machinery. Thoroughly wash and dry your toy trucks first! Position the excavator to look like it’s digging into the Oreo pile. Have the dump truck carrying a load of chocolate “boulders.” Scatter more boulders and “logs” (Pirouette cookies) around the site. Step back and admire your handiwork. You did it!
Calories & Nutritional Info


Let’s be real, you’re not eating this for your health. But if you must know…
- Serving Size: 1 slice (assuming cake is cut into 16 slices)
- Estimated Calories: Around 450-500 kcal per slice.
- Fat: High. It’s butter and oil. Delicious, delicious fat.
- Sugar: Also high. It’s a celebration cake, what did you expect?
- Protein: A little bit, from the eggs and flour.
- Fiber: Some, thanks to the cocoa and Oreos. See? It’s practically a health food. 😉
Common Mistakes to Avoid
Read this section carefully. This is the difference between a standing ovation and a structural failure.
- Frosting a Warm Cake: I said it before, and I’ll say it again. If you try to frost a cake that isn’t 100% cool, you will create a melted, soupy mess. Patience is a virtue.
- Forgetting to Wash the Toys: Please, for the love of all that is holy, wash the toys. No one wants to find factory dust or whatever else is on a new toy in their slice of cake. A good scrub with soap and hot water is mandatory.
- Over-mixing the Cake Batter: When you combine the wet and dry ingredients, mix just until combined. Over-mixing develops the gluten in the flour, leading to a tough, rubbery cake instead of a soft, tender one.
- Using Lumpy Frosting: Sift your powdered sugar and cocoa powder! If you don’t, you’ll have little chalky lumps in your otherwise glorious buttercream. It’s an extra 30 seconds that makes all the difference.
Variations & Customizations
Feeling creative? Want to put your own spin on the project? Here are a few ideas.
- Yellow “Hard Hat” Zone: Swap the chocolate cake for a vibrant yellow or lemon cake. Use a vanilla buttercream tinted bright yellow. For the “dirt,” use crushed Biscoff or Nilla Wafer cookies to create a sandy look.
- Gluten-Free Site: This cake works beautifully with a good quality 1-for-1 gluten-free all-purpose flour blend. Just make sure your other decorations (like the cookies and candies) are certified GF as well.
- Vegan Demolition Crew: It’s super easy to make this vegan! Use your favorite plant-based milk (like almond or soy) for the buttermilk, a flax egg (1 tbsp ground flaxseed + 3 tbsp water) instead of chicken eggs, vegan butter sticks for the frosting, and ensure your Oreos are the vegan-friendly kind (most are in the US!).
FAQ Section
Got questions? I’ve got answers. Here are some of the most common queries from the construction cake community.
1. What kind of cake is best for a construction theme? IMO, a dark chocolate cake is perfect because the color resembles rich soil. But honestly, any sturdy cake like a yellow, vanilla, or even a spice cake will work great as the base.
2. How do you make edible dirt for a cake? The easiest and tastiest way is to crush chocolate sandwich cookies (like Oreos). Just pulse them in a food processor or crush them in a bag. The cream filling helps it clump a bit like real dirt!
3. Can I just use a box cake mix? Absolutely! If you’re short on time, a box of your favorite chocolate cake mix is a fantastic shortcut. No shame in that game. To make it taste more homemade, try swapping the water for milk and the oil for melted butter.
4. How do you properly clean toys for a cake? Wash them like you would any dish! Use hot water and dish soap, and scrub them well with a sponge or brush to get into any small crevices. Rinse thoroughly and let them air dry completely before placing them on the cake.
5. How far in advance can I make this cake? You can bake the cake layer up to two days in advance. Let it cool completely, then wrap it tightly in plastic wrap and store it at room temperature. The frosting can also be made 2-3 days ahead and stored in an airtight container in the fridge (just let it come to room temp and re-whip it before using). I’d recommend decorating it the day of the party for maximum freshness.
6. What are some other construction cake decorating ideas? Get creative! Use yellow and orange M&M’s for “cones,” pretzel sticks for “lumber,” or even a gummy worm peeking out of the “dirt.” You can also use a fork to create “tire tracks” in the frosting before you add the dirt.
7. How do I transport a decorated construction cake? Carefully! Since the decorations are just placed on top, they can shift. The best way is to transport it in a cake carrier or a sturdy box that’s just a little larger than the cake pan. Drive like you have a precious, delicious baby in the car. Because you do.
Final Thoughts
There you have it—your complete blueprint for a construction theme cake that will be the talk of the party. You’ll get all the glory, and only you will know how simple it truly was. It’s fun, it’s messy, and it’s so much better than anything you could buy in a store.
So go on, get building. And when your guests ask who your professional baker is, just give them a wink and a slice of cake. They’ll never know your secret. Don’t forget to share your amazing creations with me!