The Ultimate Sheet Pan Chicken Nachos (That Won’t Get Soggy!)
Let’s be brutally honest for a moment. We’ve all been victims of bad nachos. You order a mountain of them at a restaurant, full of hope and hunger, only to be presented with a tragedy. A few perfectly topped chips on the surface, guarding a sad, barren wasteland of dry, naked chips underneath. It’s a culinary bait-and-switch. But what if I told you the secret to a perfect chicken nachos recipe isn’t some ancient culinary secret? It’s all about strategic layering and a little bit of love.
Are you ready to build a nacho masterpiece? A glorious, cheesy, fully-loaded monument to snack time that ensures every single chip is a winner? Of course you are. Today, we’re building the best sheet pan chicken nachos recipe of your life, and I promise, there will be no chip left behind.
Why This Recipe Is Basically a Public Service
So, why are these the only nachos you should ever make again? I’m so glad you asked.
First, the layering technique is revolutionary. We’re not just dumping stuff on top. We are creating a multi-level structure of deliciousness that guarantees a perfect chip-to-topping ratio in every single bite. This is nacho engineering, people!
Second, they’re the ultimate crowd-pleaser. Seriously, who is going to say no to a giant pan of cheesy, chicken-loaded nachos? Whether it’s game day in Barishal, a movie night, or just a Tuesday when you feel like eating your feelings, these are the answer.
Finally, they are so easy it’s almost embarrassing. The most difficult part of this recipe is shredding the cheese, and let’s be real, that’s a pretty low bar. It’s the maximum-reward-for-minimum-effort meal you’ve been dreaming of.
The A-List Ingredient Lineup

To build a nacho masterpiece, you need a solid foundation and some all-star toppings.
The Foundation (The Important Stuff):
- 1 large bag (about 12 oz) Tortilla Chips: This is critical. You need thick, sturdy, restaurant-style chips. Flimsy, thin chips will lead to the dreaded Soggy Chip Apocalypse. Don’t do it to yourself.
- 2 cups Cooked, Shredded Chicken: A rotisserie chicken is your best friend here. It’s the ultimate time-saving hack.
- 1 tbsp Taco Seasoning: Use a packet or your own blend.
- 1 can (15 oz) Black Beans, rinsed and drained:
- 3 cups Shredded Cheese: A mix of medium cheddar and Monterey Jack is the gold standard for meltiness and flavor. Grate your own if you can!
The Fresh Toppings (The Post-Bake Crew):
- 1 cup Diced Tomatoes:
- 1/2 cup Diced Red Onion:
- 1/4 cup Pickled Jalapeños, sliced: For that spicy, tangy kick.
- 1/4 cup Fresh Cilantro, chopped:
The Dollops & Drizzles (The Finishing Touch):
- Sour Cream or Mexican Crema:
- Guacamole or Diced Avocado:
- Your Favorite Salsa:
Your Nacho-Making Arsenal
You don’t need a professional kitchen, just a few key pieces of equipment.
- A Large Rimmed Baking Sheet: This is your canvas. The bigger, the better.
- Aluminum Foil: For lining the baking sheet, because who actually enjoys scrubbing melted cheese off a pan?
- Large Mixing Bowl: For seasoning your chicken.
- Cheese Grater: If you’re taking my advice and grating your own cheese (you should).
- Knife and Cutting Board: For prepping all those glorious fresh toppings.
Building Your Nacho Skyscraper: Step-by-Step
Ready to construct the best nachos of your life? Follow this blueprint for guaranteed success.
Step 1: Prep Your Station
Preheat your oven to 400°F (200°C). Line your large baking sheet with aluminum foil. In your mixing bowl, toss the shredded chicken with the taco seasoning until it’s evenly coated.
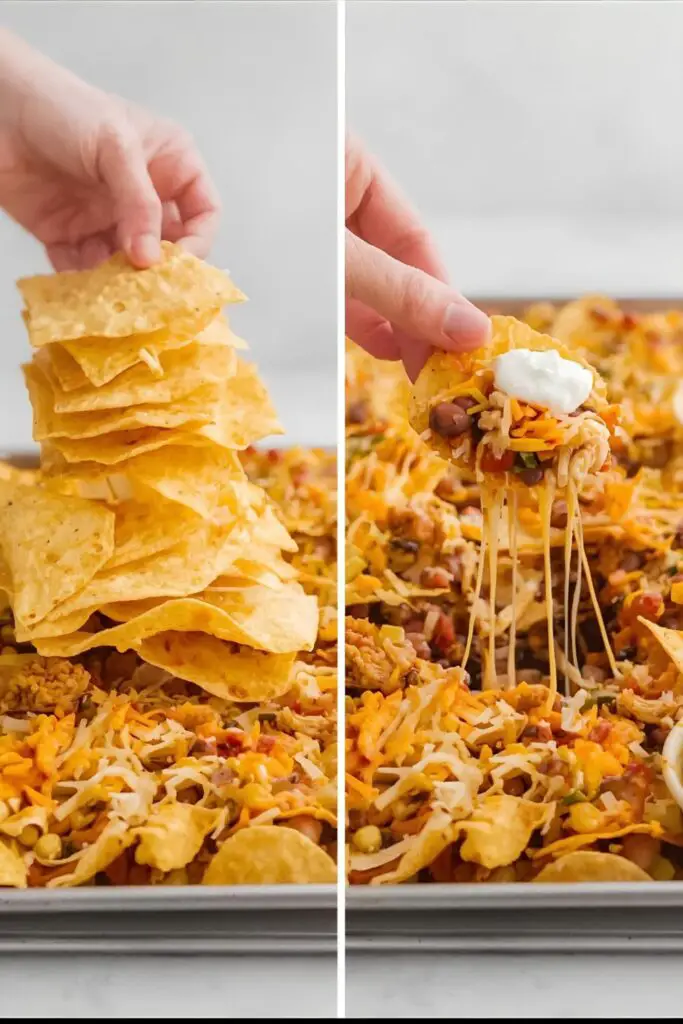
Step 2: The Crucial First Layer
Spread half of your sturdy tortilla chips in a single, even layer on the prepared baking sheet. Don’t just dump them; arrange them so they’re covering most of the surface. This is the foundation of your nacho empire.
Step 3: Topping Layer One
Sprinkle half of the seasoned chicken, half of the black beans, and half of the shredded cheese evenly over the first layer of chips.
Step 4: The Genius Second Layer
Now for the secret weapon. Arrange the remaining tortilla chips on top of the first layer of toppings. This creates pockets of goodness and ensures that the bottom layer doesn’t turn into a soggy mess.
Step 5: Topping Layer Two
You guessed it. Sprinkle the remaining chicken, remaining black beans, and remaining cheese over the top layer of chips. See? Every chip is now in the vicinity of something delicious. No chip left behind!
Step 6: Bake to Melty Perfection
Place the sheet pan in the preheated oven and bake for 8-12 minutes, or until the cheese is completely melted, bubbly, and just starting to get golden in spots.
Step 7: Garnish with the Fresh Stuff
Remove the nachos from the oven. Now, and this is important, you add the cold toppings. Scatter the diced tomatoes, red onion, pickled jalapeños, and fresh cilantro over the hot, cheesy nachos.
Step 8: Drizzle, Dollop, and Devour!
Finish your masterpiece with generous dollops of sour cream and guacamole, and serve with a bowl of salsa on the side. Serve immediately and watch them disappear.
Calories & Nutritional Info
Listen, we’re making a giant pan of chips and cheese. This is soul food, not health food. But for the curious, here’s a rough estimate for a “reasonable” serving (whatever that means):
- Calories: Approximately 450-600 kcal
- Fat: Around 25-35g
- Carbohydrates: Roughly 30-40g
- Protein: About 20-25g
- Note: The best way to enjoy nachos is to share them with people you like. The joy of sharing cancels out at least half the calories. That’s just science. 🙂
Common Mistakes to Avoid (Nacho Nightmares)
- Using Flimsy Chips: I cannot stress this enough. Thin chips will buckle under the pressure and turn into a mushy mess. Use thick, sturdy, restaurant-style tortilla chips.
- The Single-Layer Dump: Don’t just pile everything on top. The double-layer technique is the only way to ensure cheesy, chickeny goodness throughout.
- Baking Your Fresh Toppings: Do you want hot, slimy cilantro and mushy, warm tomatoes? I didn’t think so. Cold toppings go on AFTER the nachos come out of the oven.
- Using Bagged Pre-Shredded Cheese: It’s convenient, I get it. But it’s coated in starches to prevent clumping, which means it doesn’t melt as beautifully. Grating a block of cheese will give you a superior cheese pull. You deserve a superior cheese pull.
Variations & Customizations
Feel like going off-script? I encourage it!
- BBQ Chicken Nachos: Swap the taco seasoning for your favorite BBQ sauce. Use a mix of smoked cheddar and Monterey Jack cheese, and maybe add some corn and a drizzle of ranch dressing at the end.
- Spicy Buffalo Chicken Nachos: Toss the shredded chicken in buffalo sauce instead of taco seasoning. Use a mix of Monterey Jack and crumbled blue cheese. Finish with a drizzle of ranch or blue cheese dressing and some chopped celery.
- Vegetarian Black Bean Nachos: Ditch the chicken and double up on the black beans. You could also add some pinto beans, corn, or sautéed bell peppers and onions for a hearty vegetarian version.
Frequently Asked Questions (Your Nacho Inquiries, Answered)
1. How do you keep nachos from getting soggy? Three rules: Use sturdy chips, use the double-layer method, and add any wet toppings like salsa, sour cream, and guacamole after baking, right before serving.
2. What’s the best cheese for nachos? A good melting cheese is key. A combination of medium cheddar (for flavor) and Monterey Jack (for that perfect melt) is ideal. Pepper Jack adds a nice kick!
3. Should I put salsa on before or after baking? Definitely after! Baking salsa can make it watery and can contribute to the dreaded soggy chip. Serve it on the side for dipping.
4. Can I make these nachos ahead of time? Nachos are best served immediately. However, you can prep all your components ahead of time (shred the chicken, chop the veggies, grate the cheese). Then, assembly and baking will only take about 15 minutes.
5. What’s the best way to reheat leftovers? The microwave is the enemy of crispy nachos. The best way to reheat them is on a sheet pan in the oven or in an air fryer at a low temperature (around 325°F/165°C) for 5-10 minutes, until warmed through.
6. Can I use ground chicken instead of shredded? Absolutely. Just cook the ground chicken with the taco seasoning until it’s no longer pink, then proceed with the layering as directed.
7. Are corn or flour tortillas better for homemade chips? If you’re making your own chips (you overachiever, you), corn tortillas are the traditional and better choice. They get much crispier when fried or baked.
Final Thoughts
You are now equipped with the knowledge to create perfect, crowd-pleasing, never-soggy chicken nachos. You hold the power to transform a simple bag of chips into an epic feast. Wield this power wisely.
Go forth and build your nacho masterpiece. Bring it to your next gathering and humbly accept the shower of compliments that will inevitably come your way. You’ve earned it. Welcome to nacho nirvana.