The Ultimate Pistachio Pudding Dessert (A Glorious No-Bake Masterpiece)
Let’s take a journey back in time, to an era of potlucks, church socials, and unapologetically delicious desserts that came in a 9×13 inch pan. I’m talking about the kind of treat that has a cookie crust, a creamy filling, and a fluffy topping, a true masterpiece of semi-homemade glory. If you’ve ever dismissed that little box of instant pudding at the grocery store, prepare to have your mind blown. Today, we are resurrecting a legend, the one, the only, the gloriously green pistachio pudding dessert. This isn’t just a recipe; it’s a no-bake ticket to nostalgic bliss.
Why This Recipe Is Awesome (It’s Effortlessly Impressive)
So, why are we dedicating an entire article to a dessert that proudly features a box of instant pudding? Because this recipe is the definition of a “lazy genius” move. It’s awesome because:
- It’s Unbelievably Easy: Can you crush cookies? Can you stir things in a bowl? Can you operate a mixer? Congratulations, you have all the necessary skills to make this dessert. No oven required!
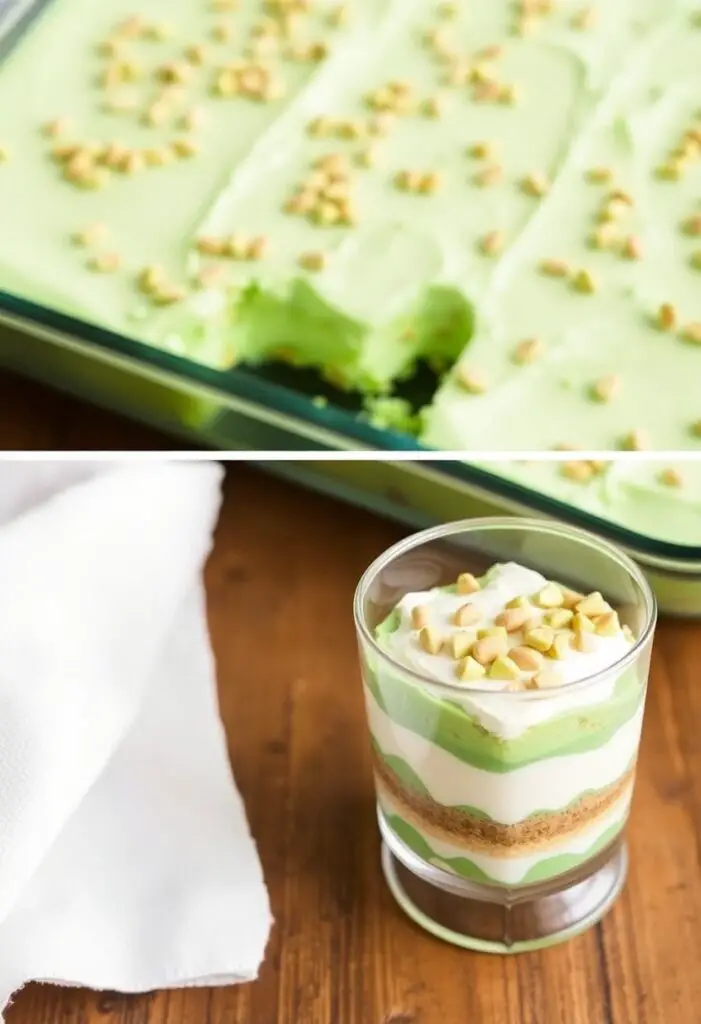
- The Texture is Everything: It’s a symphony of textures in every single bite. You get the buttery, crunchy pecan crust, the cool and creamy pistachio pudding layer, and the light, fluffy whipped topping. It’s pure magic.
- It’s a Certified Crowd-Pleaser: That vibrant green color and nutty, sweet flavor is a guaranteed hit. Bring this to a party in your Khulna home, especially on a hot day, and watch it disappear. It’s cool, creamy, and utterly irresistible.
- Perfect for Making Ahead: In fact, this dessert is better when made ahead, making it the ultimate low-stress party contribution.
It’s the dessert you make when you want to bring something spectacular without, you know, actually having to try that hard.
Ingredients: Your No-Bake Dream Team
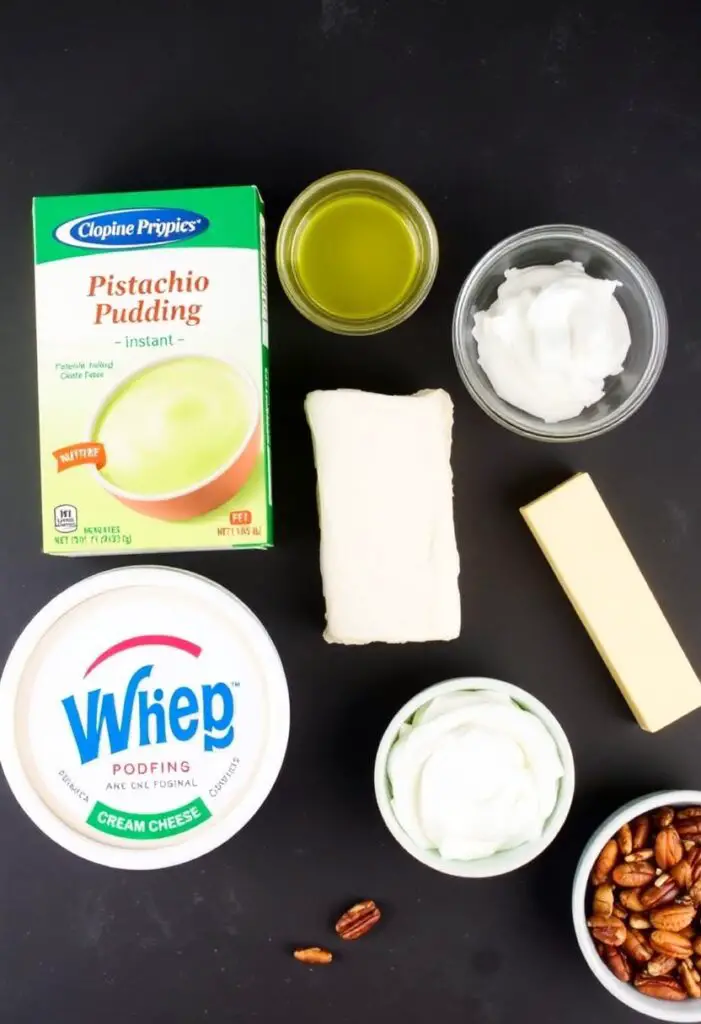
This masterpiece is a three-layer situation. Let’s assemble the team.
For the Crunchy Pecan Crust:
- 1 cup all-purpose flour
- ½ cup (1 stick) unsalted butter, melted
- ½ cup chopped pecans
For the Creamy Pistachio Layer:
- 1 (8-ounce) block cream cheese, softened
- 1 cup powdered sugar, sifted
- 1 (16-ounce) container whipped topping (like Cool Whip), thawed and divided
- 2 (3.4-ounce) boxes instant pistachio pudding mix
- 3 cups cold milk
For the Final Flourish:
- The rest of your whipped topping!
- More chopped pecans, for garnish
- Mini chocolate chips or chocolate shavings (optional, but highly recommended)
Key Ingredient Notes:
- Instant Pudding Mix: You must use INSTANT pudding mix, not the “cook & serve” kind. The instant mix is what allows this to set up beautifully without any cooking.
- Whipped Topping: The tub of frozen whipped topping is a classic for this retro dessert and provides great stability. You can use homemade sweetened whipped cream, but it may not hold up for as long.
Tools & Kitchen Gadgets Used: Your No-Bake Arsenal

Put away the oven mitts. You won’t need them.
- 9×13 inch Baking Dish (Glass or ceramic is lovely for showing off the layers.)
- Mixing Bowls (A couple of medium and one large.)
- An Electric Hand Mixer or a Stand Mixer (For the creamy layers.)
- Rubber Spatula
- Offset Spatula (For smooth, even layers.)
- Measuring Cups and Spoons
Step-by-Step Instructions: The Art of the Layer
This is less about cooking and more about delicious construction. Let’s build a masterpiece.
Act 1: The Foundation (The Crust)
- Prep Your Dish: You don’t even need to grease it! Just have your 9×13 inch dish ready.
- Mix the Crust: In a medium bowl, combine the flour, melted butter, and ½ cup of chopped pecans. Mix until it’s all combined and crumbly.
- Press It In: Dump the crumbly mixture into your baking dish. Use the back of a spoon or your clean hands to press it firmly and evenly into the bottom of the dish.
- The “Bake” (Just Kidding, It’s a Chill): Pop the crust into the refrigerator to chill for about 15-20 minutes while you prepare the next layer.
Act 2: The Creamy Green Dream (The Pistachio Layer)
- The Cream Cheese Base: In a large bowl, use your electric mixer to beat the softened cream cheese and sifted powdered sugar together until smooth and creamy.
- Fold in the Fluff: Gently fold in 1 cup of the thawed whipped topping into the cream cheese mixture with your rubber spatula until it’s all combined.
- Spread It Out: Carefully spread this cream cheese layer evenly over your chilled crust.
Act 3: The Pudding and the Topping
- Make the Pudding: In a separate medium bowl, whisk together the two boxes of instant pistachio pudding mix and the 3 cups of cold milk. Whisk for about 2 minutes, until it starts to thicken.
- Layer It Up: Immediately pour the thickened pudding over the cream cheese layer and spread it out evenly with your offset spatula.
- The Final Fluff: Top the pudding layer with the remaining whipped topping, spreading it carefully to cover the entire surface.
- Garnish and Chill: Sprinkle the top with your extra chopped pecans and a handful of mini chocolate chips. Now for the most important step: cover and chill the dessert in the refrigerator for at least 4 hours, but preferably overnight. This allows all the layers to set up and the flavors to meld. Do not skip this!
Calories & Nutritional Info (Per Glorious Square)
Let’s just say this is a dessert for a special occasion. Or a Tuesday. We don’t judge.
- Estimated Calories per square: ~350-450 calories
- Deliciousness: Off the charts.
Common Mistakes to Avoid: Don’t Let Your Lush Be a Flop!
Even a no-bake dessert has its potential pitfalls.
- Using “Cook & Serve” Pudding: This will result in a soupy, unset mess. You must use INSTANT pudding mix.
- Not Chilling Long Enough: If you try to cut into it too early, you’ll have a sloppy puddle instead of neat, beautiful layers. Patience and a long chill are your best friends.
- A Runny Topping: If you’re using homemade whipped cream instead of stabilized whipped topping, make sure you whip it to stiff peaks so it holds its shape.
- Forgetting to Sift the Powdered Sugar: This can lead to a lumpy, gritty cream cheese layer. Take the extra 30 seconds to sift it!
Variations & Customizations: Your Pudding, Your Palace
The layered pudding dessert is a classic for a reason—it’s endlessly adaptable.
- The Classic “Watergate” Salad Dessert: This is the original inspiration! For a truly retro experience, fold 1 (8-ounce) can of crushed pineapple (drained very, very well) and 1 cup of mini marshmallows into the pistachio pudding layer before you spread it.
- Chocolate Pistachio Dream: Use a crust made of crushed Oreo cookies (about 25 cookies) mixed with 6 tablespoons of melted butter. It’s a phenomenal combination with the pistachio.
- Baklava-Inspired: Use crushed pistachios instead of pecans in the crust. Add a hint of rosewater or orange blossom water to the whipped topping layer.
FAQ Section: All Your Pudding Puzzles, Solved
You have questions about this green goddess of a dessert. I have the answers.
- Q: Is this the same thing as Watergate Salad? A: Almost! Watergate Salad is typically a “fluff” salad made by mixing all the ingredients (pudding mix, pineapple, marshmallows, whipped topping, pecans) together in one bowl. This dessert takes those same classic flavors and separates them into distinct, elegant layers with a crust. It’s like the formal evening wear version of the salad.
- Q: Do I have to use instant pudding mix? Can I make the pudding from scratch? A: You can make a homemade pistachio pudding, but you need to make sure it’s very thick and completely cooled before you layer it. The beauty of this recipe is the ease and perfect setting power of the instant mix.
- Q: Can I make this dessert ahead of time? A: Yes! It’s the perfect make-ahead dessert. It needs at least 4 hours to set but is even better if you make it the day before you plan to serve it.
- Q: How long does it need to chill to get clean slices? A: For the cleanest possible slices, I recommend chilling it overnight. This gives all the layers time to firm up completely.
- Q: Can I freeze this dessert? A: Yes, it freezes surprisingly well! You can freeze the whole pan or individual slices. Let it thaw in the refrigerator for a few hours before serving. The texture will be a bit like an ice cream cake.
- Q: Can I use a different kind of nut in the crust? A: Absolutely! Walnuts, almonds, or even pistachios would be delicious. You can also use a graham cracker or Oreo crust if you prefer.
- Q: Why is my dessert runny? A: You likely either used “cook & serve” pudding by mistake, didn’t let it chill long enough, or if you used homemade whipped cream, it wasn’t whipped to stiff enough peaks.
Final Thoughts: Embrace the Glorious Green!
You’ve done it. You’ve created a masterpiece of creamy, crunchy, fluffy, nostalgic goodness. You’ve harnessed the power of the humble pudding mix and turned it into a dessert that is as impressive as it is easy. So go on, grab a fork, and dive into a slice of this glorious green dream. You’ll be the undisputed hero of the next potluck, guaranteed.