The Ultimate Oreo Cake Recipe That’s Basically a Giant Cookie
Alright, let’s cut to the chase. You’re here because you love Oreos. I’m here because I love Oreos. We’re all here for the Oreos. But what if we could take that perfect black-and-white cookie and transform it into a towering, decadent, cookies-and-cream masterpiece? It’s 2:28 AM here in Khulna, the official hour for questionable life choices and profound dessert revelations. Forget dunking them in milk. Today, we’re making the ultimate Oreo cake recipe. This isn’t just a chocolate cake with some cookies thrown in. Oh no. This is a cake that understands, respects, and celebrates the Oreo in all its glory.
Why This Cake Is a Certified Legend
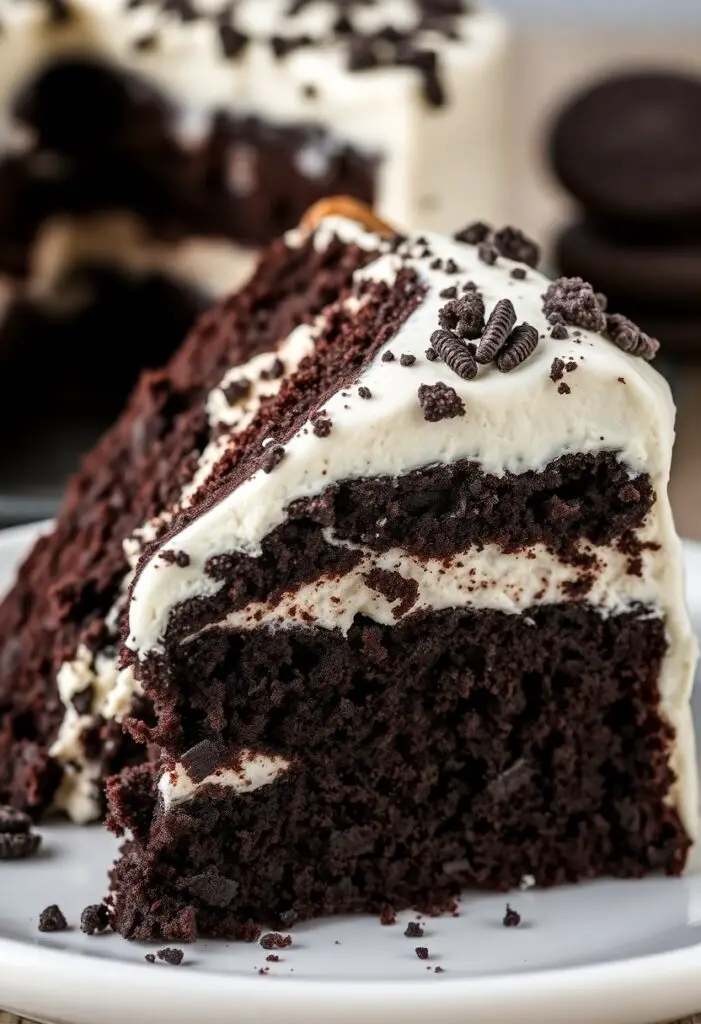
So, what makes this Oreo cake worth turning on your oven for in the middle of the night? Let’s break it down. We’re talking about a moist, dark chocolate cake that’s packed with crushed Oreo pieces, layered with a light, fluffy cookies-and-cream frosting, and then unapologetically decorated with even more Oreos. It’s an Oreo explosion. The combination of the rich chocolate cake, the creamy, crunchy frosting, and the iconic cookie flavor is pure, unadulterated joy.
This cake is the ultimate crowd-pleaser. It’s the perfect birthday cake, the star of any party, and the cure for a bad day. It looks incredibly impressive, like something you’d see in a fancy bakery window, but it’s built on a surprisingly simple and straightforward recipe. You get all the glory with none of the frantic, last-minute pastry chef stress.
The Oreo Dream Team (aka The Ingredients)
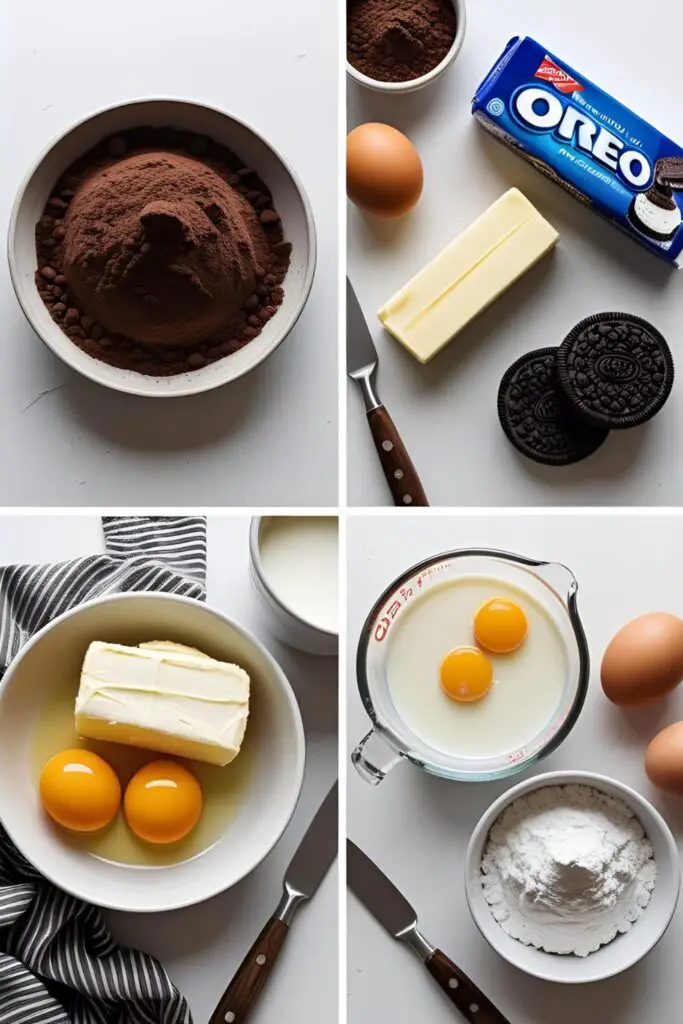
To build this monument to cookies and cream, you’ll need a few key players.
For the Oreo-Packed Chocolate Cake:
- All-Purpose Flour (2 cups): The sturdy base of our cake.
- Granulated Sugar (2 cups): For that perfect sweetness.
- Unsweetened Cocoa Powder (¾ cup): Go for a good quality one for a deeper chocolate flavor.
- Baking Soda (2 teaspoons) & Baking Powder (1 teaspoon): Our lifting crew.
- Salt (1 teaspoon): To balance all the flavors.
- Large Eggs (2): At room temperature, please!
- Buttermilk (1 cup): The secret to a super moist cake.
- Vegetable Oil (½ cup): Another moisture insurance policy.
- Vanilla Extract (2 teaspoons): A crucial background flavor.
- Hot Coffee or Hot Water (1 cup): Using hot coffee will intensify the chocolate flavor without making it taste like coffee.
- Oreo Cookies (15, coarsely crushed): The star of the show, obviously.
For the Cookies & Cream Frosting:
- Unsalted Butter (1 ½ cups / 3 sticks): Must be softened to room temperature.
- Powdered Sugar (4-5 cups, sifted): For sweetness and structure.
- Heavy Cream or Milk (¼ cup): For a creamy, spreadable consistency.
- Vanilla Extract (1 tablespoon): Yes, a whole tablespoon. Trust me.
- Oreo Cookies (10, finely crushed into crumbs): For that signature cookies and cream flavor.
- A Pinch of Salt.
- Whole Oreos for decoration.
Your Cookie-Construction Toolkit (Tools & Kitchen Gadgets)
You don’t need a professional setup, just a few baking essentials.
- Two 9-inch Round Cake Pans: For our glorious layers.
- Parchment Paper: Your best friend for preventing cakes from sticking.
- An Electric Mixer (Hand or Stand): You’ll definitely want this for the frosting.
- Mixing Bowls.
- A Whisk and a Silicone Spatula.
- A Large Ziplock Bag and a Rolling Pin: The most satisfying way to crush your Oreos.
- An Offset Spatula: For getting those beautiful, smooth frosting swirls.
- A Wire Cooling Rack.
Step-by-Step to Oreo Nirvana
Let’s build this beautiful beast.
Step 1: The Prep Phase

Preheat your oven to 350°F (175°C). Grease and flour your two 9-inch round cake pans, and line the bottoms with parchment paper circles.
Step 2: Make the Cake Batter
In a large bowl, whisk together the flour, sugar, cocoa powder, baking soda, baking powder, and salt. In a separate bowl, whisk together the eggs, buttermilk, oil, and vanilla. Pour the wet ingredients into the dry and mix until just combined. Slowly pour in the hot coffee, mixing on low speed. The batter will be very thin – this is correct! Don’t panic. Gently fold in your 15 coarsely crushed Oreos.
Step 3: Bake and Cool
Divide the batter evenly between your prepared pans. Bake for 30-35 minutes, or until a toothpick inserted into the center comes out clean. Let the cakes cool in the pans for 15 minutes before inverting them onto a wire rack to cool completely.
Step 4: Whip Up the Frosting
While the cakes cool, it’s frosting time. In a large bowl, beat the softened butter with your electric mixer until it’s light and creamy. With the mixer on low, gradually add the sifted powdered sugar. Once it’s mostly incorporated, add the heavy cream, vanilla, and salt. Now, turn the mixer up to medium-high and beat for a full 3-5 minutes, until the frosting is incredibly light and fluffy. Finally, fold in your 10 finely crushed Oreo crumbs.
Step 5: Assemble Your Masterpiece
Place one cooled cake layer on your serving plate. Top it with a thick, generous layer of your cookies and cream frosting (about 1 ½ cups). Place the second cake layer on top. Use the remaining frosting to cover the top and sides of the entire cake. For a fun look, you can create swirls on top with your offset spatula.
Step 6: The Grand Finale Decoration
Press whole or halved Oreos around the base of the cake and arrange a few on top. For extra drama, you can create a “drip” effect with melted chocolate, but that’s just showing off. 🙂
Calories & Nutritional Info (It’s a Cookie Cake, Folks)

Let’s just agree that this is a “special occasion” cake and not dwell on the numbers too much, shall we?
- Serving Size: One decadent slice (1/16th of the cake).
- Calories: Approximately 550-650 kcal.
- Main Ingredient: Pure, unadulterated happiness.
- Disclaimer: This cake is not, I repeat, not diet-friendly. And that’s why we love it.
Common Mistakes to Avoid (Oreo Tragedies)
Don’t let these simple slip-ups ruin your cookie creation.
- Over-baking the Cake: A dry chocolate cake is a culinary crime. This is a very moist cake batter, but it can still be over-baked. Check it early!
- Using Cold Butter for the Frosting: Your butter must be properly softened to get a light, fluffy, non-greasy frosting.
- Frosting a Warm Cake: This will result in a soupy, melting, heartbreaking mess. Your cake layers must be 100% cool.
- Crushing the Oreos to Dust: For the Oreos inside the cake, you want coarse chunks, not fine powder. For the frosting, you want fine crumbs. Know the difference!
Variations & Customizations (The Oreo Universe is Vast)
The classic is perfect, but who doesn’t love options?
- Mint Oreo Cake: Add 1 teaspoon of peppermint extract to both the cake batter and the frosting. Use Mint Oreos instead of the classic ones.
- Ultimate Death by Oreo: Use a rich chocolate ganache as a filling between the layers and as a drip on top of the cookies and cream frosting.
- Golden Oreo Vanilla Cake: Use a vanilla cake base instead of chocolate. Use Golden Oreos in the cake and in a vanilla buttercream frosting for a completely different but equally delicious experience.
FAQ: Your Oreo Cake Questions, Answered
Let’s tackle the burning questions about this cookie-filled creation.
1. Why is the cake batter so thin?
That’s the secret to an ultra-moist cake! The combination of oil and hot liquid (coffee or water) creates a very thin batter that bakes up into a beautifully tender and moist crumb.
2. Do I have to use coffee in the cake?
No, you can use hot water instead. But I promise, the coffee doesn’t make the cake taste like coffee; it just deepens and enhances the chocolate flavor.
3. Can I make this cake ahead of time?

Yes! The cake layers can be baked, cooled, and wrapped tightly in plastic wrap and stored at room temperature for up to 2 days, or frozen for up to a month. The frosting can also be made ahead and stored in an airtight container in the fridge. Just let it come to room temperature and give it a quick whip before using.
4. How should I crush the Oreos?
The easiest way is to place them in a large ziplock bag and gently whack them with a rolling pin or the bottom of a pan. This lets you control the size of the chunks.
5. How do I store the finished Oreo cake?
Store it in a covered cake carrier at room temperature for up to 3 days, or in the refrigerator for up to 5 days. IMO, it’s even better on day two!
6. Can I make this into cupcakes?
Absolutely! This recipe will make about 24-30 cupcakes. Fill your liners about ⅔ full and bake for 18-22 minutes.
7. My frosting is too soft/stiff! What do I do?
If it’s too soft, add more sifted powdered sugar, a little at a time, until it reaches the right consistency. If it’s too stiff, add more heavy cream or milk, one teaspoon at a time.
Final Thoughts
You are now in possession of a truly powerful recipe. You have the ability to transform the world’s favorite cookie into a showstopping cake that will make people’s eyes go wide with delight. You are an Oreo wizard.
So go on, bake this glorious cake. Take a picture of its towering, cookie-studded beauty. And then, cut yourself a giant slice and enjoy the fruits of your labor. Just be warned: once you bring this to a party, you will be the designated cake-bringer for life. It’s a delicious responsibility.