The Ultimate One-Pot Rice and Chicken Recipe (Your Weeknight Savior)
Let’s be honest. The phrase “rice and chicken” doesn’t exactly scream “culinary adventure,” does it? It sounds like something you’d eat when you’ve given up on life, or at least on dinner. But what if I told you that this humble duo could be transformed into a flavor-packed, ridiculously easy, one-pot masterpiece that will have you rethinking everything? Prepare to be amazed, because today we’re making a rice and chicken dish so good, it might just become your new weeknight obsession.
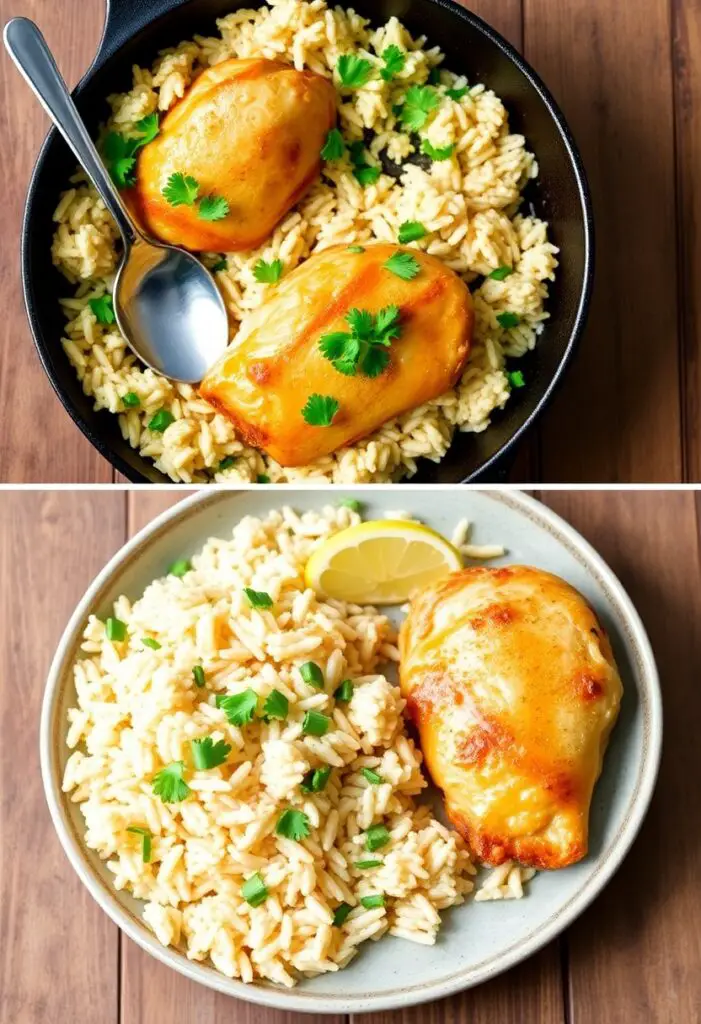
Forget about sad, bland chicken and a side of boring, plain rice. We’re talking about juicy, golden-brown chicken nestled into a bed of fluffy rice that’s been cooked in savory broth and infused with garlic and herbs. It’s a complete meal, it’s made in one pan, and it’s about to save you from yet another night of expensive takeout.
Why This One-Pot Wonder Is a Certified Genius Move
Still skeptical? Still thinking about that sad, boiled chicken of your past? Let me convince you why this specific recipe is a total game-changer.
First, it’s a one-pot miracle. I repeat: ONE. POT. That means minimal cleanup. We’re talking about a main dish and a side dish that cook together in beautiful harmony, leaving you with more time to, you know, do literally anything else besides scrubbing dishes.
Second, the flavor infusion is insane. The rice doesn’t just sit next to the chicken; it cooks with the chicken, soaking up all the savory broth, the buttery garlic, and the delicious browned bits from the pan. This isn’t just rice and chicken; it’s a fully integrated flavor experience.
Finally, it’s the ultimate comfort food. It’s hearty, it’s satisfying, and it feels like a warm hug in a bowl. It’s fancy enough to feel like you made an effort, but easy enough that you’ll actually, you know, make the effort.
The Dream Team (Ingredients)
You don’t need a long, complicated list for this masterpiece. Just a few simple, hardworking ingredients.
- Chicken: 1.5 lbs of boneless, skinless chicken thighs. Thighs are highly recommended as they stay incredibly juicy. You can use breasts, but be careful not to overcook them.
- Long-Grain White Rice: 1 ½ cups, such as Basmati or Jasmine. Make sure you rinse it until the water runs clear!
- Chicken Broth: 3 cups of low-sodium chicken broth.
- Yellow Onion: 1 large, finely chopped.
- Garlic: 4-6 cloves, minced. Let’s be real, measure this with your heart.
- Olive Oil: 1 tablespoon.
- Unsalted Butter: 2 tablespoons. For richness and flavor.
- Seasoning Blend:
- 1 teaspoon smoked paprika
- 1 teaspoon dried oregano
- ½ teaspoon dried thyme
- Salt and Freshly Ground Black Pepper: To taste.
- Fresh Parsley: ¼ cup, chopped, for a fresh finish.
- Lemon Wedges: For serving (optional, but it brightens everything up!).
Your One-Pot Arsenal
The beauty of this recipe is the short list of required tools.
- A Large Skillet or Dutch Oven with a Tight-Fitting Lid: This is the star of the show. A 12-inch skillet or a 5-quart Dutch oven is perfect. The tight-fitting lid is non-negotiable.
- Cutting Board and a Sharp Knife: For your prep work.
- Measuring Cups and Spoons.
- A Sturdy Wooden Spoon or Spatula: For stirring and scraping.
Step-by-Step to One-Pot Perfection
Ready to create some magic? The process is surprisingly simple.
Step 1: Sear the Chicken
Pat your chicken thighs dry with a paper towel. Season them generously on both sides with salt, pepper, and the smoked paprika. Heat the olive oil in your large skillet over medium-high heat. Once the oil is shimmering, carefully place the chicken thighs in the pan.
Sear for 3-4 minutes per side, until they are deeply golden brown and beautiful. The chicken does not need to be cooked through at this point. Remove the seared chicken from the skillet and set it aside on a plate.
Step 2: Sauté the Aromatics
Reduce the heat to medium. Add the butter to the same skillet. Once it’s melted, add the chopped onion and cook for 4-5 minutes, until softened and translucent, scraping up any delicious browned bits from the chicken. Add the minced garlic and cook for another minute until fragrant. Your kitchen should be smelling incredible right about now.
Step 3: Toast the Rice
Add the rinsed and drained rice to the skillet. Stir it constantly for about one minute, toasting the grains in the buttery, garlicky goodness. This little step adds a wonderful nutty depth of flavor. Stir in the dried oregano and thyme.
Step 4: Add the Liquid and Bring It All Together
Pour in the chicken broth and bring the mixture to a simmer, stirring to make sure nothing is stuck to the bottom of the pan.
Once it’s simmering, nestle the seared chicken thighs (and any juices from the plate!) back into the rice mixture.
Step 5: The “No Peeking” Simmer
Reduce the heat to low, cover the skillet with your tight-fitting lid, and let it cook for 18-20 minutes. And now for the most important rule of all: DO NOT LIFT THE LID. I’m serious. No peeking. Lifting the lid lets all the precious steam escape, which is crucial for cooking the rice perfectly. Set a timer and go do something else. Trust the process.
Step 6: Rest and Fluff
After 18-20 minutes, turn off the heat. Let the skillet sit, still covered, for another 5-10 minutes. This allows the rice to finish steaming and absorb any remaining moisture.
Now, you can finally lift the lid. The rice should be tender and all the liquid absorbed. Use a fork to gently fluff the rice around the chicken.
Step 7: Garnish and Serve
Sprinkle the dish with a generous amount of freshly chopped parsley and serve immediately with lemon wedges on the side for squeezing. The pop of fresh citrus and herbs at the end makes all the difference!
Calories & Nutritional Info (A Well-Rounded Meal)
This one-pot wonder is a pretty balanced meal on its own, with protein, carbs, and a little fat.
- Serving Size: Approximately 1 chicken thigh and 1 cup of rice
- Estimated Calories: 450-550
- Protein: A solid 30g+ from the chicken.
- Carbohydrates: From our fluffy, flavorful rice.
- Fat: From the chicken thighs, butter, and olive oil.
Common Mistakes to Avoid (Save Your Dinner!)
- The Dreaded Peek: I will say it again for the people in the back. DO NOT lift the lid while the rice is cooking. It releases the steam, messes up the temperature, and is the #1 reason for crunchy, undercooked rice.
- Mushy Rice Mayhem: You didn’t use the right rice-to-liquid ratio, or you used the wrong kind of rice (like instant or short-grain). Stick to a 1:2 ratio of long-grain white rice to broth.
- Skipping the Sear: Tossing raw chicken into the pot will work, but you’ll miss out on the deep, savory flavor that comes from searing the chicken first. Don’t skip the sear!
- Forgetting to Rest: That 5-10 minute rest period after cooking is crucial. It allows the rice to finish steaming and become perfectly light and fluffy. Be patient!
Variations & Customizations (Your Pot, Your Rules)
This recipe is a fantastic starting point. Feel free to make it your own!
1. Spicy Spanish-Style Chicken and Rice
Use smoked hot paprika instead of sweet. Add a can of diced tomatoes with green chiles along with the chicken broth. Stir in some frozen peas at the end and garnish with fresh cilantro instead of parsley.
2. Creamy Mushroom Chicken and Rice
Sauté 8 ounces of sliced cremini mushrooms along with the onions until they are golden brown. After the dish has rested, stir in a ½ cup of heavy cream or sour cream for a rich, creamy finish.
3. Lemony Greek Chicken and Rice
Add the zest of one lemon to the rice along with the herbs. When the dish is finished, stir in a handful of chopped Kalamata olives and top with crumbled feta cheese and fresh dill.
FAQ: Your Rice and Chicken Conundrums, Answered
Let’s clear up some common questions.
1. Can I use brown rice instead of white rice? Yes, but you’ll need to adjust the recipe. Brown rice requires more liquid and a longer cooking time. You’ll likely need about 3.5 cups of broth and a simmer time of 40-45 minutes.
2. Can I use boneless, skinless chicken breasts? You can, but they have a tendency to dry out more than thighs. If you use breasts, sear them lightly and make sure they are nestled into the rice so they stay moist. Check for doneness a little earlier.
3. What other vegetables can I add to this dish? Finely diced carrots and celery can be sautéed with the onions. You can also stir in some frozen peas or corn during the final 5-minute resting period (the residual heat will cook them).
4. My rice is still hard, but all the liquid is gone. What do I do? Don’t panic! Pour in another ¼ to ½ cup of hot chicken broth, put the lid back on, and continue to cook on low for another 5-10 minutes.
5. Can I make this dish in a rice cooker or Instant Pot? While you could adapt it, you would lose the flavor development from searing the chicken and toasting the rice in the skillet. The one-pot skillet method is highly recommended for this particular recipe.
6. Is this recipe gluten-free? Yes! As long as you ensure your chicken broth is certified gluten-free, this dish is naturally gluten-free.
7. How do I store and reheat leftovers? Store leftovers in an airtight container in the refrigerator for up to 3 days. Reheat in the microwave or in a skillet over low heat with a splash of water or broth to help rehydrate the rice.
Final Thoughts
You did it. You took the humble, often-underestimated “rice and chicken” and turned it into a savory, aromatic, one-pot masterpiece. You’ve officially unlocked a new level of weeknight dinner heroics. Your family will thank you, your dishwasher will thank you, and your taste buds will definitely thank you.
So go forth and conquer dinner. And the next time someone suggests having “just rice and chicken,” you can smile knowingly, because you know the delicious secret to making it truly spectacular.


