The Easiest No-Bake Oreo Dirt Cake Recipe
Why is this recipe the G.O.A.T. (Greatest Of All Time)? Let’s count the ways. First and foremost, it’s a no-bake wonder. Can I get an amen? In the sweltering heat or when you just can’t be bothered to preheat anything, this recipe is your savior.
Second, it’s ridiculously easy. If you can operate a mixer and crush cookies (which, BTW, is excellent therapy), you can make this cake. It’s the perfect recipe to make with kids, or for when you need to bring a “homemade” dessert to a party and have approximately zero baking skills. It’s pure, unadulterated fun served on a spoon. What’s not to love?
Ingredients
The beauty of this recipe is its simplicity. No weird, hard-to-find ingredients here.
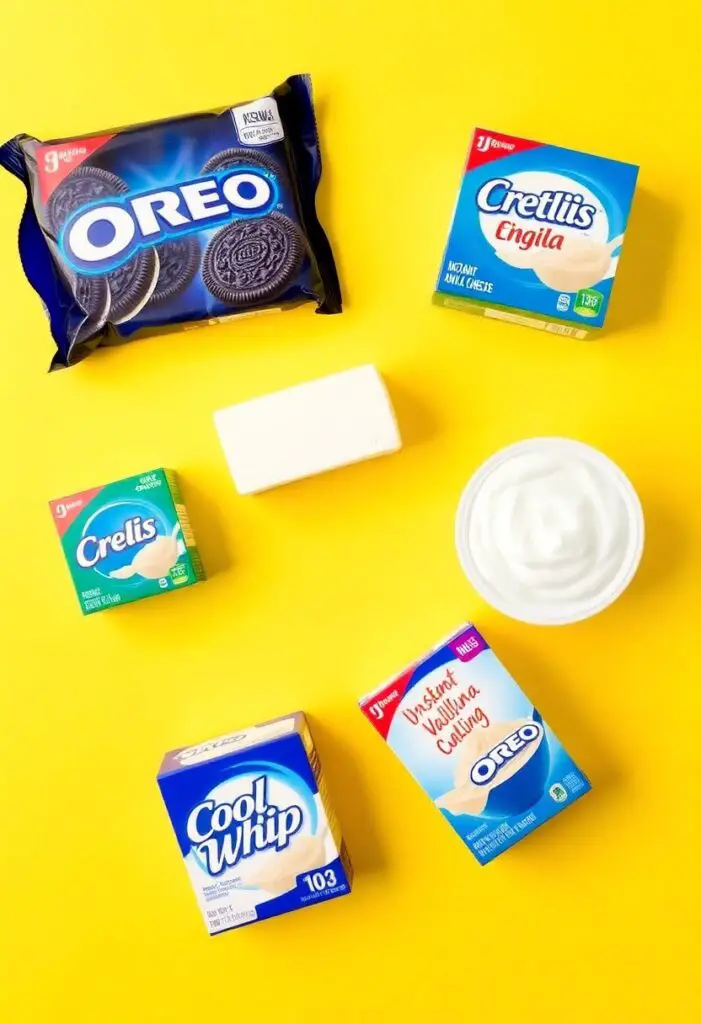
- 1 package (about 14.3 oz) Oreo cookies (the classic, don’t get fancy… yet)
- 1/2 cup (1 stick) unsalted butter, melted
- 1 block (8 oz) cream cheese, softened to room temperature (this is important!)
- 1 cup powdered sugar
- 1 container (8 oz) Cool Whip, thawed (or 2 cups of stabilized homemade whipped cream)
- 2 packages (3.4 oz each) instant vanilla pudding mix (instant is non-negotiable!)
- 3 1/4 cups cold milk (whole milk works best for a rich flavor)
- 1 teaspoon vanilla extract
- Optional for decoration: Gummy worms, gummy bugs, a clean flower pot for serving.
Tools & Kitchen Gadgets Used:
To construct this edible masterpiece, you’ll need a few things.
- Food Processor (or a large zip-top bag and a rolling pin for some therapeutic smashing)
- Large Mixing Bowl
- Medium Mixing Bowl
- Hand Mixer or Stand Mixer
- Rubber Spatula
- 9×13 inch baking dish (or a large trifle bowl, or a clean, new flower pot for the classic look)
- Measuring Cups and Spoons
Step-by-Step Instructions
Ready to get your hands dirty? Let’s build this cake layer by glorious layer.
- Make the “Dirt”: First, separate the Oreos. Scrape the cream filling into a small bowl and set it aside for later (don’t eat it all!). Place the chocolate wafers into a food processor and pulse until they look like fine crumbs—aka, dirt. If you don’t have a food processor, toss them in a zip-top bag and smash them with a rolling pin. It’s cheaper than therapy.
- Create the Crust: In a small bowl, mix about 3/4 of your Oreo crumbs with the melted butter. Press this mixture firmly into the bottom of your 9×13 inch pan or the vessel of your choice. This is your delicious, chocolatey foundation.
- Whip Up the Creamy Layer: In a large bowl, beat the softened cream cheese with a hand mixer until it’s smooth and creamy. Add the powdered sugar and the reserved Oreo cream filling, and beat again until everything is light and fluffy. Gently fold in the Cool Whip with a spatula until just combined. Try not to lick the spatula clean just yet.
- Make the Pudding: In a separate medium bowl, whisk together the two packages of instant vanilla pudding mix, the cold milk, and the vanilla extract. Whisk for about two minutes, until it starts to thicken into a beautiful, wobbly pudding.
- Combine and Conquer: Now, gently fold the prepared pudding into the cream cheese mixture. Mix until it’s smooth and uniform in color. You’ve just created the heavenly, creamy heart of your dirt cake.
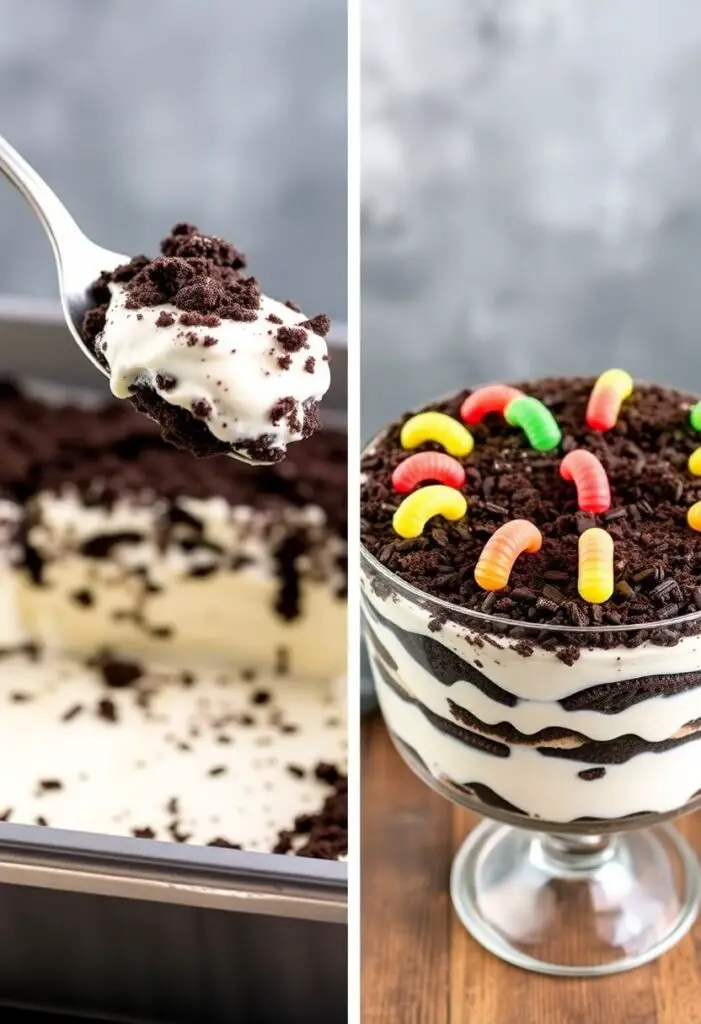
- Layer It Up: Spread the entire pudding/cream cheese mixture evenly over your Oreo crust. Sprinkle the remaining 1/4 of the Oreo crumbs over the top, covering the entire surface so it looks like a freshly tilled garden bed.
- Chill Out: This is the hardest part. Cover the cake with plastic wrap and refrigerate for at least 4 hours, but overnight is even better. This time allows the layers to set up and the flavors to meld together. Do not skip this step!
- Decorate and Devour: Just before serving, poke gummy worms and bugs into your “dirt” to complete the illusion. Serve it up and watch everyone’s inner child rejoice.
Calories & Nutritional Info (Estimated)

Let’s just say this isn’t health food. But for those who are curious, here’s an estimate per serving (if you get 12 servings from the pan).
- Calories: Approximately 450-550 kcal
- Carbohydrates: 60-70g
- Fat: 25-30g
- Sugar: A glorious, unapologetic amount
- Note: This is a dessert. Live a little. Eat the cake.
Common Mistakes to Avoid
Don’t let these simple slip-ups stand between you and dirt cake perfection.
- Using Cook & Serve Pudding: I cannot stress this enough. You must use INSTANT pudding mix. Cook & Serve pudding won’t set up properly without being heated, and this is a no-bake dessert, remember?
- Lumpy Filling: If your cream cheese isn’t fully softened to room temperature, you will have sad little lumps in your filling. Let it sit out on the counter for an hour before you start. Be patient.
- Not Chilling It Long Enough: I know, it looks amazing and you want to dive in immediately. But an under-chilled dirt cake is a soupy, sloppy mess. Give it the full 4+ hours in the fridge. It’s worth the wait.
- Oreo “Gravel” Instead of “Dirt”: If you don’t crush the Oreos fine enough, the texture will be gritty and chunky instead of soft and dirt-like. Commit to the crush!
Variations & Customizations
Feeling adventurous? Tweak the classic with one of these fun ideas.
- Peanut Butter Dirt Cake: Use Nutter Butter cookies for half of the Oreos. Add 1/2 cup of creamy peanut butter to the cream cheese mixture for a decadent twist.
- Mint Chocolate “Mud Pie”: Use Mint Oreos instead of the classic ones. You can even add a drop of green food coloring and 1/2 teaspoon of peppermint extract to the pudding layer for a full minty experience.
- Boozy Dirt Cake (For Adults Only!): Add 2-3 tablespoons of Baileys Irish Cream, Kahlua, or a chocolate liqueur to the cream cheese mixture for a grown-up version of this childhood favorite.
FAQ Section
You’ve got dirt cake questions? I’ve got answers.
Q1: Can I make Oreo dirt cake ahead of time? Yes! In fact, you should. This dessert is best when made at least 4 hours in advance, or even the day before, to give it plenty of time to set.
Q2: How long does dirt cake last in the fridge? Stored in an airtight container or covered tightly with plastic wrap, it will stay delicious for up to 3-4 days in the refrigerator.

Q3: Can you freeze Oreo dirt cake? You sure can. It freezes surprisingly well. Wrap it tightly and freeze for up to 2 months. Thaw it in the refrigerator before serving. The Oreos might soften a bit, but it will still be tasty.
Q4: Do I have to use Cool Whip? Can I use real whipped cream? Yes, you can use real whipped cream. Whip 2 cups of heavy cream with 1/4 cup of powdered sugar until stiff peaks form. However, Cool Whip has stabilizers that help the cake hold its shape longer. If using real whipped cream, it’s best to serve the cake within 24 hours.
Q5: What kind of pudding is best? Classic dirt cake uses vanilla pudding, which creates a nice visual contrast with the dark Oreo layers. However, you can absolutely use instant chocolate pudding for an even richer, more chocolatey dessert.
Q6: Do I have to use a 9×13 pan? Not at all! You can assemble it in a large glass trifle bowl to show off the layers, or in individual clear cups or jars for single servings. The classic presentation is a new, clean plastic flower pot with gummy worms crawling out!
Q7: Help! I only have regular Oreos, not the big package. How many do I need? The standard 14.3 oz package has about 36 cookies. So, aim for around 36-40 cookies for the recipe.
Final Thoughts
There you have it—your official license to play with your food. This Oreo dirt cake is more than just sugar and cream; it’s a trip down memory lane, a guaranteed party-starter, and proof that sometimes the simplest things in life are the most delicious. Now go forth and make a glorious mess. You won’t regret it.