The Only Chocolate Layer Cake Recipe You’ll Ever Need
It’s 3:19 AM here in Khulna. This is the hour of questionable decisions and profound, soul-shaking cravings. And tonight, the craving is for chocolate. Not just any chocolate, but a deep, dark, ridiculously moist slice of cake that makes all your problems melt away. You could settle for a sad, dry slice from a box, but you deserve better. You deserve a true layer cake chocolat—a chocolate layer cake so good, so decadent, it will ruin all other chocolate cakes for you. This isn’t just a recipe; this is your new secret weapon, your go-to celebration cake, your “I’m having a bad day and need this” cake. Let’s get baking.
Why This Chocolate Cake Is the G.O.A.T.
Why this specific recipe? Why should you trust me, a disembodied voice on the internet, in the dead of night? Because this cake is foolproof, my friend. It’s engineered for success. First and foremost, it is impossibly moist. We have a secret weapon (hot coffee!) that guarantees a tender, velvety crumb that stays moist for days. Second, the chocolate flavor is deep and complex, thanks to using both cocoa powder and that coffee trick, which doesn’t make the cake taste like coffee but rather makes the chocolate taste more… chocolatey.
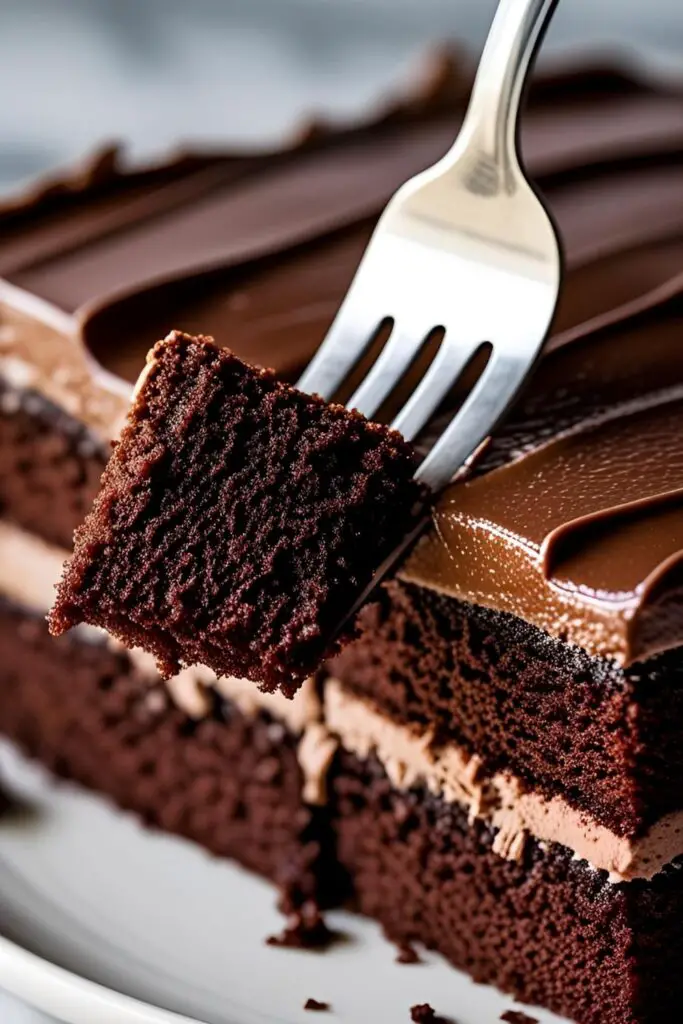
This cake looks like a million bucks. It’s tall, dark, and handsome, with layers of rich, fudgy frosting. It’s the kind of showstopper that will have your friends and family convinced you’ve been taking secret pastry classes. But you and I will know the truth: it was surprisingly simple to make.
The Dream Team of Decadence (aka The Ingredients)
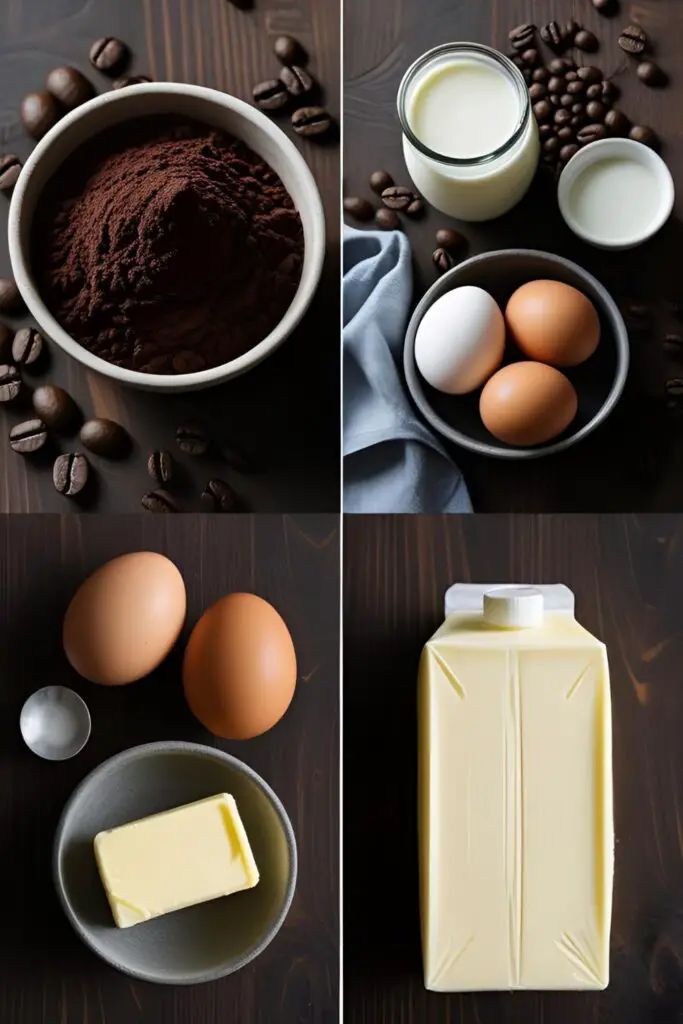
This cake uses simple pantry staples to create something truly extraordinary.
For the Ultra-Moist Chocolate Cake:
- All-Purpose Flour (2 cups): The foundation of our glorious cake.
- Granulated Sugar (2 cups): Yes, it’s a lot. We’re making a celebration cake, not a salad.
- Unsweetened Cocoa Powder (¾ cup): Use a good quality one! Dutch-process will give you a darker, richer cake.
- Baking Soda (2 teaspoons) & Baking Powder (1 teaspoon): Our leavening power couple for a perfect rise.
- Salt (1 teaspoon): Balances the sweetness and deepens the chocolate flavor.
- Large Eggs (2 of them): At room temperature, please.
- Buttermilk (1 cup): Another secret to a tender, moist crumb. Also at room temperature.
- Vegetable Oil (½ cup): Guarantees a moist cake that won’t dry out. Use a neutral oil like canola.
- Vanilla Extract (2 teaspoons): Use the real stuff.
- Hot Brewed Coffee (1 cup): This is the ultimate secret weapon. You can use hot water if you must, but coffee takes the chocolate flavor to another dimension.
For the Dreamy Chocolate Fudge Frosting:
- Unsalted Butter (1 cup / 2 sticks): Softened to room temperature.
- Powdered Sugar (3-4 cups, sifted): The foundation of our sweet, fluffy frosting.
- Unsweetened Cocoa Powder (¾ cup, sifted): For that deep chocolate flavor.
- Heavy Cream or Milk (⅓ cup): To get the perfect creamy consistency.
- Vanilla Extract (1 teaspoon) & a Pinch of Salt: For flavor balance.
The Baker’s Essential Toolkit (Tools & Kitchen Gadgets)
Having the right tools will make you feel like a pro and ensure a flawless result.
- Two 9-inch Round Cake Pans: The classic choice for a stunning layer cake.
- Parchment Paper: Your non-stick insurance policy. Don’t skip it.
- An Electric Mixer (Hand or Stand): While you can make the cake by hand, you’ll want a mixer for that light and fluffy frosting.
- Mixing Bowls: A large one for the batter and a medium one for the dry ingredients.
- A Whisk and a Silicone Spatula: For mixing and, most importantly, for scraping every last bit of batter and frosting out of the bowl.
- A Wire Cooling Rack: Absolutely essential for cooling your cakes properly.
- An Offset Spatula: The best tool for applying frosting like a pro. A butter knife will also work in a pinch.
- A Cake Turntable (optional): If you want to get really fancy with your frosting, a turntable makes it so much easier.
Step-by-Step to Chocolate Nirvana
Let’s break it down. Follow these steps and you can’t go wrong.
Step 1: Prep Like a Pro

Preheat your oven to 350°F (175°C). Grease and flour your two 9-inch round cake pans. For extra insurance, trace the bottom of the pan on parchment paper, cut out the circles, and place them in the bottom of the greased pans. Then grease and flour the parchment. Your cakes will slide out like a dream.
Step 2: The Dry Bowl
In a large bowl, whisk together the flour, sugar, cocoa powder, baking soda, baking powder, and salt. Get in there and whisk for a good 30 seconds to make sure everything is evenly distributed and aerated.
Step 3: The Wet Bowl
In a separate medium bowl, whisk together the eggs, buttermilk, oil, and vanilla extract.
Step 4: Bring Them Together
Pour the wet ingredients into the dry ingredients and mix on low speed (or with a whisk) until they are just combined. Don’t go crazy here; a few lumps are fine. Do not overmix!
Step 5: The Magic Potion
Now for the secret. With your mixer on low, slowly and carefully pour the hot coffee into the batter. The batter will be very thin and watery. Do not panic! This is exactly what you want. This thin batter is the key to an unbelievably moist cake.
Step 6: Bake and Cool
Pour the batter evenly between your two prepared pans. Bake for 30-35 minutes, or until a wooden toothpick inserted into the center comes out clean. Let the cakes cool in the pans for about 15 minutes before inverting them onto a wire rack to cool completely. I mean it. Completely.
Step 7: The Frosting Dream

While the cakes cool, make the frosting. In a large bowl, beat the softened butter until it’s creamy. Sift in the powdered sugar and cocoa powder and beat on low speed until combined. Add the heavy cream, vanilla, and salt, and then beat on high speed for 2-3 minutes until the frosting is light, fluffy, and glorious.
Step 8: Assemble Your Masterpiece
Place one cooled cake layer on your serving plate or cake stand. Top it with a generous layer of frosting. Place the second cake layer on top. Now, cover the entire cake—top and sides—with the remaining frosting. Make it smooth and sleek or create pretty swirls. You’re the artist here.
Calories & Nutritional Info (A Celebration in a Slice)
This is a tall, dark, decadent chocolate cake. It is not a health food. Let’s embrace it.
- Serving Size: One very happy slice (1/12th of the cake).
- Calories: Approximately 600-700 kcal. It’s a moment of pure indulgence.
- Key Components: Chocolate, joy, and the feeling of ultimate satisfaction.
- TBH: Every single calorie is worth it.
Common Mistakes to Avoid (Chocolate Cake Catastrophes)
Don’t let these simple slip-ups stand between you and chocolate perfection.
- Overmixing the Batter: This is the #1 killer of soft, tender cakes. Once you add the flour, mix until just combined. Overmixing develops the gluten and makes the cake tough.
- Panicking About the Thin Batter: I’m saying it again because it’s important. The batter for this cake is supposed to be very liquidy. Trust the process. This is what makes it so moist.
- Frosting a Warm Cake: This will result in a soupy, sliding, heartbreaking mess. Your cake layers must be 100% cool to the touch before you even think about frosting them.
- Overbaking the Cake: A dry chocolate cake is a sad, sad thing. Start checking your cake for doneness a few minutes before the recipe says to. The second that toothpick comes out clean, it’s done.
Variations & Customizations (Choose Your Chocolate Adventure)
The best chocolate cake in the world is also a perfect canvas.
- Mocha Madness: Add 2 teaspoons of instant espresso powder to the hot coffee before adding it to the batter. Add another teaspoon of espresso powder to your frosting for an intense mocha flavor.
- Chocolate Raspberry Dream: Place a layer of fresh raspberries on top of the frosting between the cake layers. Garnish the top of the cake with more fresh raspberries. The tartness of the fruit is a beautiful contrast to the rich chocolate.
- “Death by Chocolate” Overload: Add 1 cup of semi-sweet chocolate chips to the cake batter. For the filling, use a rich chocolate ganache instead of the buttercream.
FAQ: Your Chocolate Cake Queries, Quashed
Let’s solve the mysteries of the universe… or at least of this cake.
1. Why is the batter so thin? Is that a mistake?

Nope! It’s the secret to success. The high liquid-to-flour ratio, combined with the oil, creates a cake with an incredibly moist and tender crumb.
2. Do I have to use coffee? Will it taste like coffee?
The cake will not taste like coffee, I promise! The coffee simply enhances and deepens the chocolate flavor. However, if you’re strongly opposed, you can use one cup of hot water instead.
3. How do I get clean slices of cake?
For those perfect, bakery-style slices, use a large, sharp knife. Dip the knife in hot water and wipe it clean between each and every cut.
4. How do I store this cake?
You can store the cake in a covered cake carrier at room temperature for up to 3 days, or in the refrigerator for up to 5 days. It’s actually even more moist and fudgy on day two!
5. My cake layers baked with a dome on top. How do I make them flat for stacking?
This is super common! Once the cakes are completely cool, use a long, serrated knife to carefully slice off the domed top, creating a flat surface. (Bonus: you get to eat the scraps!).
6. Can I make this into cupcakes?
Yes! This recipe will make about 24-30 cupcakes. Fill your cupcake liners about ⅔ full and bake for 18-22 minutes.
7. What’s a “crumb coat” and should I do it?
A crumb coat is a thin layer of frosting you apply all over the cake to trap any loose crumbs. You then chill the cake for about 30 minutes before applying the final, beautiful layer of frosting. It’s the pro secret to a perfectly smooth, crumb-free finish!
Final Thoughts
You have done it. You have stared into the chocolatey abyss of a 3 AM craving and emerged with the most magnificent, moist, and decadent chocolate layer cake known to humankind. You are a hero. A baking champion.
Go on, cut yourself a giant slice. You’ve earned it. This is more than just a cake; it’s proof that you can create something truly spectacular from a few simple ingredients. Just be warned: once you serve this, you will become the designated “cake person” for every birthday and celebration forever. It’s a delicious responsibility.