The Ultimate Guide to Perfectly Baked Chicken (No More Dry Chicken, Ever!)
Let’s be honest, you’ve probably cooked a chicken breast that could be used as a doorstop. We’ve all been there. You had the best of intentions – a healthy, lean protein for dinner. But somewhere between the oven and the plate, a culinary tragedy occurred, and you were left with a dry, stringy, and utterly joyless piece of meat. It’s the kind of meal that makes you question your life choices, especially on a Tuesday night in Khulna.
But what if I told you that learning how to bake chicken in oven perfectly is not only possible but ridiculously easy? I’m not talking about some complicated, multi-day brining process. I’m talking about a simple, foolproof method that will give you juicy, flavorful chicken every single time. Ready to banish bland, dry chicken from your kitchen forever? Of course you are.
Why This Method is a Total Game-Changer
So, why is this super-simple method the only one you’ll ever need? I’m so glad you asked.
First, it’s foolproof. We’re taking the guesswork out of it. This isn’t about hoping for the best; it’s about using a couple of key techniques and one essential tool to guarantee a perfect result. You can do this. I have faith in you.
Second, this chicken is the ultimate blank canvas. It’s deliciously seasoned and perfect on its own, but it’s also the ideal starting point for a week’s worth of meals. Slice it for salads, shred it for tacos, dice it for pasta – you’ve just conquered your meal prep. You’re welcome.
Finally, it’s healthy without being boring. We’re using minimal oil and a powerhouse of spices to create a lean protein that’s packed with flavor, not guilt. It’s proof that “healthy” and “delicious” can, in fact, coexist peacefully.
The A-List (and Very Short) Ingredient List
You don’t need a pantry raid for this one. We’re keeping it simple and letting the technique shine.
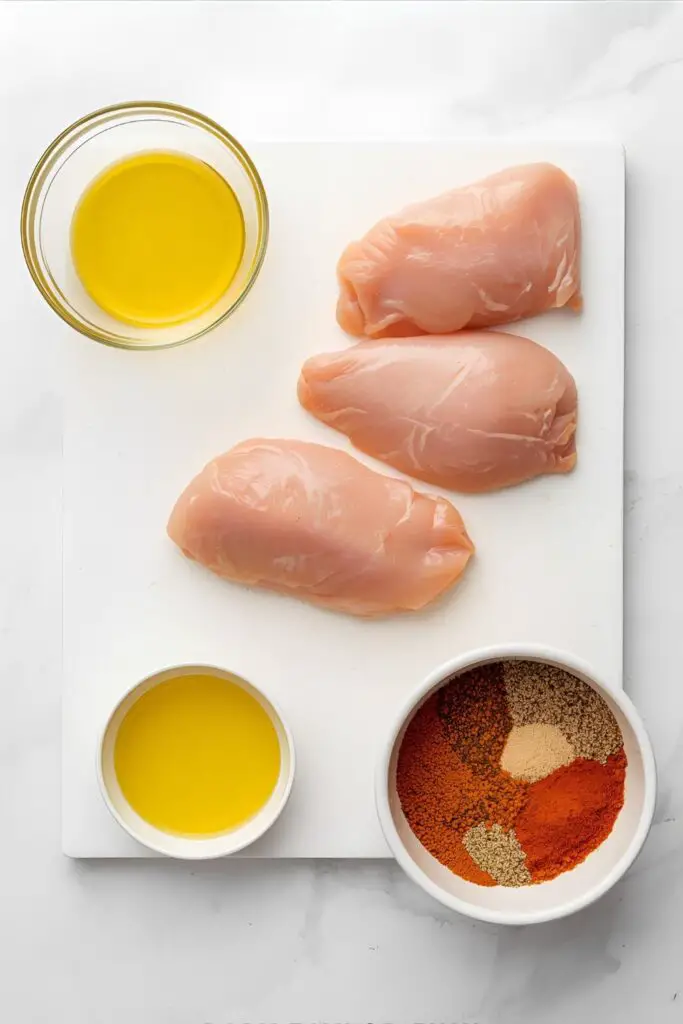
- 4 Boneless, Skinless Chicken Breasts (about 6-8 oz each): Try to get pieces that are similar in size for even cooking.
- 1-2 tablespoons Olive Oil: To help the seasonings stick and to keep the chicken moist.
- 1 teaspoon Smoked Paprika: Adds beautiful color and a subtle smoky flavor.
- 1 teaspoon Garlic Powder:
- 1 teaspoon Onion Powder:
- 1 teaspoon Salt:
- 1/2 teaspoon Black Pepper: Freshly ground is always a plus!
Your Arsenal for Chicken Conquest
You don’t need a professional kitchen, but one of these tools is absolutely non-negotiable.
- A Baking Dish or a Rimmed Baking Sheet: Anything that can safely go in the oven and hold your chicken.
- A Small Bowl: For mixing your epic spice blend.
- Tongs: For handling the chicken without poking holes in it.
- Aluminum Foil: For tenting and resting.
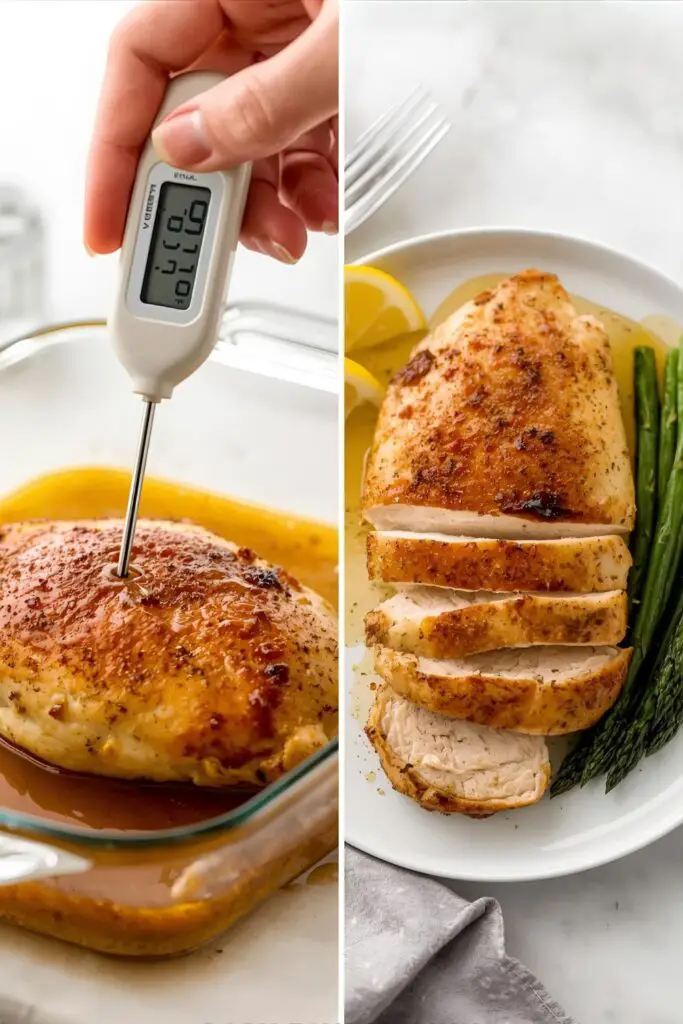
- A Meat Thermometer: This is it. This is the most important tool on this list. An instant-read digital thermometer is your ticket to perfectly cooked, juicy chicken. This is not optional!
The Path to Juicy Perfection: A Step-by-Step Guide
Ready to feel like a kitchen rockstar? Let’s do this.
Step 1: Preheat and Prep
First things first, get your oven preheating to 400°F (200°C). A hotter oven cooks the chicken relatively quickly, searing the outside and locking in the juices before it has time to dry out. Lightly grease your baking dish or line a baking sheet with foil for easy cleanup.
Step 2: Prepare the Chicken (The First Secret Step)
This is a big one. Chicken breasts are naturally thicker on one end than the other. If you cook them as is, the thin end will be dry and sad by the time the thick end is cooked. To fix this, place the chicken breasts between two pieces of plastic wrap and gently pound the thicker end with a meat mallet or a rolling pin until they are an even thickness all over (about 3/4-inch). This is a total game-changer for even cooking.
Once pounded, pat the chicken breasts completely dry with paper towels. A dry surface helps the seasonings stick and allows the chicken to brown nicely.
Step 3: Oil and Season
Place the dry, evened-out chicken breasts in your baking dish. Drizzle them with olive oil and rub it all over to coat each piece.
In your small bowl, mix together the smoked paprika, garlic powder, onion powder, salt, and pepper. Sprinkle this seasoning blend generously over all sides of the chicken. Don’t be shy!
Step 4: Time to Bake!
Arrange the seasoned chicken breasts in a single layer in your baking dish, making sure they have a little breathing room. Pop the dish into your preheated oven.
Bake for 20-25 minutes. The exact time will depend on the thickness of your chicken.
Step 5: The Moment of Truth (THE MOST IMPORTANT STEP)
This is where the magic happens. After about 20 minutes, it’s time to check the temperature. Take your meat thermometer and insert it into the thickest part of the chicken breast. You are looking for an internal temperature of 165°F (74°C). Once it hits 165°F, it is done. Do not cook it a second longer! This is the secret to juicy chicken.
Step 6: Let It Rest (The Second Most Important Step)
I know you’re hungry, but this step is crucial. Carefully remove the baking dish from the oven. Transfer the chicken to a clean cutting board and loosely tent it with aluminum foil. Let it rest for 5-10 minutes. This allows the juices to redistribute throughout the meat. If you slice into it right away, all that delicious moisture will run out onto your cutting board, and we don’t want that.
Step 7: Slice and Be Amazed
After the chicken has rested, slice it against the grain. Look at that! Juicy, tender, perfectly cooked chicken. You did it!
Calories & Nutritional Info
This is a fantastic, healthy option! Here is a rough estimate for one 6-ounce baked chicken breast:
- Calories: Approximately 280-320 kcal
- Protein: A massive 45-50g
- Fat: Around 7-10g
- Carbohydrates: Less than 2g
- Note: This is a lean, mean, protein-packed machine, perfect for a healthy and satisfying meal.
Common Mistakes to Avoid (The Path to Dry Chicken)
- Not Using a Meat Thermometer: Are you sensing a theme here? Guessing when chicken is done is how you end up with dry chicken or, even worse, undercooked chicken. Buy a meat thermometer. Use it. Love it.
- Baking at Too Low a Temperature: A low-and-slow approach can work for other cuts, but for lean chicken breasts, a higher heat (like 400°F) cooks them quickly and keeps them juicy.
- Not Pounding the Chicken to an Even Thickness: An uneven chicken breast is an unevenly cooked chicken breast. The thin part will be overcooked while you wait for the thick part to finish. Pound your chicken.
- Skipping the Rest: This is non-negotiable. Slicing into chicken immediately after it comes out of the oven is a crime against juiciness. Let it rest!
Variations & Customizations
This basic recipe is your playground!
- Lemon Herb Baked Chicken: Add 1 teaspoon of dried oregano and the zest of one lemon to your spice rub. After baking, squeeze the fresh lemon juice over the hot chicken.
- Spicy Cajun-Style Chicken: Ditch the paprika and thyme and use 1-2 tablespoons of your favorite Cajun or Creole seasoning blend instead.
- This seasoning is amazing on veggies too! While you can’t exactly make a vegetarian “baked chicken,” you can use this exact seasoning blend on thick-sliced cauliflower “steaks” or a block of extra-firm tofu. Just adjust the baking time accordingly.
Frequently Asked Questions (Your Burning Chicken Questions)
1. How long does it take to bake chicken breast at 400°F (200°C)? It typically takes 20-25 minutes for average-sized breasts that have been pounded to an even thickness. However, the only way to know for sure is to use a meat thermometer.
2. What is the best temperature to bake chicken breast? 400°F (200°C) is a fantastic temperature. It’s hot enough to cook the chicken quickly and lock in moisture without drying it out.
3. Should I cover the chicken with foil when baking? No, bake it uncovered. Covering it with foil will trap steam and you’ll end up with steamed, pale chicken instead of nicely browned baked chicken. Only use foil to tent the chicken after it comes out of the oven to rest.
4. How do I know if my chicken is done without a thermometer? While a thermometer is strongly recommended, you can check for doneness by piercing the thickest part of the chicken. The juices should run clear, not pink. However, this method is less precise and can let precious juices escape. Just get a thermometer, okay?
5. Is it better to bake chicken at 350°F or 400°F? For boneless, skinless chicken breasts, 400°F is generally better because it cooks them faster, which helps them stay juicy. 350°F can also work, but it will take longer (around 30-35 minutes).
6. Do I need to flip the chicken while it’s baking? For boneless breasts, it’s not strictly necessary, as they will cook through evenly. If you want to ensure both sides are equally browned, you can flip them halfway through.
7. How can I add even more flavor? You can marinate the chicken for a few hours before baking! A simple marinade of olive oil, lemon juice, garlic, and herbs is a great option.
Final Thoughts
Congratulations! You have now officially mastered a fundamental kitchen skill. You are the ruler of your oven, the conqueror of dry chicken, the champion of the weeknight dinner. No longer will you fear the bland and boring chicken breast.
Go forth and bake with confidence. Use this perfectly cooked chicken to build amazing meals all week long. And the next time someone serves you a dry piece of chicken, you can just smile to yourself, because you know the secret. Welcome to the juicy side.