The Ultimate Cookie Monster Cookies: A Seriously Fun & Delicious Recipe
Remember that feeling as a kid, watching Cookie Monster devour a plate of cookies with gleeful abandon? Yeah, me too. And let’s be honest, sometimes adulthood makes you yearn for that kind of unbridled joy, especially when it comes to baked goods. Well, buckle up, buttercup, because we are diving headfirst into a recipe that promises just that: cookie monster cookies. These aren’t just blue-tinted chocolate chip cookies; they’re a party in your mouth, a vibrant, crumbly, chocolatey homage to everyone’s favorite furry, cookie-obsessed monster. Get ready for some serious fun and seriously delicious results.
Why This Recipe Is Awesome (It’s a Mood-Booster, TBH)
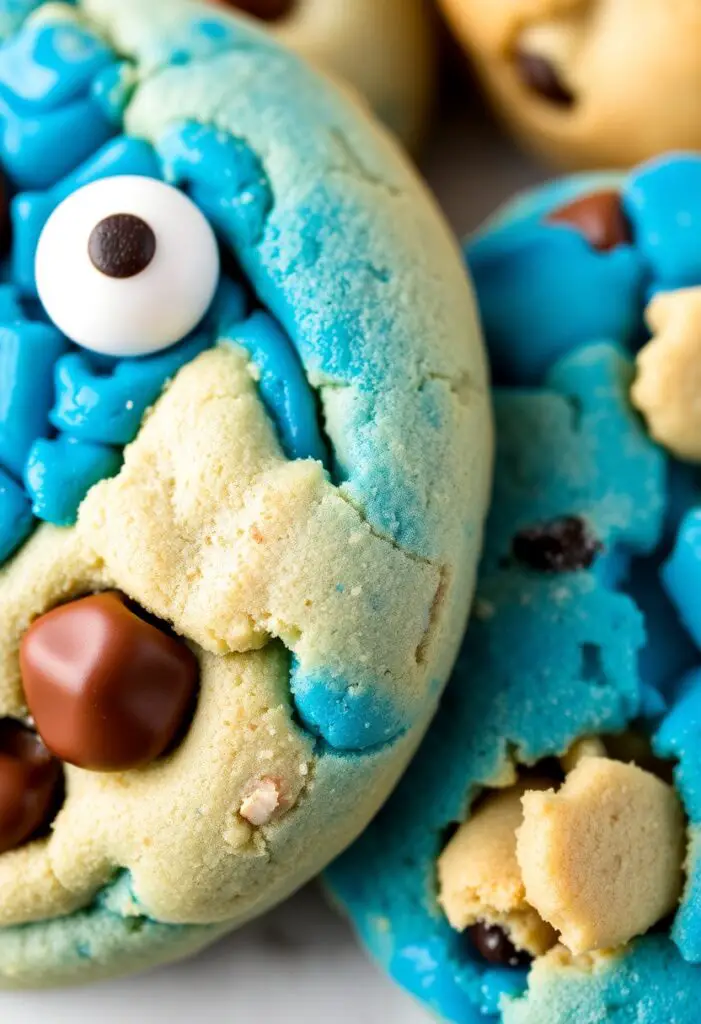
So, why bother with these whimsical creations? Because these cookies are more than just a treat; they’re an experience. They are vibrantly blue, loaded with chocolate chips and crushed sandwich cookies, and boast that perfect balance of chewy edges and a soft, tender center. Seriously, who can be sad looking at a plate of these? They practically demand a smile.
This recipe is incredibly versatile and a total crowd-pleaser. Imagine bringing these to a kid’s birthday party in Barishal, or even a grown-up gathering—they’re guaranteed to be the star of the show. Plus, the process itself is a blast. You get to play with food coloring, crush cookies (therapeutic, much?), and channel your inner monster. It’s baking, but with a sense of humor. FYI, they taste even better than they look!
Ingredients: Your Monster-Approved Stash
Gather your loot, future cookie monster!
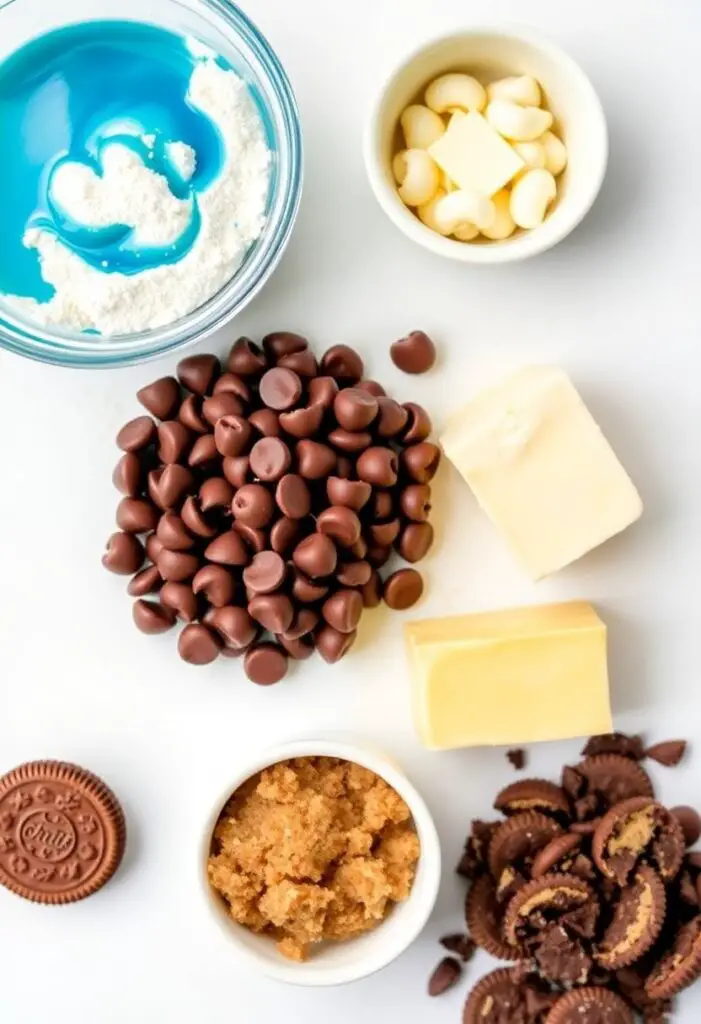
- 1 cup (2 sticks) unsalted butter, softened
- ¾ cup packed light brown sugar
- ½ cup granulated sugar
- 2 large eggs
- 1 teaspoon vanilla extract
- 2 ¼ cups all-purpose flour
- 1 teaspoon baking soda
- ½ teaspoon salt
- 1 cup semi-sweet chocolate chips
- 1 cup white chocolate chips
- 10-12 chocolate sandwich cookies (like Oreos), coarsely crushed
- Royal blue gel food coloring (gel is crucial for vibrant color!)
- Optional for decoration: Candy eyes
Key Substitutions:
- Chocolate Chips: Feel free to mix and match! Milk chocolate, dark chocolate, or even mini M&M’s would be fantastic additions.
- Sandwich Cookies: While Oreos are classic, any chocolate cream-filled sandwich cookie will work. You could even use other flavors for a twist, but it might slightly change the “monster” aesthetic.
- Blue Food Coloring: Do not use liquid food coloring! It will make your dough watery and the color won’t be nearly as vibrant. Gel food coloring is widely available and essential here.
Tools & Kitchen Gadgets Used: Your Cookie Monster’s Arsenal

You’ll need a few trusty sidekicks for this baking adventure.
- Stand Mixer with Paddle Attachment (or a sturdy Hand Mixer)
- Large Mixing Bowls (at least two)
- Baking Sheets
- Parchment Paper or Silicone Baking Mats
- Rubber Spatula
- Measuring Cups and Spoons
- Small bowl or plate (for crushing cookies)
- Rolling Pin or bottom of a glass (for crushing cookies)
- Cookie Scoop (a 2-tablespoon size is ideal for decent-sized cookies)
Step-by-Step Instructions: “Om Nom Nom” Your Way to Deliciousness
Follow these simple steps, and you’ll have monster-worthy cookies in no time.
- Prep Your Station: Preheat your oven to 375°F (190°C). Line two large baking sheets with parchment paper. Take your sandwich cookies and place them in a Ziploc bag. Give them a good whack with a rolling pin or the bottom of a glass until they are coarsely crushed. You want some chunks, not just dust!
- Cream the Butter and Sugars: In your stand mixer, beat the softened butter, brown sugar, and granulated sugar on medium-high speed for 2-3 minutes until light and fluffy. This incorporates air, making your cookies tender.
- Add the Wet Ingredients: Beat in the eggs, one at a time, until just combined. Then, stir in the vanilla extract. Scrape down the sides of the bowl to ensure everything is well mixed.
- Add the Blue Hue: Now for the fun part! Add a few drops (start with 3-4) of royal blue gel food coloring to the wet mixture. Mix until the color is evenly distributed and vibrant. Add more drops as needed until you achieve that iconic Cookie Monster blue.
- Combine the Dry Stuff: In a separate bowl, whisk together the flour, baking soda, and salt.
- Mix the Dough (Gently!): With the mixer on low speed, gradually add the dry ingredients to the blue wet mixture. Mix until the dough is just combined. Stop mixing as soon as you see no more dry streaks of flour. Overmixing is the enemy of tender cookies!
- Fold in the Goodies: Remove the bowl from the mixer. Use your rubber spatula to gently fold in the semi-sweet chocolate chips, white chocolate chips, and crushed sandwich cookies. Distribute them evenly throughout the dough.
- Scoop and Bake: Use your cookie scoop to drop rounded balls of dough (about 2 tablespoons each) onto the prepared baking sheets. Leave about 2 inches between each cookie because they will spread.
- Bake ‘Em Up: Bake for 9-12 minutes. You want the edges to be lightly golden, but the centers should still look soft and slightly underbaked. They will continue to set up as they cool.
- Cool and Decorate: Let the cookies cool on the baking sheets for 5 minutes before transferring them to a wire rack to cool completely. If you’re using candy eyes, you can gently press them onto the cookies while they are still warm so they stick.
Calories & Nutritional Info (Per Cookie, Estimated)
Let’s be real, these are a treat, not a health food. Embrace the deliciousness! (This is an estimate for one medium-sized cookie.)
- Estimated Calories per cookie: ~250-300 calories
- Fat: ~15g
- Carbohydrates: ~35g
- Protein: ~3g
- Pure Joy: Off the charts!
Common Mistakes to Avoid: Don’t Let Your Cookies Crumble!
Even Cookie Monster makes mistakes (mostly involving crumbs). Avoid these pitfalls.
- Using Liquid Food Coloring: Seriously, don’t do it. It dilutes your dough and gives you a sad, muted blue. Gel food coloring is non-negotiable for that vibrant Cookie Monster hue.
- Overmixing the Dough: This is a cardinal sin in cookie baking. Overmixing develops gluten, which leads to tough, chewy (and not in a good way) cookies instead of soft ones. Mix just until combined.
- Overbaking: If you bake these until they’re firm in the oven, they’ll be dry and hard once cool. Pull them out when the edges are set but the centers still look a bit soft and puffy.
- Not Crushing Cookies Enough (or Too Much): You want varying textures! Some bigger chunks for crunch, some smaller crumbs for distribution. Avoid turning them all into fine dust.
Variations & Customizations: Unleash Your Inner Cookie Artist
This recipe is a fantastic starting point. Get creative!
- Double Chocolate Monster: Swap out the semi-sweet and white chocolate chips for all dark chocolate chunks and maybe even a handful of milk chocolate chips.
- Minty Monster: Add ½ teaspoon of peppermint extract to the dough along with the vanilla. Use crushed mint-flavored sandwich cookies instead of plain ones, and maybe some green food coloring for a grumpy green monster!
- Nutty Monster: Fold in ½ cup of chopped walnuts or pecans with the chocolate chips for an extra layer of crunch and flavor. You could even use some to create “fur” on the cookies with icing!
FAQ Section: All Your Monster Cookie Queries, Answered
Got questions? We’ve got answers (without eating them first, mostly).
- Q: Can I use different colors of food coloring? A: Absolutely! Make green monster cookies, purple monster cookies, or even a rainbow monster batch. Just ensure you use gel food coloring for vibrant results.
- Q: My cookies spread too much! What happened? A: Several culprits! Your butter might have been too soft, your oven temperature might be off (a common issue!), or your baking sheets could have been too warm between batches. Try chilling the dough for 30 minutes before baking next time.
- Q: Where can I find candy eyes? A: Most craft stores (like Michaels or Hobby Lobby) in the baking aisle, or larger grocery stores and online retailers like Amazon. They’re usually with the sprinkles and cake decorating supplies.
- Q: Can I make the dough ahead of time? A: Yes! You can prepare the dough, wrap it tightly in plastic wrap, and refrigerate it for up to 3 days. You can also freeze the dough balls for up to 3 months. Thaw slightly before baking, or add a minute or two to the baking time.
- Q: Why do my cookies look crumbly instead of chewy? A: You likely overbaked them. Remember the “soft centers” rule! Also, ensure your butter was softened, not melted, and measure your flour accurately (too much flour makes them dry).
- Q: Can I use regular chocolate chips instead of sandwich cookies? A: Sure, but then they’re just blue chocolate chip cookies! The crushed sandwich cookies add a fantastic texture and flavor that truly makes them “Cookie Monster” worthy. Don’t skip them if you want the full experience!
- Q: How do I store these cookies? A: Store them in an airtight container at room temperature for up to 3-4 days. They tend to stay soft and delicious for quite a while!
Final Thoughts: You’re a Cookie Monster Master!

You’ve done it! You’ve wrestled with the flour, tamed the butter, and emerged victorious with a platter of the most delightful, whimsical, and utterly scrumptious cookie monster cookies. Go ahead, grab a stack, maybe make some monster noises, and relish in the pure, unadulterated joy of a truly fantastic homemade treat. Your inner child (and probably your actual children, if you have any) will thank you.