The Ultimate Black Birthday Cake: A Dramatically Delicious Recipe
Are you tired of the tyranny of pastel? Do you look at a rainbow unicorn cake and think, “That’s… a lot”? If your soul is as dark as your morning coffee and your favorite color is, well, black, then I have the cake for you. Forget sprinkles and saccharine sweetness. Today, we’re diving headfirst into the void to create the most chic, dramatic, and delicious birthday cake black you’ve ever seen.
This isn’t just a chocolate cake with a dye job. This is an experience. It’s a statement. It’s the cake you make for a 40th “Over the Hill” party, for your friend who’s a recovering goth, or for any celebration that calls for a touch of dark, sophisticated glamour. It’s the little black dress of desserts, and it’s about to become your new signature bake.
Why This Recipe Is Wickedly Awesome
First off, this cake looks absolutely stunning. Imagine placing this onyx-colored masterpiece on a table. Jaws will drop. Instagram will be summoned. It’s a showstopper that requires surprisingly little intricate decorating because the color itself does all the heavy lifting.
But is it all style and no substance? Absolutely not. Thanks to a secret weapon ingredient, this cake has the most intense, deep, dark chocolate flavor imaginable. It’s moist, it’s rich without being overly sweet, and the black buttercream is pure, velvety decadence. You’ll look like a baking god, and no one needs to know how easy it was to summon this dark delight.
The Ingredients for Your Delicious Void
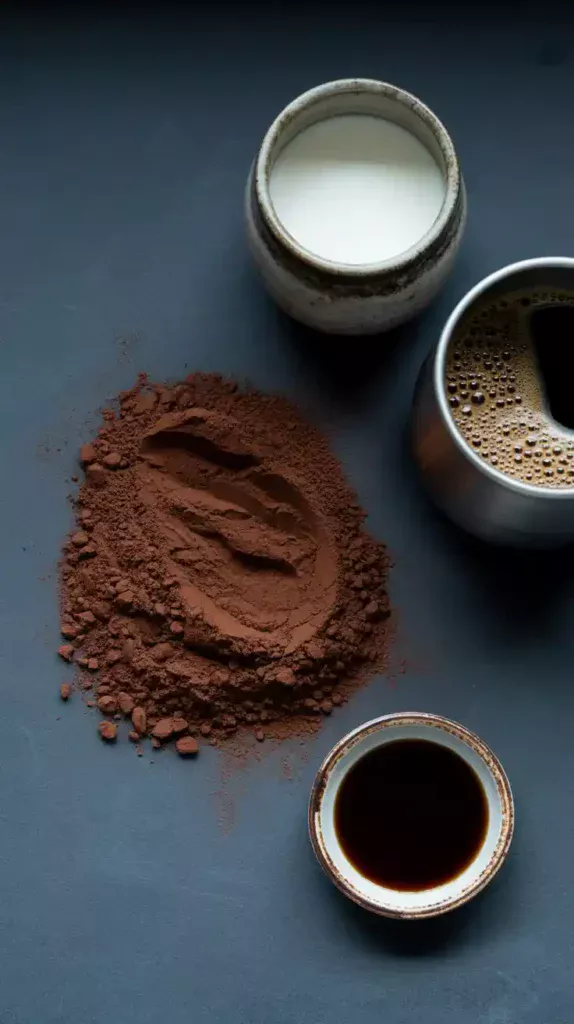
The key to a truly black cake that doesn’t taste like food coloring is using the right ingredients. The magic here is black cocoa powder.

For the Black Chocolate Cake Layers:
- 2 cups all-purpose flour
- 2 cups granulated sugar
- ¾ cup black cocoa powder (This is crucial! See notes.)
- 2 teaspoons baking soda
- 1 teaspoon baking powder
- 1 teaspoon salt
- 1 cup buttermilk, room temperature
- ½ cup vegetable oil
- 2 large eggs, room temperature
- 1 teaspoon pure vanilla extract
- 1 cup freshly brewed hot coffee
For the Black Buttercream Frosting:
- 1 ½ cups unsalted butter, softened
- 1 cup black cocoa powder
- 4-5 cups powdered sugar, sifted
- ½ cup heavy cream or whole milk
- 1 teaspoon pure vanilla extract
- A pinch of salt
- 1-2 teaspoons black gel food coloring
Tools & Gadgets of the Dark Arts
Having the right equipment will make this process smooth as silk. Or, you know, smooth as perfectly whipped black buttercream.
- Stand Mixer (or a reliable Hand Mixer): For whipping the frosting into submission.
- Two 9-inch Round Cake Pans: The standard for a good layer cake.
- Parchment Paper: To prevent your dark creations from sticking to the pan.
- Wire Cooling Racks: Absolutely essential. Do not skip these.
- Offset Spatula: For getting those smooth, swooshy frosting effects.
- Bench Scraper: The secret weapon for achieving razor-sharp, smooth sides.
- Cake Turntable: Makes frosting a cake about a thousand times easier.
- Flour Sifter or Fine-Mesh Sieve: To banish lumpy cocoa and powdered sugar forever.
Step-by-Step: How to Summon Your Cake
Don’t be intimidated. We’ll break this down into easy steps. You’ve got this.
Step 1: Create the Cake Batter
- Prep Your Station: Preheat your oven to 350°F (175°C). Grease and flour your two 9-inch cake pans, and line the bottoms with parchment paper.
- Mix the Dry Stuff: In a large bowl (or the bowl of your stand mixer), sift together the flour, sugar, black cocoa powder, baking soda, baking powder, and salt. Give it a quick whisk to combine. Sifting is not optional unless you enjoy lumpy cake.
- Mix the Wet Stuff: In a separate medium bowl, whisk together the buttermilk, oil, eggs, and vanilla extract.
- Combine and Conquer: Pour the wet ingredients into the dry ingredients. Mix on low speed until just combined. Scrape down the sides of the bowl. Do not overmix!
- Add the Coffee: With the mixer still on low, slowly and carefully pour in the hot coffee. The batter will be very thin. This is normal! Stop mixing as soon as the coffee is incorporated.
- Bake It: Divide the batter evenly between your prepared pans. Bake for 30-35 minutes, or until a wooden skewer inserted into the center comes out clean.
Step 2: Cool It Down

Let the cakes cool in their pans on a wire rack for about 15 minutes. Then, carefully invert them onto the wire racks, peel off the parchment paper, and let them cool completely. I mean it. If you try to frost a warm cake, you’ll have a black, soupy mess. Go watch an episode of your favorite show. The cake will wait.
Step 3: Whip Up the Black Buttercream
- Beat the Butter: In your stand mixer fitted with the paddle attachment, beat the softened butter on medium-high speed for about 3-4 minutes until it’s light and fluffy.
- Sift and Add: Sift the black cocoa powder and 4 cups of powdered sugar. With the mixer on low, gradually add the dry mixture to the butter. It will get thick and crumbly.
- Smooth It Out: Still on low speed, slowly pour in the heavy cream and vanilla extract. Once it’s incorporated, turn the mixer up to medium-high and beat for another 3-4 minutes until it’s silky smooth.
- Go to the Dark Side: Add 1 teaspoon of black gel food coloring. Mix it in. The frosting will likely be a dark gray. Don’t panic. The color deepens over time. Let it sit for 20-30 minutes and you’ll see it darken significantly. Add more gel coloring only if necessary. If the frosting is too thick, add more cream one tablespoon at a time. If it’s too thin, add more powdered sugar.
Step 4: Assemble Your Masterpiece
- Level Up: If your cake layers have a dome, use a long serrated knife to carefully level the tops. (The scraps are the baker’s reward. Enjoy.)
- The First Layer: Place one cake layer on your cake stand or turntable. Add a generous scoop of frosting (about 1 cup) and spread it evenly.
- The Crumb Coat: Place the second layer on top. Apply a thin layer of frosting all over the top and sides of the cake. This is the “crumb coat,” and it traps any loose crumbs.
- Chill Out: Place the whole cake in the refrigerator for at least 20-30 minutes to firm up the crumb coat.
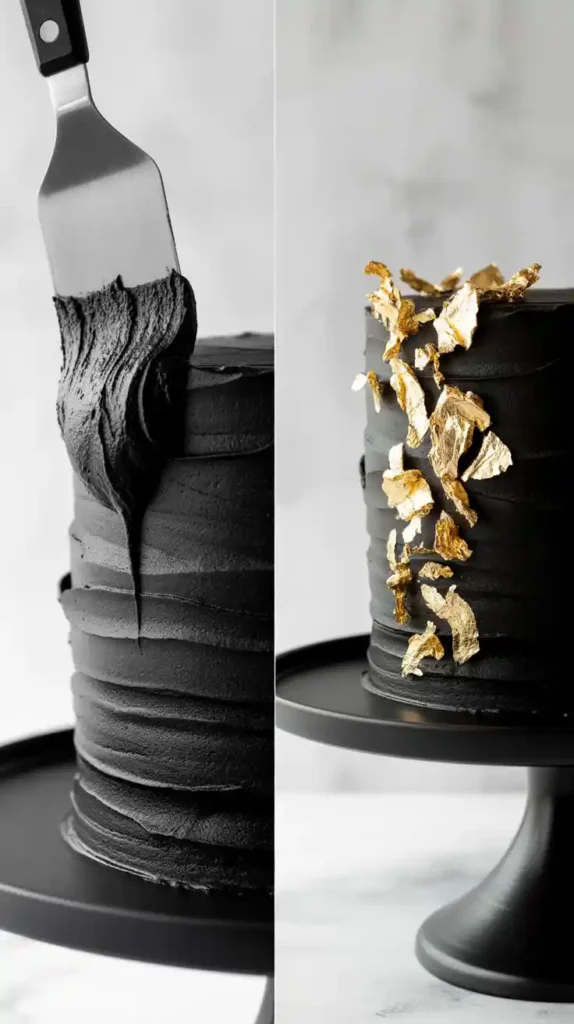
- Final Frosting: Once chilled, cover the cake with the remaining glorious black frosting. Use your offset spatula and bench scraper to get it as smooth or as textured as you like.
Calories & Nutritional Info (A Guesstimate)
Let’s be real, this is a celebration cake. But if you must know…
- Estimated Calories per Slice (1/12th): Approximately 550-650 calories.
- Flavor Profile: 100% decadent, deep, dark chocolate.
- Key Nutrient: Joy. Pure, unadulterated joy.
- FYI: This cake is rich. A small slice goes a long way.
Common Mistakes to Avoid (Listen Up!)
- Using Regular Cocoa: If you use regular Dutch-process cocoa, you’ll get a dark brown cake. For that true black color and Oreo-like flavor, you must use black cocoa powder.
- Turning White Frosting Black: Starting with a white vanilla buttercream and trying to turn it black requires a horrifying amount of food coloring. It will taste bitter and dye everyone’s mouth for days. Always start with a dark chocolate/black cocoa base.
- Over-mixing the Batter: I’ve said it before, and I’ll say it again. Over-mixing develops the gluten in the flour and leads to a tough, rubbery cake. Mix until just combined and then stop.
- Ignoring Room Temperature Ingredients: Using cold eggs and buttermilk will cause the batter to curdle and not bake evenly. Set them out on the counter an hour before you start.
Variations & Customizations
Feel like adding your own twist? Go for it.
- Black Forest Vibe: Add a layer of cherry pie filling or a tart cherry compote between the cake layers. The combination of dark chocolate and cherry is a classic for a reason.
- Mocha Madness: Add 2 teaspoons of instant espresso powder to the hot coffee before adding it to the batter. You can also add a teaspoon to the frosting to really amplify that rich mocha flavor.
- Gilded & Glamorous: Make your black cake extra fancy by decorating it with edible gold leaf, gold sprinkles, or a metallic gold drip. The contrast is absolutely breathtaking.
Frequently Asked Questions
H3: How do you make a cake pitch black? The secret is a two-pronged attack: black cocoa powder in the cake and frosting for a deep, natural base color, and a small amount of black gel food coloring in the frosting to push it to true black.

H3: Will this black frosting stain my guests’ teeth? Yes, temporarily. It’s part of the fun! Give everyone a heads-up. It’s a small price to pay for such a dramatic dessert. The stain fades quickly, but the memory of the cake will last forever. 😉
H3: What does black cocoa powder taste like? It has a very smooth, non-bitter, deep chocolate flavor, very similar to an Oreo cookie. It has less fat than regular cocoa, which is why this recipe includes oil to keep the cake moist.
H3: Can I make this cake with regular Dutch-process cocoa? You can, but the final product will be a dark brown, not black. You’ll miss out on that signature color and flavor. If you do, you’ll need to add much more black food coloring to the frosting.
H3: How do you prevent black frosting from tasting bitter or chemical-like? By starting with a dark base! The black cocoa powder does 90% of the work, so you only need a tiny bit of gel coloring to finish the job, which avoids that nasty food dye taste.
H3: Can I prepare this cake in advance? Absolutely. You can bake the cake layers, let them cool, wrap them tightly in plastic wrap, and freeze them for up to a month. The frosting can be made up to a week ahead and stored in an airtight container in the fridge (just bring to room temp and re-whip before using).
H3: What’s the best way to decorate a black cake? Simplicity is key. Let the color be the star. A sprinkle of coarse sea salt, some edible glitter, fresh dark berries (like blackberries or black raspberries), or a few artfully placed gold leaf flakes look incredible against the black canvas.
Final Thoughts
So there you have it. A cake that’s as sophisticated, mysterious, and awesome as you are. It’s more than just a dessert; it’s a statement piece. It’s proof that birthday cakes don’t have to be childish to be fun.
Go on, embrace your dark side. It’s shockingly easy and unbelievably delicious. Your friends will be talking about this one for years to come.