The Ultimate Banana Pudding Cake Recipe (A Southern Dream!)
Have you ever found yourself at a potluck, staring down the dessert table, facing an impossible choice? On one side, a majestic, fluffy layer cake stands tall. On the other, a comforting, creamy bowl of classic banana pudding, studded with Nilla wafers, calls to you. It’s a cruel culinary dilemma, a true Sophie’s choice of the dessert world. Do you go for the cakey satisfaction or the creamy nostalgia?
What if I told you that you never have to choose again? What if I told you that you could have both, in one single, glorious, magnificent creation? Friends, today we are making the ultimate dessert hybrid, the love child of two Southern legends, the one and only banana pudding cake. Get ready to enter a new dimension of comfort food.
Why This Recipe Is a Certified Crowd-Pleaser
So, why is this mashup masterpiece destined to become your new signature dessert? I’m so glad you asked.
First, it’s literally the best of both worlds. You get the satisfying structure and visual appeal of a beautiful layer cake, but each bite delivers the unmistakable, nostalgic flavor of classic banana pudding. It’s a dessert that satisfies two cravings at once, which is the kind of efficiency I can really get behind.
Second, it’s a paradise of textures. You have layers of incredibly moist and tender banana cake, a silky-smooth and rich pudding filling, soft slices of fresh banana, and the signature, slightly softened crunch of Nilla wafers. It’s a complex, delightful party in your mouth, and everyone is invited.

Finally, this is a guaranteed showstopper. It looks so impressive with its distinct, beautiful layers. You can bring this to any family gathering, potluck, or birthday party and it will be the first dessert to disappear. People will be begging you for the recipe, and you can just smile mysteriously like the dessert wizard you are.
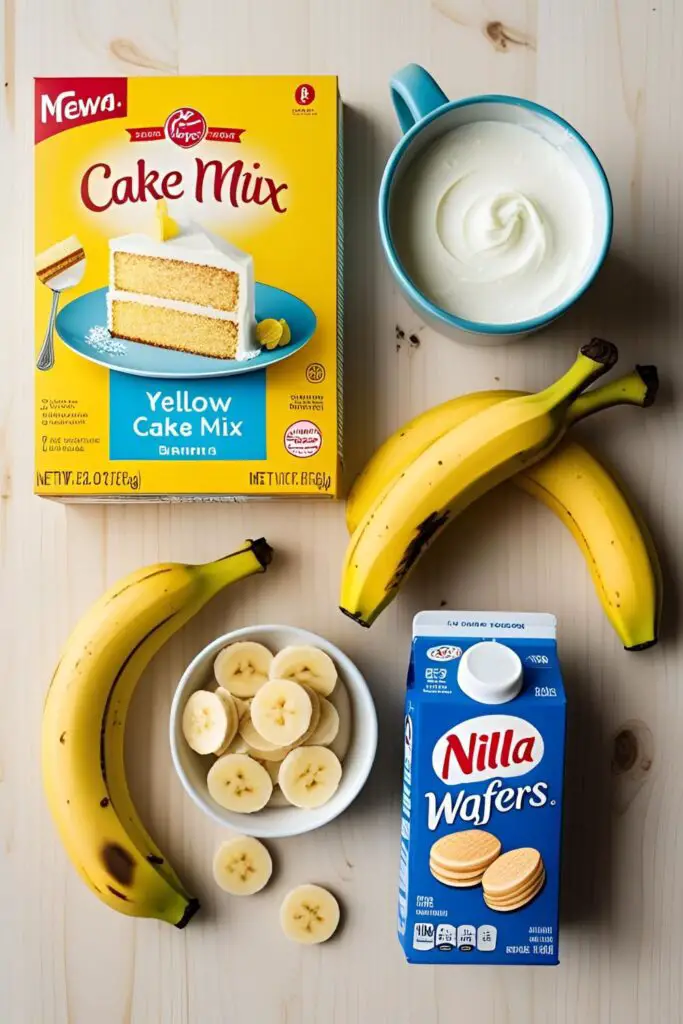
The A-List Ingredients
This cake has a few key components, but don’t be intimidated! We’re going to use a few smart shortcuts to make this a totally achievable project.
For the Moist Banana Cake Layers:
- Yellow Cake Mix: 1 standard box (about 15.25 ounces). We’re going to doctor it up!
- Ripe Bananas: 3 large ones, mashed up well. The browner the spots, the better the flavor.
- Milk: 1 cup.
- Vegetable Oil: ½ cup.
- Large Eggs: 3 of them.
For the Creamy Banana Pudding Filling:
- Instant Vanilla Pudding Mix: 1 small box (3.4 ounces). Make sure it’s instant, not the cook-and-serve kind.
- Cold Milk: 1 ½ cups.
- Sweetened Condensed Milk: ½ cup. This is a secret weapon for an ultra-rich and creamy pudding.
For Assembly & the Whipped Cream Frosting:
- Fresh Bananas: 2-3 ripe but still firm bananas, for slicing between the layers.
- Nilla Wafers: About one box. You’ll need some for the layers and some for decorating.
- Heavy Whipping Cream: 2 cups, very cold.
- Cream Cheese: 4 ounces, softened to room temperature. This is the key to a stable whipped cream frosting that won’t weep or melt.
- Powdered Sugar: 1 cup, sifted.
- Vanilla Extract: 1 teaspoon.
The Baker’s Toolkit
Let’s gather the gear you’ll need to construct this masterpiece.
- Round Cake Pans: Two or three 8-inch or 9-inch round cake pans.
- An Electric Mixer: A stand mixer or a reliable hand mixer is essential for the cake batter and the whipped cream frosting.
- Mixing Bowls: You’ll need a couple for the various components.
- An Offset Spatula and a Bench Scraper: These are your best friends for getting that smooth, professional frosting finish on the outside of the cake.
- A Serrated Knife: For leveling your cooled cake layers.
- A Food Processor (Optional): The fastest way to crush Nilla wafers for decoration. A Ziploc bag and a rolling pin also work for some therapeutic smashing.
- A Piping Bag and Tip (Optional): If you want to get fancy with the decoration on top.
Step-by-Step: Assembling Your Dream Cake
We’ll tackle this in phases. The key is to make sure your components are properly cooled and set before you start building.
Phase 1: Bake the Banana Cake Layers
- Prep: Preheat your oven to 350°F (175°C). Grease and flour your cake pans and line the bottoms with parchment paper.
- Mix the Batter: In a large bowl, combine the dry cake mix, mashed bananas, milk, oil, and eggs. Using your electric mixer, beat on low speed until just combined, then increase the speed to medium and beat for 2 minutes. The batter will be thick and smell amazing.
- Bake: Divide the batter evenly between your prepared pans. Bake for 28-32 minutes, or until a toothpick inserted into the center comes out clean.
- Cool Completely: Let the cakes cool in the pans for 15 minutes before inverting them onto a wire rack to cool completely. This is non-negotiable.
Phase 2: Whip Up the Fillings and Frosting
- Make the Pudding: In a medium bowl, whisk together the instant pudding mix and the 1 ½ cups of cold milk for about 2 minutes, until it starts to thicken. Whisk in the sweetened condensed milk until smooth. Cover and place in the fridge to set up for at least 15-20 minutes.
- Make the Stable Whipped Cream Frosting: In the bowl of your electric mixer, beat the softened cream cheese on medium speed until it’s completely smooth and has no lumps. On low speed, gradually stream in the very cold heavy cream. Once it’s all added, add the vanilla and gradually add the sifted powdered sugar. Turn the mixer up to medium-high and whip until stiff, billowy peaks form. Don’t over-whip!

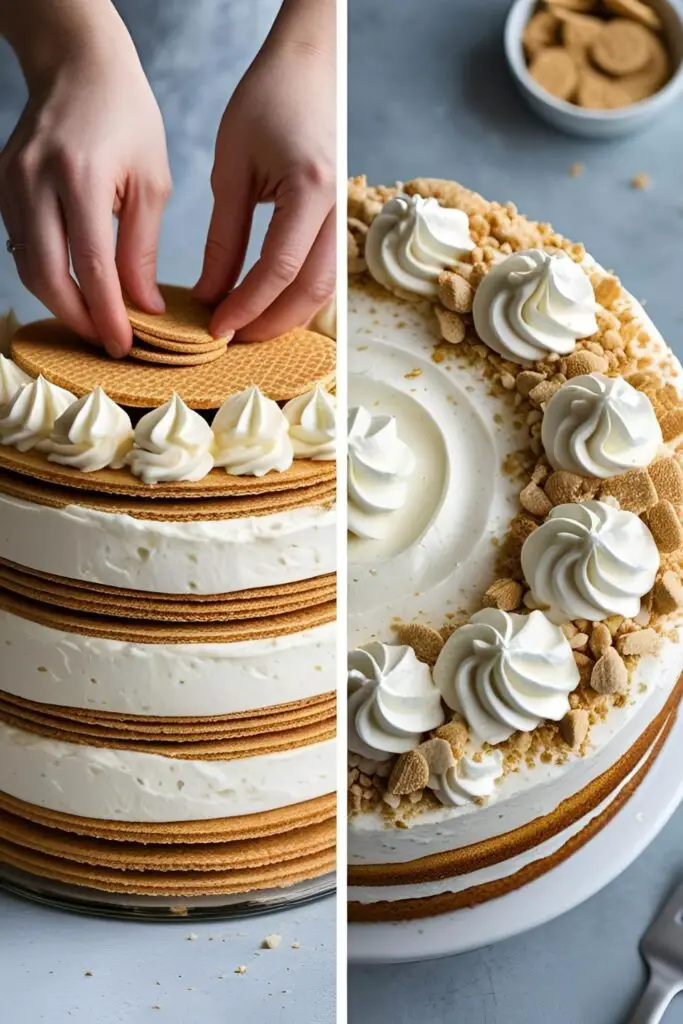
Phase 3: The Grand Assembly
- Level Up: Once your cakes are completely cool, use a long serrated knife to carefully level the tops, slicing off any domes so you have flat, stable surfaces to work with. (The scraps are the baker’s reward. Enjoy.)
- Layer One: Place your first cake layer on your serving plate or cake stand. Spread about half of the prepared pudding filling evenly over the top. Arrange a single layer of sliced bananas over the pudding, followed by a single layer of Nilla wafers.
- Layer Two: Gently place your second cake layer on top. Spread the remaining pudding over it. Arrange another layer of sliced bananas and Nilla wafers. (If using a third cake layer, divide your filling accordingly and add the final layer now).
- Frost Your Masterpiece: Cover the entire cake—top and sides—with your beautiful, stable whipped cream frosting. Use your offset spatula and bench scraper to get it as smooth or as rustic as you like.
- Decorate and Chill: Decorate the top with whole or crushed Nilla wafers. For the best result, chill the assembled cake in the refrigerator for at least 2-4 hours. This allows the flavors to meld and the cake to set up, making it much easier to slice.
Calories & Nutritional Info (A Comforting Reality)
This is a rich, comforting, celebratory cake. It is not diet food, and that is a beautiful thing.
- Estimated Calories: Around 550-650 kcal per generous slice (assuming 12 slices).
- A Dessert Extravaganza: It’s a glorious combination of cake, pudding, and cream. It’s meant to be an indulgent treat.
- Potassium Power!: Hey, it’s loaded with bananas, which are a great source of potassium! Let’s focus on that positive, shall we? 🙂
Common Cake-tastrophes to Avoid
Don’t let these simple mistakes turn your dream cake into a nightmare.
- The Brown Banana Blunder. Bananas start to oxidize and turn a sad, unappetizing shade of brown the moment you slice them. The trick is to slice your bananas and immediately place them on the cake during assembly. The pudding and frosting layers will help seal them from the air and keep them looking fresh.
- The Soggy Wafer Catastrophe. The Nilla wafers inside the cake are meant to soften into a tender, cake-like texture, not disintegrate into complete mush. Use a single, distinct layer of wafers. Don’t crush them for the inside layers, and don’t let them sit in the pudding for ages before you add the next cake layer.
- The Weeping Frosting Disaster. Trying to frost a even slightly warm cake with whipped cream is a recipe for a soupy, sliding, weeping disaster. Your cake layers must be 100% cooled to room temperature before you begin assembly. No exceptions.
- Using Unripe, Green-Tinged Bananas. The flavor of this cake depends on the sweet, fragrant taste of ripe bananas. Look for bananas that are bright yellow with plenty of brown sugar spots. Greenish bananas will be starchy, firm, and lack that essential banana flavor.
Variations & Customizations
This cake is a fantastic template for all kinds of creamy, dreamy desserts.
- The “Poke Cake” Shortcut: For a faster, easier version, bake the banana cake in a single 9×13 inch pan. Once it’s cool, use the handle of a wooden spoon to poke holes all over the top. Pour the prepared pudding over the cake, letting it sink into the holes. Top with the whipped cream, sliced bananas, and crushed wafers.
- Salted Caramel Banana Pudding Cake: A truly decadent upgrade. Drizzle a generous layer of your favorite salted caramel sauce over the sliced bananas in each layer before adding the next cake layer.
- Chocolate Banana Pudding Cake: For the chocolate lovers. Use a chocolate cake mix instead of yellow, and use chocolate instant pudding instead of vanilla. It creates a rich, “black bottom” style dessert that is absolutely incredible.
Your Burning Pudding Cake Questions, Answered
Let’s clear up some of the most common queries.
Can I make the cake layers from scratch instead of using a box mix?
Absolutely! If you have a favorite homemade banana cake or yellow cake recipe, feel free to use it. Just make sure it’s sturdy enough to hold up to the layers.
How do I keep the bananas from turning brown inside the cake?

The key is to limit their exposure to air. Assembling the cake quickly and sealing the banana slices between the layers of pudding and cake helps significantly. A little lemon juice tossed with the bananas can help, but it can also alter the flavor slightly.
Can I make this cake a day ahead of time?
You can, but with a caveat. The cake will taste amazing as the flavors meld, but the bananas inside may start to brown slightly and the wafers will become very soft. For the best texture and appearance, it’s ideal to assemble it the morning of the day you plan to serve it.
How do I store this cake?
It must be stored in the refrigerator because of the pudding and whipped cream frosting. Keep it covered to prevent it from drying out. It will last for about 2-3 days.
My whipped cream frosting is always too soft and runny. What’s the secret?
The secret weapon is the softened cream cheese! Beating a little bit of cream cheese before adding the cream acts as a stabilizer, making the whipped cream much sturdier, less likely to weep, and easier to frost with.
Can I use cook-and-serve pudding instead of instant?
You can, but it’s more work. You’ll need to prepare the cook-and-serve pudding according to its package directions and then let it cool completely, with plastic wrap pressed against the surface to prevent a skin from forming, before you can use it as a filling.
Why did my cake seem watery after a day?
This can sometimes happen as the fresh bananas release their moisture over time. It’s a natural process. This is why the cake is at its textural peak on the day it’s made.
Final Thoughts
You have done it. You have created the ultimate comfort food mashup, a dessert that is a hug in cake form. It’s a testament to the idea that sometimes, two great things can come together to create something even more spectacularly delicious.
So go on, grab a fork, find your favorite chair, and treat yourself to a slice of pure, unadulterated nostalgia. You’ve earned it.