The Unbeatable Easy Jello Poke Cake Recipe
So, why should you, a modern and discerning foodie, welcome this retro wonder into your kitchen? Let’s get one thing straight: this cake is awesome. First, it is ridiculously easy. If you can follow the instructions on a box of cake mix and boil water without setting off the smoke alarm, you are wildly overqualified to make this.
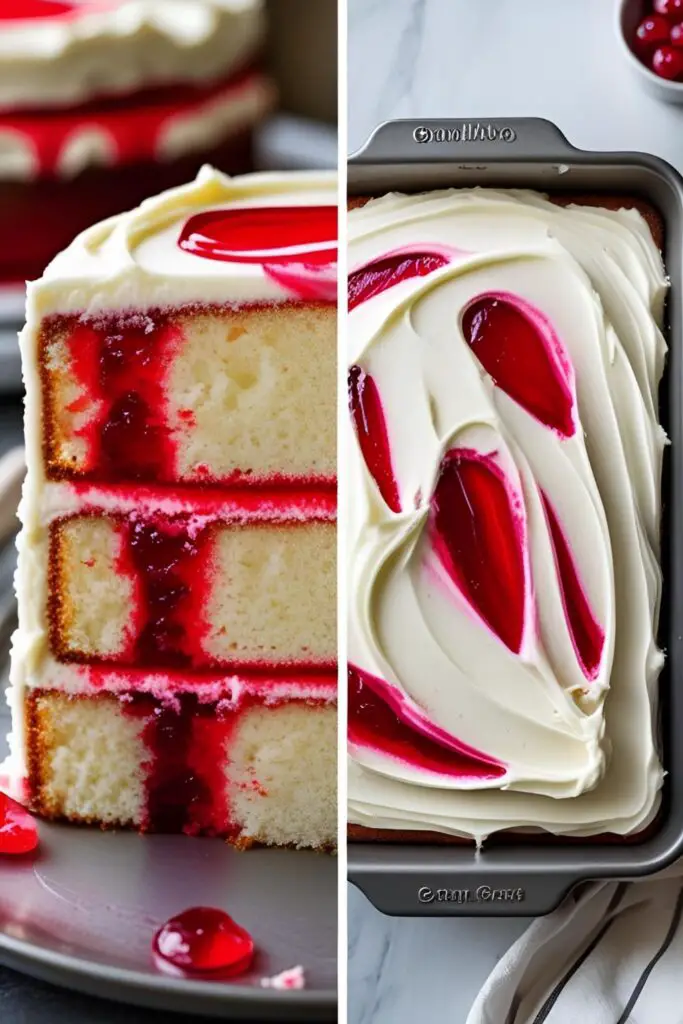
Second, it’s a visual showstopper. A plain white cake is transformed into a tie-dyed masterpiece that elicits oohs and aahs every single time you slice into it. And finally, the flavor and texture are unbeatable, especially on a hot day. The cake becomes impossibly moist, infused with a cool, fruity flavor, and topped with a creamy, light-as-a-cloud frosting. It’s refreshing, it’s fun, and it feeds a crowd. What more could you possibly want?
Ingredients
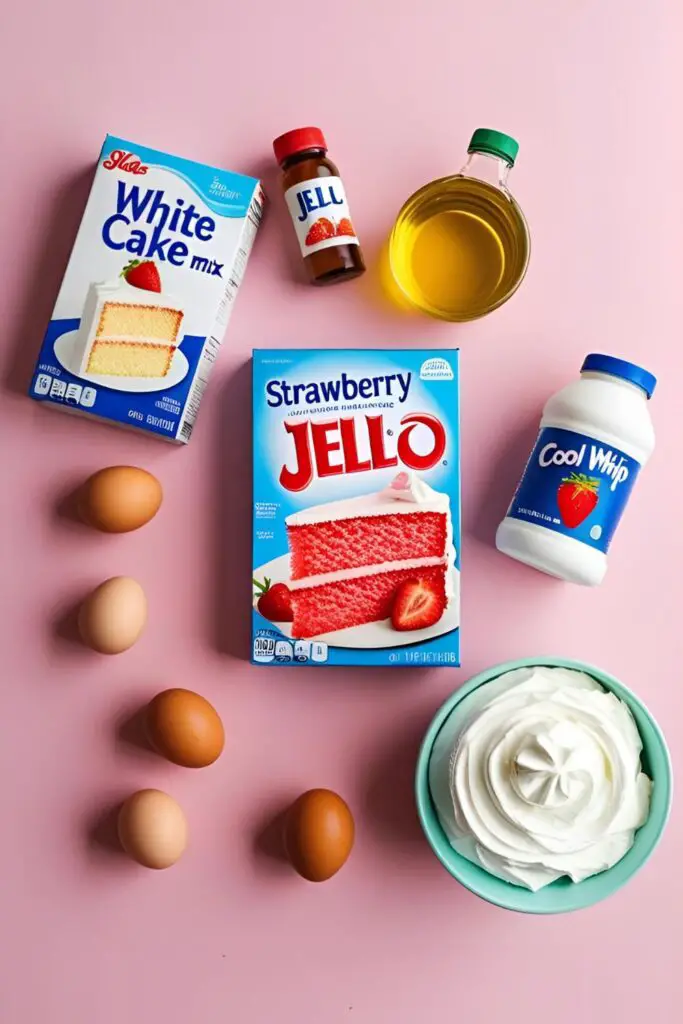
Prepare yourself for the most refreshingly simple ingredient list you’ve ever seen.
- 1 box (about 15.25 oz) white cake mix, plus the ingredients listed on the box (usually eggs, oil, and water)
- 1 package (3 oz) Jello gelatin, any flavor your heart desires (Strawberry or Raspberry are classic choices)
- 1 cup boiling water
- 1/2 cup cold water
- 1 container (8 oz) Cool Whip, thawed (or other whipped topping)
- Optional for fun: Sprinkles, fresh berries for garnish
Flavor Notes: While white cake mix provides the best blank canvas for the Jello colors to pop, you can totally experiment! A yellow cake mix with lemon Jello? A strawberry cake mix with strawberry Jello for double the flavor? Go wild!
Tools & Kitchen Gadgets Used:
You don’t need a fancy, decked-out kitchen for this one.
- 9×13 inch baking pan (glass or metal works fine)
- Large Mixing Bowl
- Hand Mixer or a trusty Whisk
- Rubber Spatula
- Something to poke with: The round handle of a wooden spoon is the traditional (and perfect) tool. A large fork or a chopstick also works.
- Liquid Measuring Cup
Step-by-Step Instructions

Alright, let’s make this psychedelic masterpiece. Try to contain your excitement.
- Bake the Cake (The “Hard” Part): First, preheat your oven and prepare your 9×13 inch pan according to the cake mix box directions. Prepare the cake mix batter exactly as the box tells you to. Pour the batter into the prepared pan and bake as directed. You’ve got this. It’s literally on the box.
- Cool It (Slightly): Once the cake is baked, let it cool on a wire rack for about 15-20 minutes. You want it to be still warm, but not piping hot.
- Time for Aggressive Poking: Now for the best part. Take the handle of a wooden spoon (or your poking tool of choice) and poke holes all over the top of the warm cake. Go down about halfway to three-quarters of the way into the cake. Space the holes about an inch apart. Don’t be shy; this is how the magic gets in.
- Prepare the Jello: In a small bowl or liquid measuring cup, add the Jello powder. Carefully pour in 1 cup of boiling water and stir for about two minutes until the gelatin is completely dissolved. Then, stir in 1/2 cup of cold water.
- The Magic Pour: Slowly and evenly, pour the prepared Jello mixture all over the top of the poked cake. Try to get the liquid into all the holes you so lovingly created. It might look like a sugary swamp, but trust the process.
- The Big Chill: Now, the most crucial step. Cover the cake and refrigerate it for at least 3-4 hours, or until the Jello is completely set. Don’t rush this! The cake needs this time to absorb the Jello and become a thing of wonder.
- Frost and Admire: Once the cake is thoroughly chilled and the Jello is firm, spread the thawed Cool Whip evenly over the top. Add some sprinkles or fresh berries if you’re feeling fancy. Keep it refrigerated until you’re ready to serve your masterpiece.
Calories & Nutritional Info (Estimated)
Let’s not ruin a good time with too many facts, but for those who need to know (per serving, if cut into 12 pieces):
- Calories: Roughly 300-380 kcal
- Fun Factor: 1,000%
- Nostalgia: Immeasurable
- Note: We are combining cake mix, gelatin, and whipped topping. This is a treat, not a health food. Enjoy it as such. 🙂
Common Mistakes to Avoid
This recipe is nearly foolproof, but you can still trip at the finish line. Don’t be that person.
- Pouring Jello on a Hot Cake: If the cake is fresh from the oven, the hot Jello will just melt it into a soggy, tragic mess. Let it cool for at least 15 minutes.
- Letting the Jello Set in the Bowl: You need to pour the Jello over the cake while it’s still liquid. If you get distracted and it starts to set in the bowl, you’re out of luck.
- Not Poking Enough (Or Deep Enough): The holes are the highway for the Jello. If you don’t poke enough holes, or if they’re too shallow, you won’t get those beautiful, colorful stripes inside the cake.
- Frosting a Warm Cake: Even if the Jello is set, if the cake itself isn’t fully chilled, your Cool Whip will weep and melt into a sad, milky puddle. Cold cake is key.
Variations & Customizations
The classic is great, but why not get a little creative?
- Rainbow Poke Cake: The ultimate party trick! Prepare the cake as directed. Divide the cake into sections and pour different flavors/colors of Jello over each section (e.g., red, orange, yellow, green, blue). You’ll need multiple small boxes of Jello, but the final rainbow effect is totally worth it.
- Pina Colada Poke Cake: Use a yellow cake mix. Poke it and fill with pineapple-flavored Jello. Top with Cool Whip, and then sprinkle generously with toasted shredded coconut. It’s a tropical vacation in a pan.
- Red, White, and Blue Patriotic Poke Cake: Perfect for the 4th of July or any patriotic event! Use a white cake mix, poke it, then alternate pouring Strawberry (or Raspberry) Jello and Berry Blue Jello over the holes. Top with Cool Whip and decorate with fresh strawberries and blueberries.
FAQ Section
You’ve got questions about this wobbly wonder? I’ve got answers.
Q1: Can I use a homemade cake recipe instead of a box mix? You can, but you’ll want a sturdy white or yellow cake that can stand up to being poked and having liquid poured over it. A lighter, more delicate cake might fall apart.

Q2: Do I have to use Cool Whip? Can I use real whipped cream? You can use real homemade whipped cream, but you’ll need to stabilize it so it doesn’t weep in the fridge. To do this, beat 1.5 cups of heavy cream with 1/2 cup of powdered sugar and a teaspoon of vanilla until soft peaks form. In a separate small bowl, sprinkle 1 teaspoon of unflavored gelatin over 1 tablespoon of cold water, then microwave for 5-10 seconds until just melted. Whisk the melted gelatin into the whipped cream and beat until stiff peaks form.
Q3: How do I store jello poke cake? It must be stored, covered, in the refrigerator. It will stay fresh and delicious for up to 3-4 days.
Q4: Can I use sugar-free Jello and cake mix? Absolutely! This is a great way to reduce the sugar content. Just swap in your favorite sugar-free versions and prepare as directed.
Q5: My cake turned out soggy. What happened? This usually happens for one of two reasons: the cake was too hot when you poured the Jello over it, or you poked way too many holes too close together, compromising the cake’s structure.
Q6: Can I freeze a jello poke cake? I wouldn’t recommend it. Jello doesn’t freeze well; its texture can become watery and weird upon thawing. This cake is best made and enjoyed fresh.
Q7: Can I make this in round cake pans? You could, but it’s much trickier to manage. The 9×13 inch pan is ideal because it contains the liquid Jello perfectly and makes for easy chilling and serving.
Final Thoughts

And there you have it. You are now a master of the jello poke cake, a keeper of the retro flame. Go forth and create this wibbly, wobbly, wonderful work of art. It’s proof that the best desserts don’t have to be complicated—they just have to be fun. Now, if you’ll excuse me, I see a slice of strawberry poke cake calling my name.