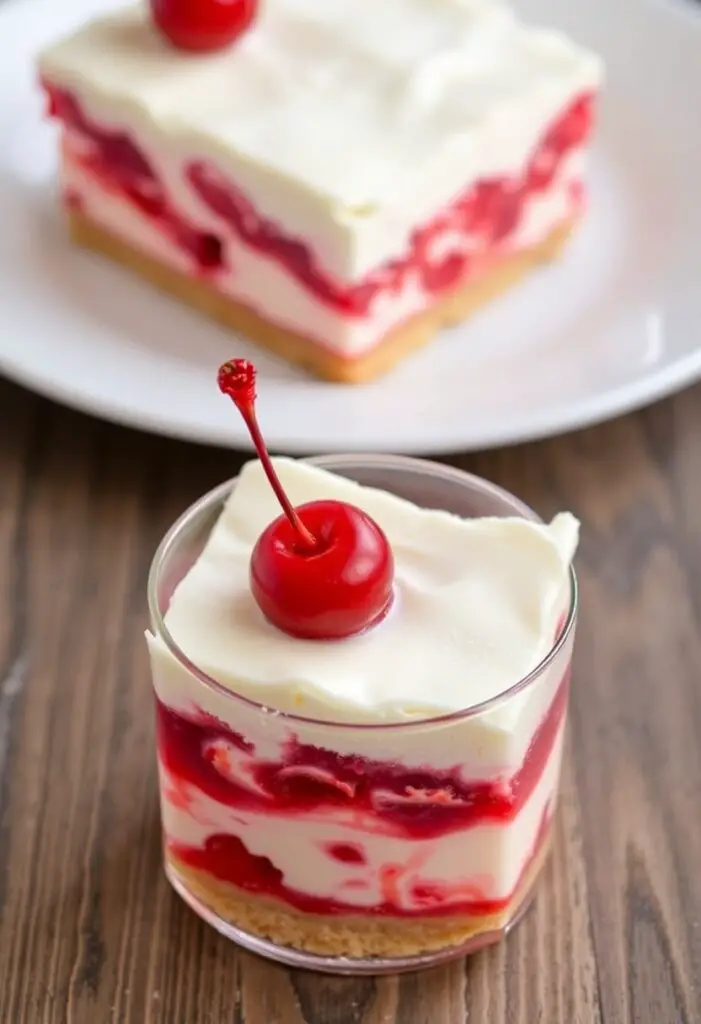
The Easiest Cherry Delight Dessert (Your New No-Bake Obsession!)
Let’s get real. Sometimes, you just need a dessert that delivers maximum impact with minimal effort. You want something that looks like you slaved away in the kitchen for hours, but in reality, you just… layered a few things. If you’re nodding along, then you’ve officially found your new best friend: the cherry delight dessert. This isn’t just a dessert; it’s a testament to the power of no-bake genius. It’s creamy, it’s fruity, it’s got that perfect crunchy crust, and it’s so easy you’ll wonder why you ever bothered with an oven again. Prepare to become a legend at your next potluck!
Why This Recipe Is Awesome (It’s a “Set It and Forget It” Masterpiece)
Why should this gloriously simple, ridiculously delicious dessert be in your regular rotation? Because it’s the ultimate combination of convenience and pure, unadulterated pleasure. This recipe is awesome because:
- It’s 100% NO-BAKE: Seriously. Your oven can stay off. This means less heat in your kitchen (especially helpful in a warmer climate like Khulna!), less energy used, and zero oven-related stress.
- Layers of Pure Bliss: You get that satisfying, buttery graham cracker crust, a rich and tangy cream cheese layer, a light and fluffy whipped topping, and that vibrant, sweet cherry pie filling. Every spoonful is a symphony.
- A Crowd-Pleaser Extraordinaire: This dessert scales beautifully and is perfect for feeding a family or a small army. Everyone loves cherries, everyone loves creamy things, and everyone loves ease.
- Make-Ahead Magic: This dessert actually needs to chill for several hours, making it the perfect make-ahead option. Prepare it the day before your event, and then just pull it out of the fridge when it’s time to impress.
This is the dessert you make when you want to look like a culinary wizard, but you secretly just pressed a few buttons and walked away. No judgment here, BTW. 😉
Ingredients: Your Layers of Deliciousness
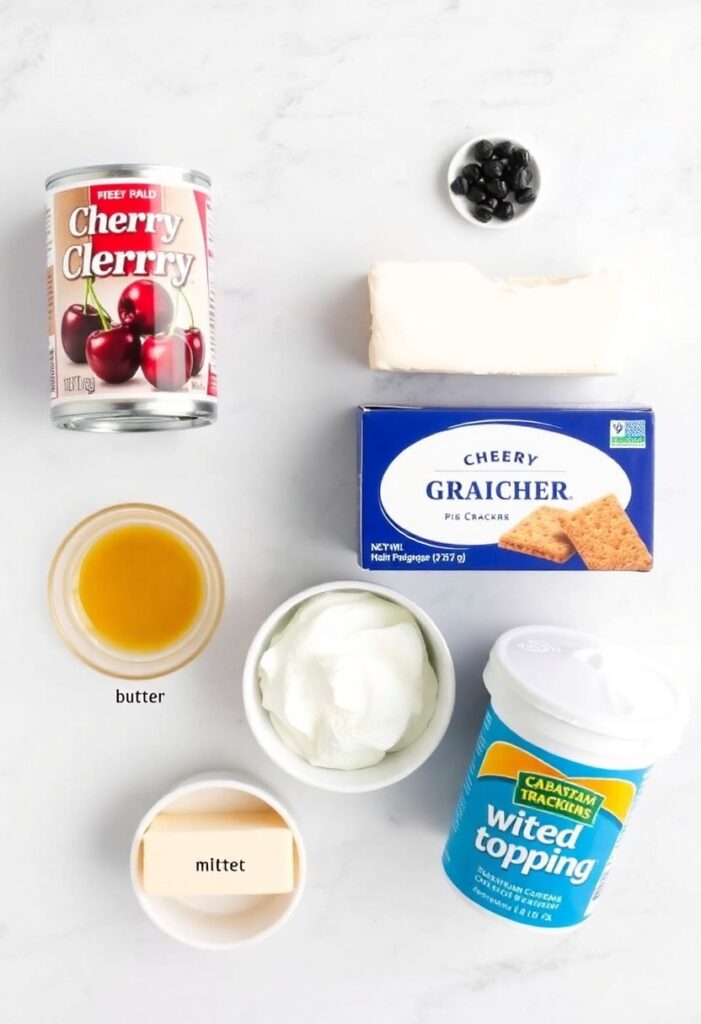
This beauty is all about simple, impactful layers.
For the Buttery Graham Cracker Crust:
- 2 cups graham cracker crumbs (about 18-20 full sheets)
- ½ cup (1 stick) unsalted butter, melted
- ¼ cup granulated sugar
For the Creamy Cheesecake Layer:
- 1 (8-ounce) block full-fat cream cheese, softened to room temperature
- 1 cup powdered sugar, sifted
- 1 teaspoon vanilla extract
- 1 (8-ounce) container whipped topping (like Cool Whip), thawed
For the Fluffy Topping & Cherry Glory:
- 1 (21-ounce) can cherry pie filling
- Another (8-ounce) container whipped topping, thawed
- Optional Garnish: A few fresh cherries, chocolate shavings, or a sprinkle of chopped nuts.
Substitution Alert!
- No graham crackers? You can use crushed vanilla wafers, shortbread cookies, or even digestive biscuits for the crust.
Tools & Kitchen Gadgets Used: Your No-Bake Toolkit

You won’t break a sweat, or any fancy equipment, for this one.
- 9×13 inch Baking Dish
- Mixing Bowls (You’ll need a couple of medium ones and one large.)
- An Electric Hand Mixer or a Stand Mixer (Makes the cream cheese layer dreamy smooth.)
- Food Processor (for crumbs) or a Ziploc bag and a rolling pin
- Rubber Spatula
- Offset Spatula (for those perfectly smooth layers, darling.)
- Measuring Cups and Spoons
Step-by-Step Instructions: Building Your Cherry Dream
Ready to layer your way to dessert domination? Let’s go!
Act 1: The Golden Foundation (The Crust)
- Prep Your Pan: Grab your 9×13 inch baking dish. No need to grease it; the butter in the crust prevents sticking.
- Make the Crumbs: If you’re not using pre-made crumbs, pulse your graham crackers in a food processor until fine. Or, put them in a Ziploc bag, seal it, and go to town with a rolling pin. (Great for stress relief, TBH.)
- Mix the Crust: In a medium bowl, combine the graham cracker crumbs, melted butter, and granulated sugar. Stir until everything is uniformly moist and sandy.
- Press It Down: Pour the crumb mixture into the bottom of your baking dish. Use the back of a spoon or the bottom of a flat-bottomed measuring cup to press it firmly and evenly into a compact layer. Get it nice and tight.
- Chill Out: Pop the dish into the refrigerator to chill for at least 15 minutes while you prepare the next layer. This helps it firm up.
Act 2: The Creamy Cloud (The Cheesecake Layer)
- Whip It Good: In a large bowl, use your electric mixer to beat the softened cream cheese and sifted powdered sugar together on medium-high speed until the mixture is completely smooth and fluffy. There should be absolutely no lumps.
- Fold in the Fluff: Gently fold in one 8-ounce container of thawed whipped topping using your rubber spatula. Fold just until it’s combined and the mixture is light and airy. Don’t overmix, or you’ll deflate it.
- Spread It Out: Carefully spread the cream cheese mixture evenly over your chilled graham cracker crust. An offset spatula works wonders here for a super smooth, professional-looking layer.
Act 3: The Grand Cherry Finale
- Cherry on Top (Almost): Carefully spoon the cherry pie filling over the cream cheese layer, spreading it gently to create an even, vibrant red layer. Try not to mix it with the white layer below.
- The Final Fluff: Top the cherry layer with your second 8-ounce container of whipped topping. Spread it gently to cover the entire dessert.
- Garnish Time (Optional, but Fun): If you’re feeling fancy, sprinkle with some chopped nuts, chocolate shavings, or arrange a few fresh cherries on top.
- The All-Important Chill: Cover the dish with plastic wrap and chill in the refrigerator for at least 4-6 hours, but ideally overnight. This step is crucial! It allows the layers to set beautifully, so you get nice, clean slices. Don’t skip it!
Calories & Nutritional Info (Per Serving, Estimated)
Let’s be real, this is a “delight,” not a diet. 😉 (This is for a basic version, assuming 12 servings.)
- Estimated Calories per serving: ~350-450 calories
- Happiness Factor: Immeasurable.
- Vitamin C: Probably some from the cherries.
Common Mistakes to Avoid: Your Path to Perfection
Even the easiest recipes have potential pitfalls. Avoid these common slip-ups!
- Lumpy Cream Cheese Layer: This is the arch-nemesis of smooth, creamy desserts. Your cream cheese must be fully softened to room temperature before you beat it. If it’s cold, it will stay lumpy.
- A Soupy, Runny Mess: This happens if you don’t chill the dessert long enough. Seriously, give it the full 4-6 hours (or overnight) for everything to firm up and meld. Impatience leads to disappointment.
- Mashing Layers Together: When spreading the cherry filling, be gentle! Don’t drag your spoon through the cream cheese layer. Just dollop and gently spread.
- Using Too-Thin Whipped Topping: Make sure your whipped topping is fully thawed but still cold. If it gets warm and runny, it won’t hold its shape.
Variations & Customizations: Your Delight, Your Rules
The classic is perfect, but a little customization never hurt anyone.
- Peach Perfection: Swap the cherry pie filling for a can of peach pie filling. Garnish with a sprinkle of cinnamon or a few fresh peach slices.
- Chocolate Cherry Dream: Add ½ cup mini chocolate chips to the cream cheese layer for a chocolatey kick. Or, drizzle chocolate syrup over the top before serving.
- Pineapple Coconut Bliss: Use a crushed vanilla wafer crust. Replace the cherry pie filling with a can of well-drained crushed pineapple. Top with toasted shredded coconut. FYI, drain that pineapple very well!
FAQ Section: Your Cherry Delight Troubleshooting Guide
Got questions? I’ve got answers.
- Q: Can I use fresh cherries instead of canned pie filling? A: You can, but it will be a different dessert. You’ll need to pit and sweeten fresh cherries, then cook them down into a thick sauce (or combine them with cornstarch to thicken) to prevent the dessert from becoming watery. Canned pie filling offers that thick, glossy texture.
- Q: How long does cherry delight last in the refrigerator? A: It’s best eaten within 3-4 days. After that, the crust might start to get a bit soft.
- Q: Can I freeze this dessert? A: Yes, it freezes quite well! Cover it tightly with plastic wrap and then foil, and freeze for up to a month. Thaw it in the refrigerator for several hours or overnight before serving. The texture will be slightly different, more like an ice cream cake.
- Q: My cream cheese layer is too sweet. What did I do wrong? A: Sweetness is subjective! Next time, try reducing the powdered sugar in the cream cheese layer by a quarter cup or so.
- Q: Do I really need to use full-fat cream cheese? A: For the best, creamiest, and most stable results, yes. Low-fat cream cheese can sometimes make the layer a bit too soft or watery.
- Q: What’s the best way to cut clean slices? A: Make sure the dessert is completely chilled. Use a sharp knife and wipe it clean with a hot, damp cloth between each slice for the cleanest cuts.
- Q: Can I make individual portions? A: Absolutely! Layer it in small glass jars, ramekins, or even clear plastic cups. Just adjust the chilling time if they’re much smaller.
Final Thoughts: Go Forth and Delight!
You’ve got this. You’ve mastered the art of the effortlessly elegant, unbelievably delicious cherry delight dessert. So go on, whip up this no-bake wonder, claim your crown as the dessert champion, and enjoy every single creamy, fruity, crunchy bite. Your taste buds (and your guests) will thank you.