The Best Sugar Cookie Bars (For People Who Hate Rolling Dough)
Let’s be honest. We all love the idea of sugar cookies. Those buttery, sweet, perfectly decorated little works of art are the stuff of holiday dreams. But then reality hits. The chilling, the rolling, the sticky dough, the flour-dusted disaster zone that was once your kitchen… suddenly, that box of store-bought cookies doesn’t look so bad. But what if you could have all the soft, chewy, frosted glory with none of the hassle? My friend, allow me to introduce you to your new best friend: sugar cookie bars.
Why This Recipe Is Awesome (It’s a Delicious Life Hack)
So, why are these bars about to change your life? Because they are the ultimate “lazy genius” dessert. You get all the classic, nostalgic flavor of a perfect sugar cookie, but with zero chilling, zero rolling, and zero cookie cutters required. You literally make the dough, press it into a pan, and bake. That’s it. It’s a miracle of modern baking, I tell you.
The texture is pure bliss: unbelievably soft, thick, and chewy, topped with a generous layer of creamy buttercream frosting. They are a blank canvas for any color of frosting or sprinkle combination you can imagine, making them perfect for birthdays, holidays, or a random Friday night in Barishal when you just need a treat. You get to serve up a stunning, crowd-pleasing dessert and look like a baking hero, all while having barely broken a sweat.
Ingredients: Your Arsenal for Easy Deliciousness
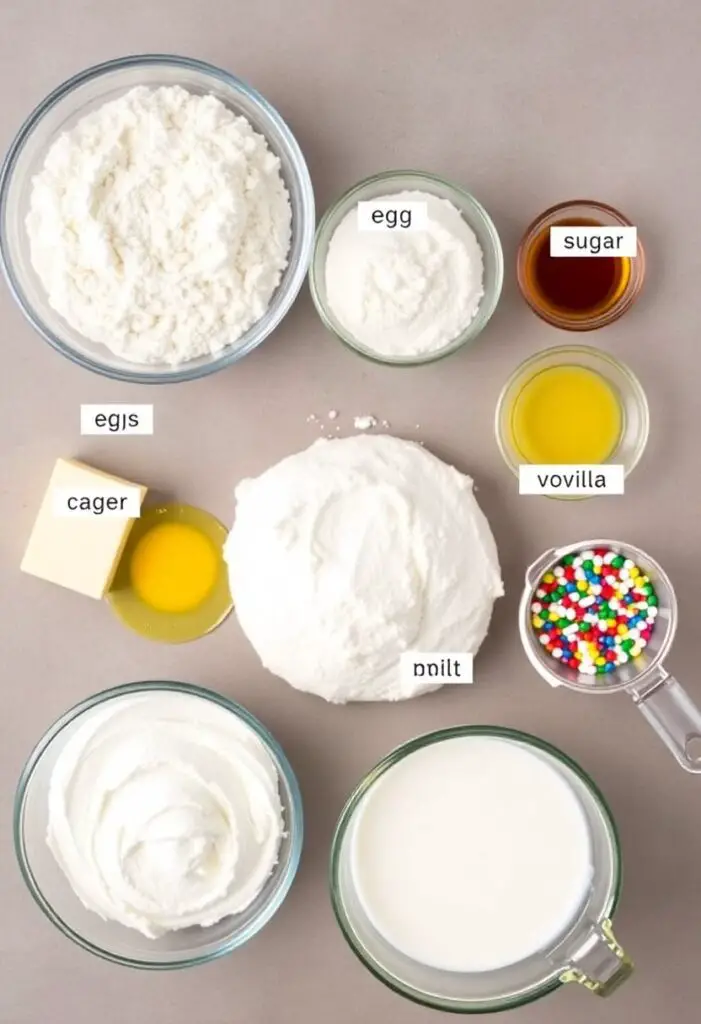
This recipe is a two-part symphony of simplicity: the bars and the frosting.
For the Soft & Chewy Sugar Cookie Bars:
- ½ cup (1 stick) unsalted butter, melted
- 1 cup granulated sugar
- 1 large egg
- 1 teaspoon vanilla extract
- ¼ teaspoon almond extract (Optional, but it gives that classic “bakery” flavor!)
- 1 ½ cups all-purpose flour
- ½ teaspoon baking powder
- ¼ teaspoon salt
For the Creamy Buttercream Frosting:
- ½ cup (1 stick) unsalted butter, softened to room temperature
- 2 cups powdered sugar, sifted
- 2-3 tablespoons milk or heavy cream
- ½ teaspoon vanilla extract
- A pinch of salt
- Sprinkles! (These are not optional for your soul.)
Key Substitutions:
- Almond Extract: If you’re not a fan, just leave it out and use a full 1 ½ teaspoons of vanilla.
- Frosting: Not a buttercream fan? A simple cream cheese frosting (using 4 oz cream cheese instead of some of the butter) is also divine on these.
Tools & Kitchen Gadgets Used: Your Path to Bar Perfection
You don’t need much for this easy-peasy recipe.
- 9×13 inch baking pan (A 9×9 pan will also work, see FAQ)
- Parchment Paper (The secret to easy removal!)
- Large Mixing Bowl
- Medium Mixing Bowl
- Whisk
- Rubber Spatula
- Electric Hand Mixer or Stand Mixer (Highly recommended for the frosting.)
- Offset Spatula (For getting that perfect swoopy frosting finish.)
- Measuring Cups and Spoons
Step-by-Step Instructions: The Easiest Sugar Cookies You’ll Ever Make
This is so simple, you’ll be wondering why you ever bothered with rolling pins.
Act 1: The Cookie Bars
- Prep Your Pan and Oven: Preheat your oven to 350°F (175°C). Line a 9×13 inch baking pan with parchment paper, leaving an overhang on the two long sides to act as “handles.” Lightly grease the parchment and any exposed parts of the pan.
- Mix the Wet Stuff: In a large bowl, whisk together the melted butter and granulated sugar until well combined. Add the egg, vanilla extract, and almond extract (if using) and whisk until smooth.
- Mix the Dry Stuff: In a separate medium bowl, whisk together the flour, baking powder, and salt.
- Combine and Press: Add the dry ingredients to the wet ingredients and stir with a rubber spatula until a soft dough forms. Do not overmix! The dough will be thick. Plop the dough into your prepared pan and use your spatula (or lightly greased hands) to press it into an even layer.
- Bake It Up: Bake for 17-22 minutes. This is important: the edges should be lightly golden, but the center should look pale and just barely set. Do not overbake them, or they will lose their chewiness. A toothpick inserted should come out with moist crumbs, not clean.
- Cool Completely: Let the bars cool completely in the pan on a wire rack. I know it’s hard, but frosting warm bars leads to a soupy, melted mess. Patience, grasshopper.
Act 2: The Frosting and Final Flourish
- Whip the Butter: In a large bowl using your electric mixer, beat the softened butter on medium-high speed for 2-3 minutes until it’s light and creamy.
- Add the Sugar: Gradually add the sifted powdered sugar and beat on low speed until combined, then increase the speed to medium-high and beat for another 2 minutes until smooth.
- Finish the Frosting: Add 2 tablespoons of milk/cream, the vanilla extract, and a pinch of salt. Beat until light and fluffy. If the frosting is too thick, add the remaining tablespoon of milk until you reach your desired consistency.
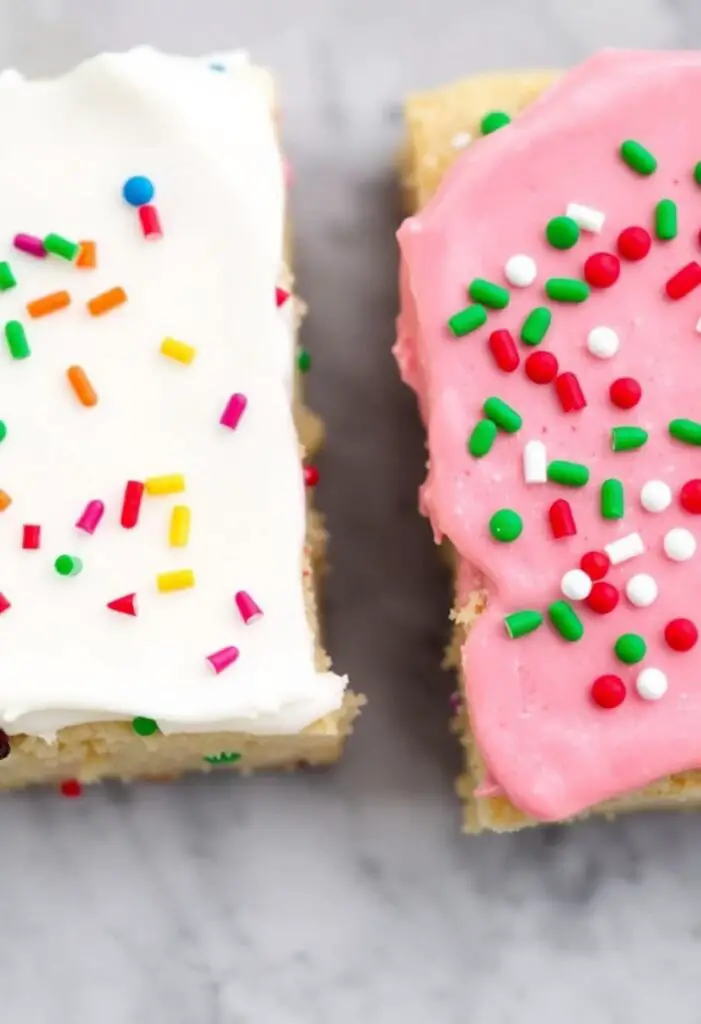
- Frost and Decorate: Once the bars are completely cool, spread the frosting evenly over the top with an offset spatula. Go wild with the sprinkles!
- Slice and Serve: Use the parchment paper handles to lift the entire slab out of the pan. Place on a cutting board and slice into bars. Now go, be a hero.
Calories & Nutritional Info (Per Bar, Estimated)
Let’s just call these “happiness squares” and not worry too much about the numbers. (This is for one bar, assuming you cut them into 24 pieces.)
- Estimated Calories per bar: ~200-240 calories
- Fat: ~11g
- Carbohydrates: ~25g
- Protein: ~2g
- Sprinkles: 100% of your daily recommended fun.
Common Mistakes to Avoid: Don’t Let Your Bars Be Basic!
Avoid these simple slip-ups for perfect results every time.
- Overbaking: This is the #1 enemy of soft, chewy cookie bars. The center should look underdone when you pull it from the oven. It will finish cooking as it cools in the hot pan.
- Overmixing the Dough: Just like with regular cookies, overmixing develops gluten and makes your bars tough instead of tender. Mix just until the flour disappears.
- Frosting While Warm: I know it’s tempting, but you will end up with a greasy, melted, heartbreaking mess. The bars must be completely cool.
- Not Using Parchment Paper: You can just grease the pan, but the parchment paper “handles” make it a million times easier to lift the bars out for clean, perfect slicing.
Variations & Customizations: The Bar is Your Canvas
This recipe is a perfect base for all kinds of creativity.
- Funfetti Sugar Cookie Bars: Add ½ cup of rainbow sprinkles into the cookie dough itself. Use a drop of pink or blue food coloring in the frosting for a festive birthday cake vibe. The almond extract is a must here!
- Lemon Lover’s Bars: Add the zest of one lemon to the cookie dough. For the frosting, replace 1 tablespoon of the milk with fresh lemon juice and add the zest of another lemon. Bright, tangy, and delicious.
- Chocolate Chip Sugar Cookie Bars: It’s a hybrid! Fold 1 cup of mini semi-sweet chocolate chips into the cookie dough before pressing it into the pan.
FAQ Section: All Your Bar-Related Questions
You’ve got questions about this brilliant baking shortcut. I’ve got answers.
- Q: Do I really not have to chill the dough? A: Nope! That’s the magic of making them in a pan. Because the dough is contained by the sides of the pan, spreading isn’t an issue, so you can skip the chilling step entirely.
- Q: Can I use a 9×9 inch pan instead? A: Yes, you can. The bars will be much thicker, so you’ll need to increase the baking time to 25-30 minutes. Keep an eye on the center to make sure it’s not raw.
- Q: How do you get such clean, neat slices? A: First, make sure the bars are completely cool (you can even chill them for 30 minutes after frosting). Use a large, sharp chef’s knife. Press straight down to cut; don’t drag the knife. Wiping the knife clean between cuts also helps.
- Q: Can I make these ahead of time? A: Absolutely! They are a fantastic make-ahead dessert. You can store the frosted bars in an airtight container at room temperature for up to 3 days.
- Q: How should I store them? A: In an airtight container at room temperature is best. If you have a cream cheese-based frosting, you should store them in the refrigerator.
- Q: My bars seem raw in the middle. What happened? A: You likely pulled them from the oven a little too early. There’s a fine line between “perfectly underdone” and “raw.” The center should look pale and just set, not wet and jiggly. A toothpick should have moist crumbs, not wet batter.
- Q: Can I make these gluten-free? A: Yes! A good 1:1 gluten-free all-purpose baking flour blend should work very well in this recipe.
Final Thoughts: You’ve Hacked the System

Congratulations, you brilliant, efficient baker! You’ve successfully made the most delicious sugar cookies of your life with about half the effort. You’ve discovered the glorious shortcut that is the cookie bar. So go forth, cover them in an unapologetic amount of sprinkles, and enjoy the sweet taste of victory. You’ll never look at a rolling pin the same way again.