The Ultimate Pure Vanilla Cookie (Because “Plain” Is a Dirty Word)
Let’s get one thing straight: vanilla is not boring. It’s the victim of a massive PR crisis, relegated to the role of “plain” or “default” while chocolate gets all the glory. But I’m here to tell you that’s a lie we’ve been fed by imitation extracts and bland, soulless baked goods. When you use the good stuff, a pure vanilla cookie is one of the most sophisticated, aromatic, and downright delicious things you can bake. This recipe is my love letter to the humble vanilla bean, a cookie so profoundly flavorful it will make you rethink everything you thought you knew about “plain.”
Why This Recipe Is Awesome (And Will Make You a Vanilla Convert)
What makes this cookie the undisputed champion of the non-chocolate world? It’s all about celebrating one perfect flavor. These cookies are intensely aromatic, with a warm, floral, and complex vanilla profile that perfumes your entire kitchen. Forget those one-note sugar cookies; this is a whole symphony in a single bite.
The texture is pure bliss: a buttery, melt-in-your-mouth tenderness with a soft, satisfying chew. They are ridiculously easy to whip up, using simple ingredients to create something truly special. And because of their elegant simplicity, they are the perfect canvas for decorating, sandwiching with frosting, or just enjoying with a cup of tea when you want to feel a little bit fancy. TBH, they’re perfect for any occasion.
Ingredients: The Secret to Vanilla Victory
The beauty of this cookie is its simplicity, which means the quality of your ingredients truly shines. Don’t skimp here!
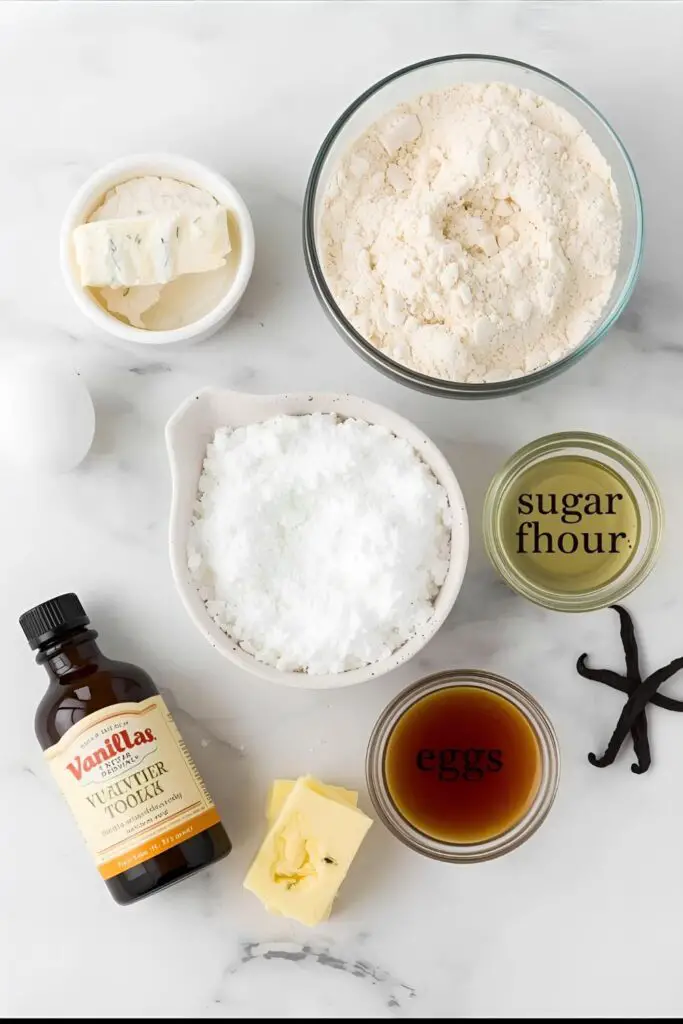
- 1 ½ cups (3 sticks) unsalted butter, softened to room temperature (High-fat, European-style butter is amazing here if you can find it)
- 1 cup granulated sugar
- 1 large egg + 1 large egg yolk, at room temperature
- 1 tablespoon pure vanilla extract (This is the star! Use the best you can afford.)
- Optional: 1 teaspoon vanilla bean paste for those beautiful, tell-tale black specks.
- 3 cups all-purpose flour
- ½ teaspoon baking soda
- ½ teaspoon salt
- Optional for topping: A mix of granulated sugar and flaky sea salt for a crunchy, sparkly finish.
Key Substitutions:
- Vanilla: If you have a vanilla bean, scrape out the seeds and use them in place of the vanilla bean paste. It’s a true luxury!
- Gluten-Free: A good quality 1:1 gluten-free baking flour blend should work well.
- Vegan: This recipe relies heavily on butter and eggs for its texture, so veganizing can be tricky. Use high-quality vegan butter sticks and a reliable egg replacer for the best results.
Tools & Kitchen Gadgets Used: Your Baking Essentials
You don’t need a professional pastry kitchen, but these tools will make your cookie-baking life a dream.
- Stand Mixer or a Hand Mixer (Crucial for getting that butter and sugar perfectly creamed.)
- Large and Medium Mixing Bowls
- Rubber Spatula (For scraping down the bowl and making sure everything is incorporated.)
- Whisk (To combine your dry ingredients.)
- Measuring Cups and Spoons
- Baking Sheets
- Parchment Paper or Silicone Baking Mats (For non-stick perfection.)
- Cookie Scoop (The key to evenly sized and perfectly baked cookies.)
- Wire Cooling Rack
Step-by-Step Instructions: Let’s Bake Some Bliss
Ready to give vanilla the respect it deserves? Let’s go.
- Prep Your Station: Preheat your oven to 350°F (175°C). Line two baking sheets with parchment paper. No greasing needed!
- Cream the Butter and Sugar: In your large bowl, use your mixer to beat the softened butter and granulated sugar on medium-high speed for a full 4-5 minutes. You want it to be super light, fluffy, and almost white. This step is non-negotiable for the perfect texture!
- Add the Eggs and Vanilla: Add the egg and egg yolk, one at a time, mixing well after each. Scrape down the bowl, then beat in the pure vanilla extract and/or vanilla bean paste. The mixture should smell incredible.
- Combine the Dry Stuff: In a separate medium bowl, whisk together the flour, baking soda, and salt.
- Gently Does It: With the mixer on its lowest speed, carefully add the dry ingredients to the wet ingredients in two or three additions. Mix only until the flour is just incorporated. Do not overmix! Overmixing will make your tender cookies tough.
- The Chill Out: This dough benefits from a little rest. Cover the bowl and chill the dough for at least 30 minutes. This prevents spreading and deepens the vanilla flavor. You can chill it for up to 48 hours.
- Scoop and Roll: Once chilled, use a cookie scoop (about 1.5 tablespoons) to portion out the dough. Roll each portion into a smooth ball. If you’re using the sugar topping, roll the balls in the sugar-salt mixture to coat.
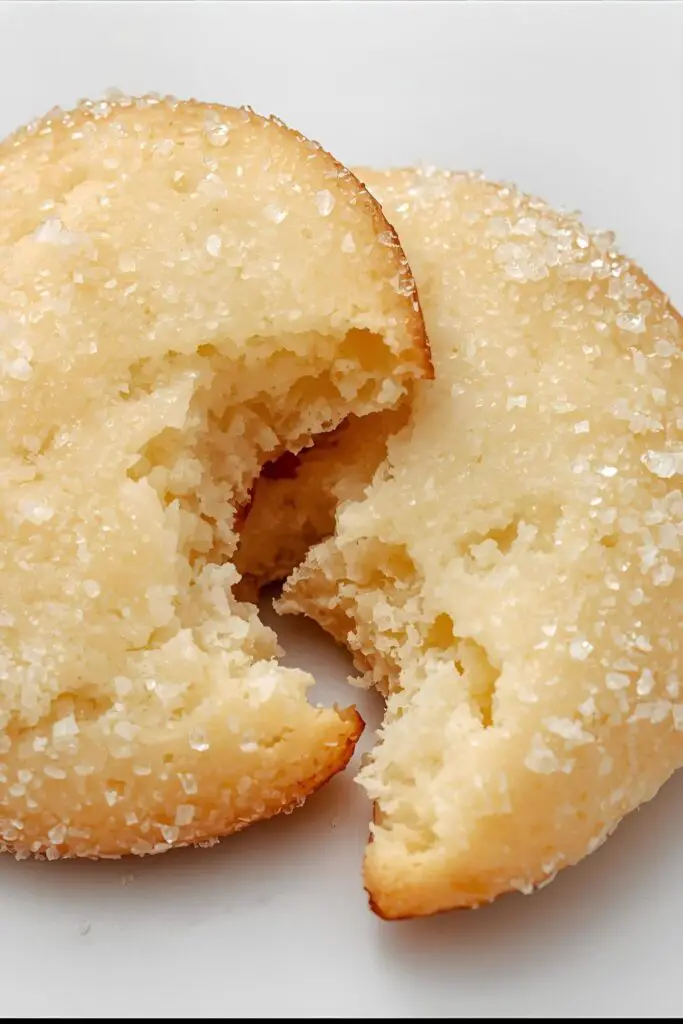
- Bake with Love: Place the dough balls about 2 inches apart on your prepared baking sheets. Bake for 11-13 minutes. The edges should be just barely turning a light golden brown, and the centers should look puffy and set, but not browned.
- Cool Down: Let the cookies cool on the baking sheet for 5 minutes before transferring them to a wire cooling rack to cool completely. They will firm up as they cool.
Calories & Nutritional Info: The Nitty-Gritty
Here’s a rough estimate per cookie, assuming the recipe makes about 3 dozen. But honestly, who’s counting?
- Estimated Calories per cookie: ~120-140 calories
- Fat: ~7g
- Carbohydrates: ~13g
- Protein: ~1g
- Sugar: ~6g
Nutritional Notes:
- This cookie is a certified mood-booster.
- The actual numbers can vary. Don’t let them steal your joy. 🙂
Common Mistakes to Avoid: Don’t Disrespect the Vanilla!
Avoid these common errors to bake the perfect vanilla cookie.
- Using Imitation Vanilla: This is the biggest crime you can commit against this recipe. The entire flavor profile depends on pure vanilla extract. Imitation vanilla is a chemical compound that tastes flat and artificial. Just don’t.
- Not Creaming the Butter and Sugar Enough: This is the most critical step for the texture. You need to beat them together for several minutes to incorporate air, which results in a lighter, more tender cookie.
- Overbaking: These cookies should be pale. If the tops start to get golden brown, you’ve gone too far. Pull them when the centers look puffy and just set. They will firm up as they cool.
- Skipping the Chill: Chilling the dough is important. It prevents the cookies from spreading into thin, sad pancakes and allows the flour to hydrate, resulting in a chewier, more flavorful cookie.
Variations & Customizations: The Perfect Blank Canvas
This cookie is a perfect base for your creativity.
- Funfetti Fun: Gently fold in ½ cup of your favorite rainbow sprinkles at the very end of mixing for a festive, funfetti-style cookie.
- Brown Butter & Spice: Brown the butter before you start (let it cool!) for a deep, nutty flavor. Add ½ teaspoon of cardamom or cinnamon to the dry ingredients for a warm, spicy twist.
- Iced, Iced Baby: Once cooled, these cookies are perfect for icing. A simple glaze (powdered sugar, a splash of milk, and more vanilla) or a classic buttercream frosting works beautifully.
FAQ Section: All Your Vanilla Inquiries
You have questions about this underrated superstar. I have answers.
- Q: What is the real difference between pure vanilla extract and imitation vanilla? A: Pure vanilla extract is made by steeping real vanilla beans in alcohol. Imitation vanilla is made from synthetic vanillin, often derived from wood pulp. The flavor difference is immense; pure vanilla is complex and aromatic, while imitation is one-note and can have a chemical aftertaste.
- Q: Can I use a real vanilla bean instead of extract or paste? A: Yes! One vanilla bean is roughly equivalent to one tablespoon of extract. Split the bean lengthwise, scrape out the seeds with the back of a knife, and add the seeds to your creamed butter and sugar mixture.
- Q: Why did my cookies spread out too much? A: The most common reasons are butter that was too soft (or melted) or skipping the chilling step. Chilling the dough solidifies the fat, which helps the cookies hold their shape while baking.
- Q: How do I get my cookies to be perfectly soft? A: The key is to not overbake them! Pull them from the oven when the centers still look soft and puffy. They will finish setting up on the hot baking sheet.
- Q: Can I use this dough for cut-out cookies? A: This dough is a bit soft for intricate cut-outs. For a sturdier cut-out dough, you might need a recipe with less leavening and a slightly different butter-to-flour ratio.
- Q: How should I store pure vanilla cookies? A: Store them in an airtight container at room temperature for up to a week. Their vanilla flavor actually deepens after a day or two!
- Q: My cookie dough is really sticky. What did I do wrong? A: You probably did nothing wrong! This is a soft dough. That’s why the chilling step is so important—it makes the dough much easier to handle and roll.
Final Thoughts: Long Live Vanilla!
So there you have it. The perfect pure vanilla cookie, ready to convert even the most die-hard chocoholic. You are now an ambassador for the real vanilla agenda, armed with a recipe that proves “simple” can be absolutely spectacular. Go forth and bake, and the next time someone calls vanilla “plain,” you can just smile knowingly and hand them one of these cookies. They’ll understand.