The Ultimate Moist Chocolate Cake Recipe (An Easy One-Bowl Miracle!)
Let’s talk about the Great Chocolate Cake Betrayal. You’ve been there. You see a beautiful, dark, promising-looking chocolate cake at a party or a potluck. You take a slice, your fork poised, your heart filled with hope and dreams. You take a bite, and you’re met with… dryness. A Sahara of sadness. A crumbly, disappointing texture that makes you immediately reach for the nearest glass of milk just to wash it down. It’s a tragedy.
I am here today, as your culinary spirit guide, to tell you that your quest for a perfect, deeply chocolatey, and unapologetically moist cake is officially over. We are ending the tyranny of dry chocolate cake. This is the one. This is the recipe that is so easy it’s made in a single bowl, and so good it will ruin all other chocolate cakes for you. This is the ultimate moist chocolate cake.
Why This Recipe Is a Certified Masterpiece
So, what makes this the one chocolate cake to rule them all? Why is this the recipe that will make you a baking legend among your friends and family?
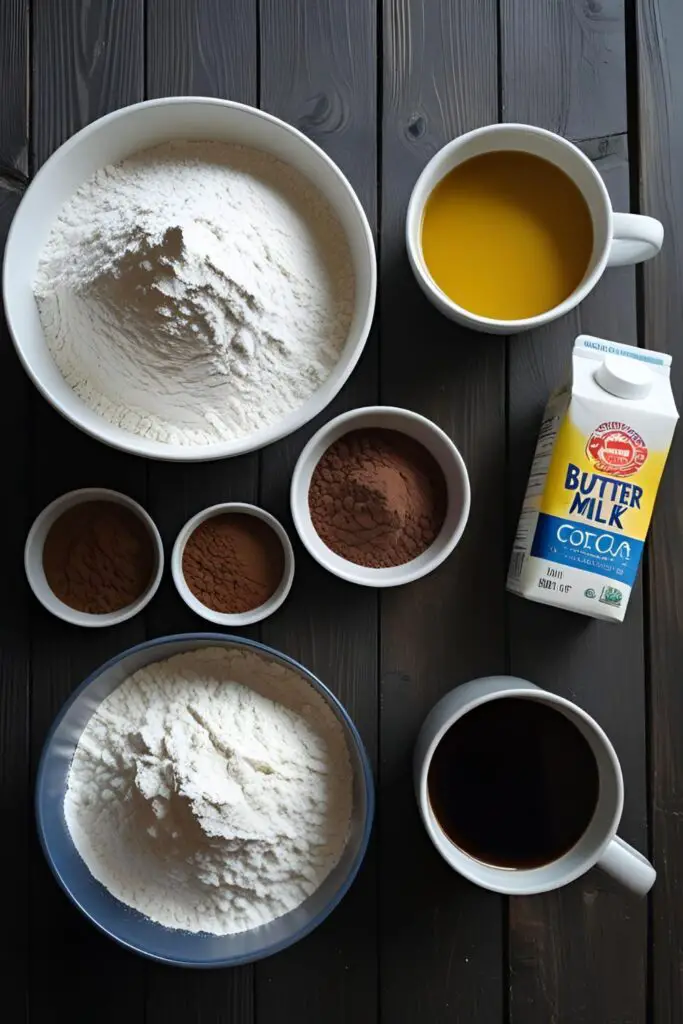
First, it is impossibly, almost scientifically, moist. This isn’t just a happy accident; it’s by design. We are using a holy trinity of moisture-locking ingredients—oil, buttermilk, and a secret weapon of hot coffee—that guarantees a tender, fudgy crumb that stays ridiculously moist for days. This cake laughs in the face of dryness.
Second, it’s a one-bowl wonder. That’s right. No creaming butter and sugar in one bowl, whisking dry ingredients in another, and combining wet ingredients in a third. We are dumping everything into one single, glorious bowl. The cleanup is an absolute dream, which means you can get to the most important part (eating the cake) much, much faster.

Finally, it has a deep, intense, grown-up chocolate flavor. We have a little trick up our sleeve (it’s the hot coffee!) that “blooms” the cocoa powder, unlocking its richest, most complex flavors. This cake doesn’t just taste like sweet, brown-colored sugar; it tastes like pure, glorious CHOCOLATE.
The A-List Ingredients
This cake uses simple pantry staples to create something truly spectacular. I’ve also included a simple, can’t-fail chocolate buttercream that is its perfect soulmate.
For the Supremely Moist Chocolate Cake:
- All-Purpose Flour: 1 ¾ cups.
- Granulated Sugar: 2 cups.
- Unsweetened Cocoa Powder: ¾ cup, sifted if it’s lumpy.
- Baking Soda & Baking Powder: 1 ½ teaspoons of baking soda and 1 ½ teaspoons of baking powder.
- Salt: 1 teaspoon.
- Large Eggs: 2 of them, at room temperature.
- Buttermilk: 1 cup, at room temperature. (See the note below for a super easy DIY substitute!)
- Vegetable Oil (or any neutral oil): ½ cup. This is a key to the moistness!
- Vanilla Extract: 2 teaspoons.
- Hot Brewed Coffee or Hot Water: 1 cup. This is the game-changing secret ingredient!
DIY Buttermilk in a Pinch: No buttermilk on hand? Don’t you dare go to the store! Just pour 1 tablespoon of white vinegar or fresh lemon juice into a liquid measuring cup. Add enough regular milk to reach the 1 cup line. Give it a quick stir and let it sit for 5-10 minutes. It will curdle slightly and be ready to use! Science!
For the Fluffy Chocolate Buttercream:
- Unsalted Butter: 1 cup (2 sticks), softened to room temperature.
- Powdered Sugar: 3 cups, sifted.
- Unsweetened Cocoa Powder: ½ cup, sifted.
- Heavy Cream or Milk: 3-4 tablespoons.
- Vanilla Extract: 2 teaspoons.
- Salt: A pinch (about ¼ teaspoon).
The Baker’s (Minimalist) Toolkit
This easy-going cake requires a refreshingly simple set of tools.
- A Large Mixing Bowl: The undisputed star and hero of our one-bowl show.
- A Whisk: For all of your mixing needs.
- Measuring Cups and Spoons: Baking is chemistry, so let’s be precise with our measurements.
- Cake Pans: Two 9-inch round pans for a classic layer cake, or one 9×13 inch pan for an easy sheet cake.
- An Electric Mixer (Hand or Stand): While not necessary for the cake itself, this is highly recommended for making a light and fluffy buttercream frosting.
- A Spatula, Parchment Paper, and a Wire Cooling Rack.
Step-by-Step: Your Path to One-Bowl Chocolate Glory
This is one of the easiest cake-making processes on the planet. Embrace the beautiful simplicity!
Phase 1: The One-Bowl Cake Magic
- Prep Your Kingdom: Preheat your oven to 350°F (175°C). Grease your cake pans, line the bottoms with parchment paper, and then grease the parchment. This is your non-stick insurance policy and it’s worth the 30 seconds.
- The Dry Dump: In your single large mixing bowl, add the flour, sugar, cocoa powder, baking soda, baking powder, and salt. Use your whisk to mix them all together thoroughly. This is your chance to break up any clumps and make sure everything is evenly distributed.
- The Wet Ingredients: To the same bowl with the dry ingredients, add the eggs, buttermilk, oil, and vanilla extract. Whisk everything together until it is well combined. Scrape down the sides of the bowl to make sure you get everything incorporated. The batter will be thick and paste-like at this point.
- The Secret Weapon: Now, for the magic trick. Very slowly and carefully, pour the hot coffee or hot water into the batter while whisking gently but constantly. The batter will transform from a thick paste into a very thin, liquidy batter. I promise you, this is correct! Do not panic and add more flour! This thin batter is the secret to an incredibly moist cake.
- Bake to Perfection: Pour the thin batter evenly into your prepared cake pans. Bake for 30 to 35 minutes for round pans, or 35-40 minutes for a 9×13 pan. You’ll know it’s done when a wooden skewer inserted into the center of the cake comes out clean or with a few moist crumbs attached.
- The Cool Down: Let the cakes cool in their pans on a wire rack for about 15-20 minutes. Then, carefully run a knife around the edges and invert the cakes onto the rack to cool completely before you even think about looking at the frosting ingredients.

Phase 2: The Fluffy Chocolate Buttercream
- While your glorious cake cools, make the frosting. In a large bowl, using your electric mixer, beat the softened butter on medium speed until it’s light, pale, and creamy, about 2 minutes.
- With the mixer on its lowest speed, gradually add the sifted powdered sugar and the sifted cocoa powder, alternating with the heavy cream, until everything is incorporated. Add the vanilla and salt.
- Once it’s all combined, turn the mixer up to medium-high and beat for a full 3-4 minutes, until the buttercream is light, voluminous, and incredibly fluffy.
- Generously frost your completely cooled cake as your heart desires!
Calories & Nutritional Info (The Delicious Details)

This is a rich, classic chocolate cake. It’s a treat designed for pure, unadulterated happiness.
- Estimated Calories: Around 450-550 kcal per frosted slice (assuming 12 slices).
- A Decadent Delight: This cake is a glorious celebration of chocolate, sugar, and fat. It’s what makes it so comforting and delicious.
- Cocoa Power: Cocoa powder contains flavonoids, which are antioxidants. So really, this is just a health food. 😉 You’re welcome.
Common Chocolate Cake Crimes to Avoid
Even with a foolproof recipe, there are a few ways to go wrong. Let’s keep you on the righteous path to deliciousness.
- The Over-Mixing Overlord. I know it’s a simple one-bowl recipe, but you can still make it tough. The moment you see the last streaks of flour disappear, put the whisk down and walk away. A few small lumps are better than a tough, rubbery cake.
- Fearing the Thin Batter. When you add that hot coffee, the batter will look shockingly thin, almost like chocolate milk. Your brain, conditioned by thick, traditional cake batters, will scream, “This is wrong! I’ve ruined it!” You must tell your brain to be quiet. The thin batter is the secret to a moist cake. Trust the process.
- Using Cold Ingredients. Even in a simple recipe, room temperature ingredients make a difference. Room temperature eggs and buttermilk will emulsify into the batter much more smoothly, giving you a more uniform and tender cake crumb.
- The Hot Cake Frosting Tragedy. This is the cardinal sin of all cake-making. I don’t care how delicious it smells or how impatient you are. If you try to put buttercream frosting on a warm cake, you will have a soupy, greasy, melted puddle of sadness. Your cake must be completely cool.
Variations & Customizations (The Chocolate Universe Is Vast)
This perfect chocolate cake is a fantastic base for all sorts of delicious experiments.
- The “Mexican Hot Chocolate” Cake: Add 1 ½ teaspoons of ground cinnamon and a ¼ teaspoon of cayenne pepper to the dry ingredients. The subtle warmth and spice paired with the deep chocolate flavor is absolutely incredible.
- The Mocha Overload: For the true coffee lover. Use 1 cup of strong, hot espresso instead of regular coffee. You can also add a tablespoon of instant espresso powder to your chocolate buttercream to intensify the rich mocha flavor.
- The Blackout Cake: For an even more intense chocolate experience, fold in 1 cup of semi-sweet chocolate chips into the batter after you add the hot coffee. Frost with a rich, dark chocolate ganache instead of the buttercream.
Your Burning Cake Questions, Answered
Let’s tackle some of the most common questions about making the perfect chocolate cake.
Why use oil instead of butter in this chocolate cake recipe?
While butter provides great flavor, oil provides superior moisture. Since oil is a liquid at room temperature, it keeps cakes moister for longer than butter, which solidifies as it cools. For a cake that is guaranteed to be moist for days, oil is the secret weapon.
Why use hot coffee? Will my cake actually taste like coffee?

Hot liquid helps to “bloom” the cocoa powder, which means it dissolves the cocoa and brings out its richest, most intense chocolatey notes. Coffee has a magical ability to enhance the flavor of chocolate without making the cake taste overtly like coffee. It just makes it taste more like itself. If you’re worried about it, you can use hot water instead, but the chocolate flavor won’t be quite as deep.
The batter is so thin and liquidy! Are you sure I didn’t mess it up?
You didn’t mess up! That is exactly how it’s supposed to look. This type of liquidy, oil-based batter is what creates an incredibly moist, tender, and almost fudgy cake once it’s baked.
Can I make this recipe as cupcakes?
Absolutely! This recipe will make about 24 standard-sized cupcakes. Line a muffin tin with paper liners and fill them about two-thirds full. Bake at 350°F for about 18-22 minutes, or until a toothpick comes out clean.
What are the best tips for keeping my chocolate cake moist?
This recipe has them built-in! The keys are 1) Using oil instead of butter, 2) Using buttermilk, and 3) Storing it properly. Once frosted, store the cake in an airtight cake carrier at room temperature. It stays moist for up to 4 days.
Can I use Dutch-process cocoa powder instead of natural unsweetened?
Yes, you can. Dutch-process cocoa has a darker color and a smoother, less acidic flavor. Since this recipe uses both baking powder and baking soda, it is stable enough to work with either type of cocoa powder.
Can I make this cake ahead of time?
Yes. The cake layers can be baked, cooled completely, and wrapped tightly in plastic wrap. They can be stored at room temperature for up to 2 days or frozen for up to 3 months. The frosting can also be made and stored in the fridge for up to a week.
Final Thoughts
You now possess the recipe for the perfect chocolate cake. A cake that is always moist, always rich, always decadent, and always a crowd-pleaser. The quest is officially over. You are now the keeper of the one true recipe.
So go forth. Bake this one-bowl wonder. Frost it with that luscious buttercream. And be the undisputed hero of every birthday party, potluck, and Tuesday night from now on. You’ve earned it.