How to Make a Stunning Purple Vintage Cake (It’s Easier Than It Looks!)
Scroll through any social media feed right now and you’ll see them. They’re unapologetically extra, dripping with dramatic frills, and look like they’ve been teleported directly from Marie Antoinette’s personal tea party. The vintage cake is back, and it has overthrown the minimalist, “naked cake” regime with a fabulous, buttercream-heavy coup. And at the heart of this glorious revolution is the stunning purple vintage cake.
You’ve seen them, you’ve lusted after them, and you’ve probably thought, “That’s art. I could never.” Well, I’m here to tell you that’s nonsense. What if I told you that all that elaborate, frilly, over-the-top piping is more about having fun and being a little bit dramatic than it is about having professional pastry skills?
Today, we’re pulling back the velvet curtain. We’re going to break down this seemingly complex masterpiece into simple, achievable steps. Get your piping bags ready—it’s time to get fancy.
Why This Recipe is an Absolute Showstopper
This isn’t just dessert; it’s a statement. It’s the main character of any party it attends.
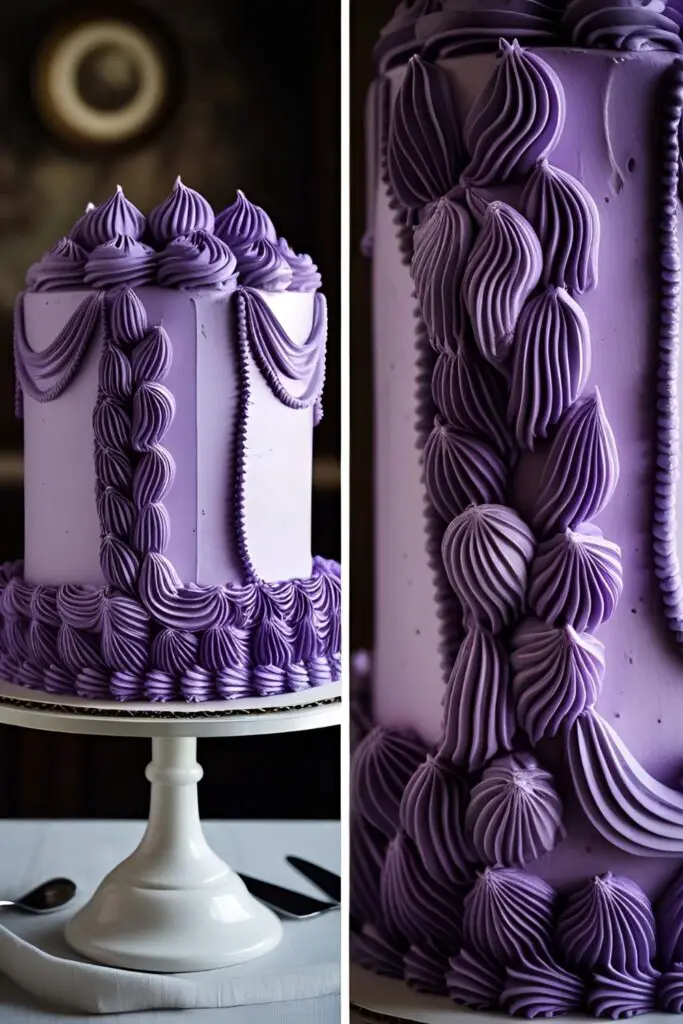
First, it’s a literal work of art. Let’s be honest, this cake is made for the ‘gram. The intricate, lavish piping—known as the Lambeth style—is incredibly impressive. In a gorgeous monochromatic purple palette, it’s the definition of a showstopper. Your friends will not believe you made it yourself.
Second, the flavor is as elegant as the design. We’re not just putting a pretty face on a boring cake. Inside, we’re making a sophisticated Lavender Earl Grey cake. The subtle, fragrant notes of lavender and bergamot are unique, memorable, and the perfect complement to the sweet vanilla bean buttercream.

Finally, it’s an incredibly fun creative outlet. After years of minimalist cakes, there’s a certain joy in being unapologetically maximalist. This is your chance to play, to be creative, and to embrace the “more is more” philosophy. It’s a therapeutic, artistic process with a delicious reward.
The Royal Pantry: Ingredients

A cake this grand requires an ingredient list to match its style.
For the Lavender Earl Grey Cake:
- 221 cups (300g) all-purpose flour
- 121 cups (300g) granulated sugar
- 1 tablespoon baking powder
- 21 teaspoon salt
- 1 cup (240ml) whole milk
- 3 Earl Grey tea bags
- 1 tablespoon culinary lavender buds
- 1 cup (226g) unsalted butter, softened
- 4 large eggs, at room temperature
- 1 teaspoon vanilla extract
For the Sturdy Piping Buttercream:
- 2 cups (452g) unsalted butter, softened
- 1 cup (190g) vegetable shortening (This is the secret to a super stable, pipe-able frosting!)
- 8 cups (960g) powdered sugar, sifted
- 1/4 cup (60ml) heavy cream or milk
- 2 teaspoons clear vanilla extract
- A pinch of salt
For the Purple Palette & Sparkle:
- Purple, Violet, and/or Lavender Gel Food Coloring: Gels are a must for achieving deep, beautiful shades.
- White or silver sprinkles, sugar pearls (nonpareils), and edible glitter.
The Decorator’s Studio: Tools & Gadgets
This is a decorator’s cake, so the tools are key.
- Stand Mixer: You are making a lot of buttercream. A stand mixer is your best friend and trusted confidant.
- Three 6-inch or 8-inch Round Cake Pans: Using 6-inch pans will give you a taller, more dramatic cake that’s perfect for this vintage style.
- A Full Set of Piping Tips: This is where the magic happens. You’ll want a variety, including:
- Star Tips (like Wilton #21, #32, or the large 1M) for shells and borders.
- Round Tips (like Wilton #3, #5) for dots and pearls.
- Shell/Border Tip (like Wilton #104) for swags and ruffles.
- Plenty of Piping Bags: You’ll need one for each color of frosting.
- A Cake Turntable: This is 100% non-negotiable for piping even borders and swags.
- Offset Spatula & Bench Scraper: For a perfectly smooth base coat to build your masterpiece upon.
- Sifter: For lump-free flour and powdered sugar.
Step-by-Step: Your Vintage Cake Masterclass
Let’s build this beauty, one frilly layer at a time.
H3: Part 1: The Fragrant Lavender Earl Grey Cake
- Infuse the Milk: In a small saucepan, gently heat the milk until it’s steaming (not boiling). Remove from the heat, add the Earl Grey tea bags and culinary lavender, cover, and let it steep for at least 30 minutes. Strain the milk through a fine-mesh sieve, pressing on the solids to get all the liquid. Let it cool to room temperature.
- Prep the Oven: Preheat your oven to 350°F (175°C). Grease and flour your cake pans, and line the bottoms with parchment.
- Mix the Batter: In your stand mixer, cream the butter and sugar until light and fluffy. Add the eggs one at a time. In a separate bowl, whisk the flour, baking powder, and salt. Alternate adding the dry ingredients and the infused milk to the mixer, starting and ending with the dry. Mix in the vanilla.
- Bake and Cool: Divide the batter between your pans and bake for 25-30 minutes (for 8-inch) or 35-40 minutes (for 6-inch), or until a toothpick comes out clean. Let the cakes cool in their pans for 15 minutes before turning them out onto a wire rack to cool completely.
H3: Part 2: The Buttercream & Assembly
- Make the Buttercream: In your stand mixer, beat the softened butter and shortening together until completely smooth. On low speed, gradually add the sifted powdered sugar. Add the vanilla, salt, and heavy cream, then whip on medium-high speed for 3-5 minutes until light and fluffy.
- Stack and Crumb Coat: Level your cooled cakes. Stack them on your turntable with a layer of buttercream between each. Apply a thin crumb coat of buttercream all over and chill for 30 minutes until firm.
H3: Part 3: The Base Coat & Purple Palette
- The Canvas: Apply a final, smooth coat of buttercream to your cake. Take your time with your bench scraper and offset spatula to get it as flawless as possible. This is the canvas for your art. Chill the cake again for at least 30 minutes until the frosting is firm to the touch.
- Create Your Colors: Divide your remaining buttercream into 2 or 3 bowls. Leave one white, or tint them all in varying shades of purple (e.g., a pale lavender, a medium violet, a deeper purple). A monochromatic palette looks incredibly chic.
H3: Part 4: The Piping Extravaganza
- The Foundation Borders: Using your darkest purple and a large star or shell tip, pipe a border around the top and bottom edges of the cake. This frames your design.
- The Dramatic Swags: Using a medium shade of purple and a shell or petal tip, pipe swooping swags or drapes along the side of the cake. Pipe one, then pipe the next one overlapping it slightly.
- The Over-the-Top Frills: Now it’s time to be extra. Use a smaller star tip and your lightest purple to pipe ruffles, shells, or rosettes on top of your borders and swags. Layering is key to the Lambeth look.
- Fill in the Details: Use a small round tip to pipe “pearls” or dots. Add piped stars in any empty spaces.
- Add Some Sparkle: Finish your masterpiece with a delicate scattering of sprinkles, sugar pearls, or a touch of edible glitter.
Nutritional Info (The Royal Decree)
A slice of opulence, broken down.
- Serving Size: 1 slice (assuming a tall 6-inch cake yields 12 slices)
- Estimated Calories: Around 650-700 kcal (Buttercream is a lifestyle.)
- Main Nutrients: Sugar, butter, and pure, unadulterated fabulousness.
- Disclaimer: This cake is a special occasion. Treat it as such. No one is counting.
Common Mistakes to Avoid (A Royal Mess)
- Soft, Soupy Buttercream: Your butter was too soft, or you live in a hot climate. The secret is the shortening—it makes the buttercream much more stable. Your buttercream needs to be stiff; if it feels soft, chill it for 15-20 minutes and whip it again.
- Piping on a Soft Cake: If your base coat of frosting isn’t firm and cold, your elaborate piping will slide right off. The cake must be thoroughly chilled before you begin the detailed decorating.
- The Dreaded Crumbly Base: You didn’t do a proper crumb coat. All your beautiful piping will be ruined by little cake crumbs getting dragged through it. Don’t skip the crumb coat and chill!
- Wobbly, Inconsistent Piping: Your piping pressure wasn’t even. Before you touch the cake, do a few practice pipes on a piece of parchment paper to get a feel for the pressure needed for each tip.
- A Chaotic Mess of Color: You tried to use every color in the rainbow. The vintage look is at its most elegant when you stick to a monochromatic palette of 2-3 shades of the same color.
Variations & Customizations (Your Reign, Your Rules)
Don’t feel like going full-on maximalist? Adapt the throne.
- Vintage Heart Cake: The ultimate romantic cake. Bake your layers in heart-shaped pans and go wild with the frills. Perfect for anniversaries, Valentine’s Day, or just because.
- “Vintage-Lite” Style: If the full Lambeth look is too intimidating, just pipe the top and bottom shell borders on a smoothly frosted cake. It’s a simple, elegant nod to the style without the commitment.
- Classic Flavor, Vintage Look: If you’re not a fan of floral flavors, this decorating style looks just as stunning on a classic Vanilla Bean or a rich Chocolate Cake. The contrast of a dark chocolate cake with purple frosting would be amazing.
Frequently Asked Questions (A Royal Q&A)
What exactly is a “vintage” or “Lambeth” style cake?

It’s a cake decorating style that originated in England and was popularized by Joseph Lambeth in the 1930s. It’s characterized by intricate, over-the-top piping techniques, including lots of shells, swags, drapes, and ruffles, creating a very ornate and dimensional look.
What is the best frosting for this much piping?
A sturdy American buttercream, especially one made with part shortening, is often best for beginners as it’s very stable and “crusts” slightly. A well-made, stiff Swiss Meringue Buttercream also works beautifully for a less sweet option.
Do I really need so many different piping tips?
To get the full, layered look, yes. However, you can create a beautiful cake with just two or three key tips: a medium star tip (for shells/borders), a small round tip (for dots), and a petal tip (for swags).
How do you make different shades of purple from one food coloring?
Start with your big bowl of white buttercream. Take a small amount out for your lightest shade and add a tiny drop of purple. Then add a bit more coloring to the main bowl for your medium shade. Finally, add even more color for your darkest shade. It’s easier to make a color darker than it is to make it lighter.
My hands shake when I pipe. Any tips?
It’s all about support! Use your dominant hand to squeeze the piping bag and your non-dominant hand to guide the tip. Try resting your elbows on the table for stability. And remember to breathe!
How far in advance can I make this cake?
You can bake the cake layers up to two days ahead and store them, well-wrapped, at room temperature. The entire cake can be frosted and decorated a day in advance and stored in the refrigerator.
How do I store a cake with this much frosting?

Carefully, in the refrigerator. A tall cake box is your best friend. Let the cake sit at room temperature for at least 30-60 minutes before serving to allow the buttercream to soften.
Final Thoughts
You did it. You tackled the frills, you conquered the swags, and you created a cake that is unapologetically extra and absolutely breathtaking. You’ve created a piece of edible art that is the perfect blend of nostalgic charm and modern trendiness.
So go ahead, put on a tiara, and serve up a slice of your magnificent creation. You’re not just a baker anymore; you’re a cake artist. And you’ve earned the right to be a little bit dramatic about it.