The Ultimate Bow Birthday Cake Tutorial (Because You’re in Your Bow Era)
Let’s be honest, we’re all living in the bow era. We’re putting bows on our hair, our handbags, our shoes… so why on earth should our desserts be left out of the party? If your personal aesthetic is currently leaning towards all things charming, feminine, and unapologetically pretty, then you don’t just need a cake. You need a statement. You need the ultimate bow birthday cake.
Forget boring cakes. We are about to create a masterpiece of delicate details and sweet sophistication. This is your official guide to making a cake adorned with the most darling buttercream bows you’ve ever seen. It looks like it came from a chic Parisian patisserie, but I’m going to let you in on a secret: the technique is surprisingly simple, and the result is pure, edible charm.
Why This Cake is the Prettiest Present
So, why should you tie up your time making this delightful confection? Let me count the reasons.
- It’s Incredibly Chic and On-Trend: This cake is the absolute pinnacle of the coquette and hyper-feminine aesthetic that’s everywhere right now. It’s perfect for a stylish birthday, a bridal shower, or any celebration that calls for a touch of elegance. Your camera roll is about to be blessed.
- You’ll Learn a New Skill: This isn’t just a recipe; it’s a mini masterclass in buttercream piping. Learning how to pipe a perfect little bow is a game-changing skill that you can use on cupcakes, cookies, and any other dessert you want to make instantly prettier.
- The Flavor is as Delicate as the Design: Beneath all those beautiful bows is a soft, moist, and incredibly delicious almond cake. It has a subtle, sophisticated flavor that perfectly complements the delicate, sweet buttercream.
The Ingredient List: All Things Nice
A cake this pretty deserves the most delightful ingredients.
For the Delicate Almond Cake:
- All-Purpose Flour: 2 ½ cups.
- Baking Powder: 2 teaspoons.
- Salt: ½ teaspoon.
- Unsalted Butter: 1 cup (2 sticks), softened to room temperature.
- Granulated Sugar: 1 ¾ cups.
- Large Eggs: 3, at room temperature.
- Almond Extract: 1 ½ teaspoons. The star of the show.
- Vanilla Extract: 1 teaspoon.
- Buttermilk: 1 cup, at room temperature.
- Sour Cream: ½ cup, at room temperature.
For the Perfect Piping Buttercream & Decorations:
- Unsalted Butter: 2 cups (4 sticks), softened.
- High-Ratio Shortening: 1 cup. This is the secret to a super stable buttercream that holds those delicate bow shapes perfectly.
- Powdered Sugar: 8 cups (a whole 2lb bag), sifted.
- Meringue Powder: 3-4 tablespoons for extra stability.
- Vanilla Extract: 2 teaspoons.
- Milk or Water: 4-6 tablespoons.
- A Pinch of Salt.
- Gel Food Colorings: Pastel pink is a classic, but any soft, pretty color will do.
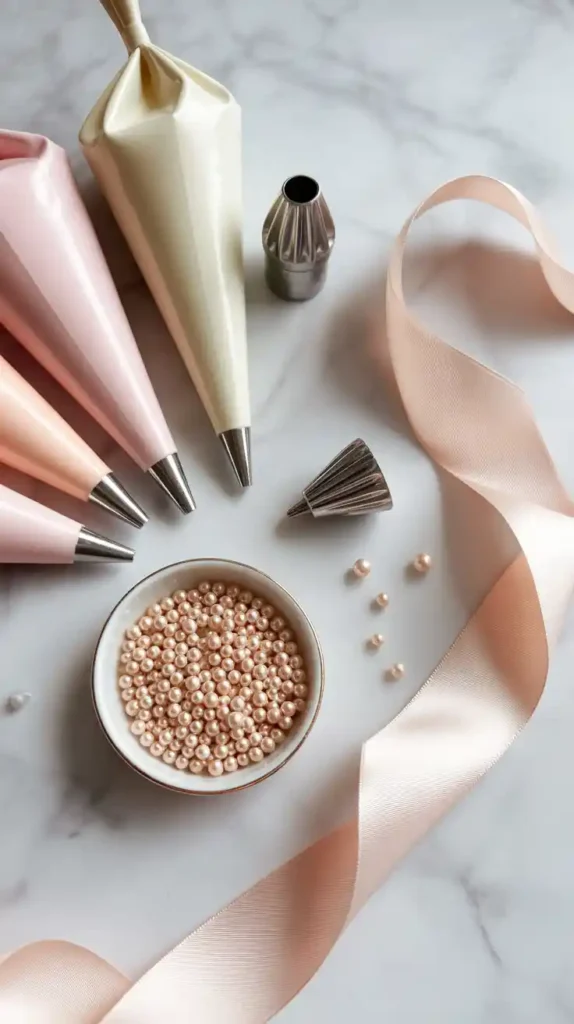
- Optional: Edible pearls or delicate sprinkles.
Tools & Kitchen Gadgets: The Artist’s Atelier
To create these perfect bows, you’ll need the right set of tools.
- A Stand Mixer: Highly recommended for making a large batch of smooth, stable buttercream.
- Two or three 8-inch Round Cake Pans.
- A Cake Turntable: For a smooth, professional finish.
- An Offset Spatula and a Bench Scraper.
- Piping Bags and an Assortment of Tips: This is the most important part!
- A small petal tip (like Wilton #102 or #103): This is the key to making the bow loops.
- A small round tip (like Wilton #2 or #3): For piping the tails and the center knot.
- Parchment Paper: For practicing your piping.
Step-by-Step Instructions: Let’s Tie One On
Ready to create something beautiful? Let’s break it down.
Step 1: Bake the Perfect Canvas
- Prep: Preheat your oven to 350°F (175°C). Grease and flour your cake pans.
- Mix: In your stand mixer, cream the butter and sugar until very light and fluffy. Add the eggs one at a time, followed by the almond and vanilla extracts. In a separate bowl, whisk your dry ingredients.
- Combine: On low speed, alternate adding the dry ingredients and the buttermilk, then fold in the sour cream. Mix only until just combined.
- Bake: Divide the batter between your pans and bake for 25-30 minutes, or until a toothpick comes out clean. Let the cakes cool completely on a wire rack.
Step 2: Whip the Perfect Piping Buttercream

In your stand mixer, beat the butter and shortening until smooth. On low speed, gradually add the sifted powdered sugar and meringue powder. Add the vanilla and salt. Once combined, increase the speed to medium-high and beat for 5 minutes until very light and fluffy. Add milk or water to reach a stiff, but not dry, consistency. A stiff frosting is crucial for defined bows.
Step 3: A Flawless Foundation
Level and stack your cooled cake layers with buttercream in between. Apply a thin crumb coat and chill for 30 minutes. Once firm, apply a final, perfectly smooth coat of your base color frosting (white or a pale pastel is lovely).
Step 4: The School of Bows (The Piping Tutorial)
This is the main event! Let’s pipe a bow. Practice on a piece of parchment paper first.
- The Loops: Fit a piping bag with a petal tip (#102). Hold the bag with the wide end of the tip down and the narrow end up. Squeeze and pipe a small “u” shape to make the first loop. Pipe another “u” shape right next to it, mirrored, to create the second loop.
- The Tails: Switch to a bag with a small round tip (#2). From the center of your loops, pipe two wiggly, flowing lines downwards for the tails.
- The Knot: Pipe a single dot right in the center, where the loops and tails meet, to create the knot. Voilà! A perfect bow.
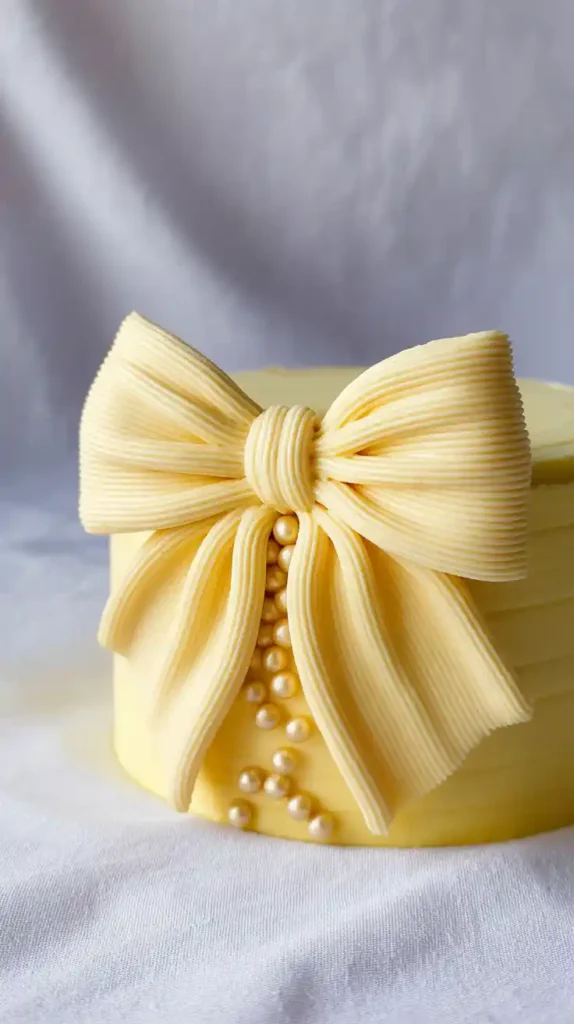
Step 5: Decorate Your Present
Once you have your technique down, it’s time to decorate. You can pipe bows in a neat, repeating pattern all over the cake, scatter them randomly, or create a beautiful cascade down one side. Add some edible pearls for an extra touch of charm.
Calories & Nutritional Info (It’s a Gift to Yourself)
The main nutrient in this cake is charm, and it’s essential for a well-rounded life.
- Primary Ingredient: Pure, unadulterated prettiness.
- Calories: Let’s not concern ourselves with such trivial matters, darling.
- Serves: Anyone with a heart for beautiful things.
Common Mistakes to Avoid (Bows Turned into Blobs)
- Using Soft, Runny Frosting: This is the #1 enemy of a defined bow. Your buttercream must be stiff. The shortening and meringue powder in this recipe are your secret weapons for stability. If your frosting gets too warm, pop it in the fridge for 15 minutes.
- Using the Wrong Piping Tip: You really do need a petal tip to get that realistic, ribbon-like look for the bow loops. A star tip or a round tip just won’t cut it for this specific task.
- Uneven Pressure: If your bow loops are lopsided, it’s because you’re not applying consistent pressure on your piping bag. Practice on parchment paper until you get a feel for the steady motion.
- A Messy Canvas: Trying to pipe delicate bows onto a lumpy, crumb-filled base coat of frosting is a recipe for frustration. A smooth, chilled foundation is key.
Variations & Customizations (Tie It Your Way)
A bow is a classic, but you can style it in so many ways.
1. The Giant Fondant Bow Topper

Not a fan of piping? Create one single, dramatic statement bow out of fondant to place on top of the cake. Roll out strips of fondant, form them into loops and tails (propping them up with paper towels to dry), and then “glue” them together with a little water once they’re firm.
2. The Coquette Dream Cake
Go all out! Combine your piped bows with other vintage piping techniques. Add a frilly shell border around the top and bottom of the cake. Pipe delicate swags and ruffles on the sides. It’s a maximalist, hyper-feminine masterpiece.
3. The Minimalist Ribbon Cake
For a very chic and incredibly simple alternative, frost your cake smoothly in a pale pastel color. Then, take a beautiful, real satin or silk ribbon, and tie it into a perfect bow around the base of the cake. It’s simple, elegant, and timeless. (Just remember to remove the ribbon before serving!)
FAQ: Your Prettiest Questions, Answered
Is it really hard to pipe a buttercream bow?
It looks harder than it is! It just takes a little practice to get the hang of the motion. The key is the right frosting consistency and the right piping tip. After about five practice bows on parchment paper, you’ll feel like a pro.
What is the absolute best frosting for piping details like this?
A stiff American buttercream that is either all-butter with meringue powder, or a half-butter, half-shortening recipe (like the one above) is your best bet. It “crusts” over slightly, which helps the delicate shapes hold perfectly.
Can I make the bows ahead of time?
Yes! This is a fantastic pro-tip. Pipe your bows onto small, individual squares of parchment paper. Place them on a cookie sheet and pop them in the freezer. Once they are frozen solid, you can gently peel them off the paper and arrange them on your freshly frosted cake.
Are real ribbons safe to put on a cake?

Yes, as long as you use a new, clean ribbon and you remove it completely before you slice and serve the cake. It is a beautiful, non-edible garnish.
How do I get that perfect, pale pastel frosting color?
Use gel food coloring. Dip a clean toothpick into the gel, get the tiniest possible amount, and swirl it into your white buttercream. A little goes a very long way, and you can always add more.
Can I put piped bows on cupcakes?
They are absolutely perfect for cupcakes! A single, perfect buttercream bow on top of a cupcake is the definition of adorable.
My hands get so tired and shaky when I pipe. Any tips?
Don’t overfill your piping bag. A smaller amount of frosting is much easier to control and less tiring to squeeze. Also, use your dominant hand to squeeze and your other hand to guide the tip. And take breaks!
Final Thoughts
You’ve done it. You have created a cake that is the edible embodiment of charm. It’s a sweet, delicate, and beautiful present, all tied up with a bow. You are now a master of one of the prettiest cake trends around.
So go on, serve your beautiful creation. Watch as everyone swoons over the delicate details. You’ve just proven that with a little patience and the right piping tip, you can turn a simple cake into a true work of art.