Stunning Blue Cake Designs for a Birthday (An Easy Ombré Recipe!)
Let’s talk about birthday cakes. You can go for chocolate, you can go for vanilla, but when you really want to make a statement, you go for color. And if you ask me, there’s no color more versatile or stunning than blue. But I know what you’re thinking—you’re picturing a cake that looks like a furry blue monster, staining everyone’s teeth for a week. We’re not doing that. Today, we’re creating one of the most elegant blue cake designs for a birthday you’ve ever seen: the watercolor ombré cake.
Sound intimidating? Like you need an art degree to pull it off? Nope. This is one of those fantastic techniques that looks incredibly complex but is secretly super fun and forgiving for beginners. It’s less about perfection and more about creating a beautiful, edible work of art.
So, if you’re ready to bake a cake that will have everyone asking, “You made that?!”, then grab your apron. Let’s paint with frosting.
Why This Recipe is Your New Secret Weapon
This cake isn’t just a pretty face. It’s the total package, and it’s destined to become your go-to for any special occasion.
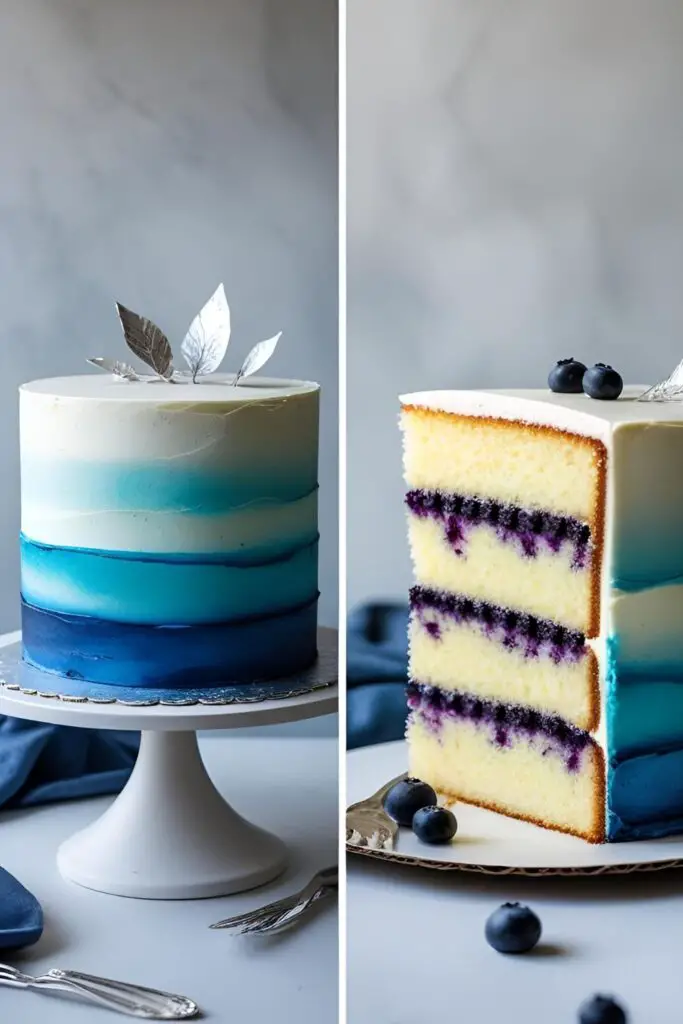
First, it’s an edible masterpiece. The watercolor effect is effortlessly chic. With its dreamy, blended shades of blue and delicate silver accents, it looks like it belongs in a high-end bakery window, not like something you whipped up in your own kitchen (but you did, you superstar).

Second, the flavor is perfectly balanced. We’re pairing the stunning blue exterior with a bright and zesty Lemon Blueberry cake on the inside. The pops of blueberry and fresh lemon flavor are the perfect complement to the sweet buttercream, creating a cake that’s as delicious as it is beautiful.
Finally, it’s practically foolproof. The best part about a watercolor design? It’s supposed to be imperfect. A little smudge here, an uneven blend there—it’s all part of the artistic charm! This takes all the pressure off, making it a surprisingly low-stress way to create a high-impact dessert.
The Artist’s Palette: Ingredients

For a masterpiece, you need the right materials. Here’s your shopping list.
For the Lemon Blueberry Cake:
- 221 cups (325g) all-purpose flour, plus 1 tbsp for the blueberries
- 221 teaspoons baking powder
- 1 teaspoon salt
- 1 cup (226g) unsalted butter, softened
- 143 cups (350g) granulated sugar
- 4 large eggs, room temperature
- Zest of 2 large lemons
- 1/4 cup (60ml) fresh lemon juice
- 1 teaspoon pure vanilla extract
- 1 cup (240g) sour cream, room temperature
- 121 cups fresh or frozen blueberries
For the Silky Swiss Meringue Buttercream (The Perfect White Canvas):
- 5 large egg whites
- 121 cups (300g) granulated sugar
- 2 cups (452g) unsalted butter, cubed and softened
- 2 teaspoons pure vanilla extract
- 1/4 teaspoon salt
For the Watercolor Design:
- Sky Blue, Royal Blue, and Navy Gel Food Coloring (Gel is a must for vibrant colors!)
- Edible silver leaf, silver sprinkles, or white nonpareils for garnish
The Artist’s Studio: Tools & Gadgets
Every artist needs their tools. Here are the essentials for this project.
- Stand Mixer: Highly, highly recommended for making Swiss Meringue Buttercream. It’s a long whipping process.
- Saucepan & Heatproof Bowl: For creating the meringue base over a double boiler.
- Instant-Read Thermometer: Takes the guesswork out of heating the egg whites.
- Whisk & Silicone Spatula: Your trusty sidekicks.
- Measuring Cups and Spoons: For accuracy.
- Three 8-inch Round Cake Pans: To build your beautiful layer cake.
- Parchment Paper & Wire Cooling Rack: For a clean release and proper cooling.
- Offset Spatula & Bench Scraper: These are absolutely essential for the watercolor technique.
- Cake Turntable: Will make frosting and decorating feel like a dream.
- Small Bowls: You’ll need a few for mixing your shades of blue frosting.
Step-by-Step: Painting Your Cake
Ready to channel your inner Bob Ross? Let’s make some happy little cake layers.
H3: Part 1: The Lemon Blueberry Cake Layers
- Prep Your Station: Preheat your oven to 350°F (175°C). Grease and flour three 8-inch cake pans, and line the bottoms with parchment paper.
- Toss the Berries: In a small bowl, gently toss the blueberries with 1 tablespoon of flour. This little trick helps prevent them all from sinking to the bottom of the cake. Set aside.
- Combine Dry Ingredients: In a medium bowl, whisk together the remaining flour, baking powder, and salt.
- Cream Butter & Sugar: In the bowl of your stand mixer, beat the softened butter, sugar, and lemon zest on medium-high speed for 3-5 minutes until light and fluffy.
- Add Wet Ingredients: Beat in the eggs one at a time, followed by the lemon juice and vanilla. Scrape down the bowl as needed.
- Alternate & Mix: On low speed, add the flour mixture in three parts, alternating with the sour cream (start and end with flour). Mix only until just combined.
- Fold and Bake: Gently fold in the flour-coated blueberries. Divide the batter evenly among the pans and bake for 25-30 minutes, or until a skewer comes out clean. Let cool in the pans for 15 minutes before turning out onto a wire rack to cool completely.
H3: Part 2: The Flawless Swiss Meringue Buttercream
- Heat Egg Whites & Sugar: Fill a saucepan with a few inches of water and bring it to a simmer. In a large, heatproof bowl (the bowl of your stand mixer is perfect), whisk together the egg whites and sugar. Place the bowl over the simmering water, ensuring the bottom doesn’t touch the water.
- Whisk Constantly: Whisk the mixture constantly until the sugar has completely dissolved and the mixture reaches 160°F (71°C) on your instant-read thermometer. It should feel completely smooth when you rub it between your fingers.
- Whip to a Meringue: Transfer the bowl to your stand mixer fitted with the whisk attachment. Whip on high speed for 10-15 minutes, until the meringue is stiff, glossy, and the outside of the bowl has cooled to room temperature. This is crucial!
- Slowly Add Butter: Switch to the paddle attachment. With the mixer on low speed, add the softened butter cubes one piece at a time. The frosting might look curdled or soupy at some point—don’t panic! This is normal. Just keep mixing.
- The Magic Moment: After a few minutes, it will magically come together into a silky, smooth buttercream. Once it’s smooth, add the vanilla and salt and whip for another minute.
H3: Part 3: The Watercolor Masterpiece
- Assemble and Crumb Coat: Stack your cooled cake layers on the turntable, with a layer of buttercream between each. Apply a thin crumb coat of white buttercream all over the cake and chill for 30 minutes.
- The Blank Canvas: Apply a smooth, final coat of the white buttercream. Get it as smooth as you can with your offset spatula and bench scraper.
- Mix Your Blues: Portion out a small amount of the remaining buttercream into three separate bowls. Use your gel food coloring to tint them into a light blue, a medium blue, and a dark navy blue.
- Apply Color Blobs: Using a small spatula or the back of a spoon, randomly dab blobs of your three blue buttercreams onto the side of your chilled white cake. Don’t overthink it!
- The Big Swoosh: Hold your bench scraper against the side of the cake at a 45-degree angle. With firm, even pressure, spin your turntable in one smooth, continuous motion. This will smear and blend the colors into a beautiful watercolor effect. Stop after one or two rotations. Over-blending will turn it into a muddy mess.
- Decorate: While the frosting is still soft, gently apply pieces of edible silver leaf or a sprinkle of silver dust around the cake for a touch of elegance.
Calories & Nutritional Info (For the Curious)
This is a birthday cake, a vehicle for joy. But if you must know…
- Serving Size: 1 slice (assuming a 12-slice cake)
- Estimated Calories: Around 680 kcal per slice.
- Key Nutrients: Happiness, celebration, and a solid dose of Vitamin Zest.
- Disclaimer: The calories are merely festive sprinkles on the journey of life. Enjoy them.
Common Mistakes to Avoid (I’ve Made Them So You Don’t Have To)
- Over-Blending the Colors: The single most common mistake. You want streaks and patches of different blues, not a uniform pale blue cake. One or two smooth passes with the bench scraper is all you need. Step away from the cake!
- Using a Yellow-Tinted Buttercream: A standard American buttercream can appear yellowish, which will turn your beautiful blues into a murky green. A pure white Swiss Meringue is the perfect canvas for true blue tones.
- Sinking Blueberries: Did you skip the step where you toss the blueberries in flour? If so, you’ll likely find them all in a sad clump at the bottom of your cake. Don’t skip it!
- A Soupy Meringue Mess: If you add your butter while the meringue is still warm, it will melt into a greasy soup. The bowl must be cooled to room temperature before the butter goes in. If it does turn to soup, pop the whole bowl in the fridge for 20 minutes and try whipping again.
- Skipping the Chill: You need a cold, firm base coat of frosting. If you try to apply the watercolor blobs to a soft, room-temperature cake, the colors will just mix into the base instead of gliding over the top.
Variations & Customizations (Be Your Own Artist)

Once you’ve mastered the technique, the possibilities are endless.
- Ocean Waves Cake: Use the same blues but apply them in wavy horizontal lines before you smooth them out. You can top the cake with some crushed graham crackers for “sand” and a few white chocolate seashells.
- Galaxy Night Sky Cake: Use a mix of navy blue, purple, and black buttercream on your white canvas. After smoothing, take a clean paintbrush, dip it in white food coloring (thinned with a drop of vodka or clear extract), and flick it at the cake to create a starry night sky.
- Clean & Simple Ombré: For a less “painterly” look, divide your remaining buttercream into four bowls. Leave one white, and tint the others light, medium, and dark blue. Pipe thick rings of each color onto the cake, from dark at the bottom to white at the top, and smooth with a bench scraper for a perfect, clean gradient.
Frequently Asked Questions (Your curiosities, answered!)
What are some popular blue cake designs for a birthday?
Besides this watercolor design, ombré stripes, galaxy/night sky themes, and ocean or winter-themed cakes are all incredibly popular. A simple blue cake with a white chocolate drip is also a classic!
How do you make a watercolor effect on a cake?
The key is a chilled, smooth base coat of frosting. You then dab on blobs of your chosen colors and use a bench scraper to smooth and blend them in one or two continuous motions.
My Swiss Meringue Buttercream looks curdled! How do I fix it?
Don’t panic! It’s almost always fixable. This usually means the butter was a bit too cold. Just keep whipping! The friction from the mixer will warm it up and it should come together. If it’s soupy, it’s too warm; chill the bowl for 15-20 minutes and whip again.
What flavor cake goes well with a blue design?
Lemon, vanilla, coconut, or a white almond cake are fantastic choices because they provide a light-colored crumb that won’t distract from your beautiful design. Our Lemon Blueberry recipe is a perfect match!
How do I get really vibrant blue colors in my frosting?
Use high-quality gel food coloring. Liquid coloring from the grocery store is too watery and will never give you deep, vibrant shades. Gels are super concentrated, so a little goes a long way.
Can I make this cake without a stand mixer?

It’s possible with a powerful electric hand mixer, but it will be an arm workout! The meringue needs to be whipped for a solid 10-15 minutes, which is a long time to hold a hand mixer.
How far in advance can I make this beautiful blue cake?
You can bake the cake layers up to 2 days ahead and store them tightly wrapped at room temperature. The entire cake can be assembled and decorated a day in advance and stored in the refrigerator. Just let it sit at room temp for about 30 minutes before serving.
Final Thoughts
There you have it. You didn’t just follow a recipe; you created a conversation starter, a centerpiece, a piece of edible art. You took flour, sugar, and some color and turned it into a birthday memory. Go ahead, take a million photos from every angle. You’ve more than earned it.
Now, go present your masterpiece and get ready for the oohs, the aahs, and the inevitable question: “Where did you buy this?” The answer, delivered with a casual shrug, is the sweetest part of all.