The Strawberry Cake Decorations That Will Make You Look Like a Pro
Let’s be real. You’ve baked a perfectly delicious cake. It tastes like a dream, the crumb is tender, the frosting is divine… but it looks, well, a little boring. It’s a beige circle of sadness, and you know it deserves better. Before you have an existential crisis in front of the sprinkle aisle, I’m here to tell you the answer is simple, fresh, and sitting right in your fridge. We’re talking about next-level strawberry cake decorations.
Forget trying to pipe intricate buttercream flowers that end up looking like colorful blobs. We’re going to turn the humble strawberry into a show-stopping work of art. With a few simple tricks, you can elevate any cake from “homemade” to “who made this?!” Get ready to unlock the secrets to strawberry cake decorations that are so easy, it almost feels like cheating.
Why These Strawberry Decorations Are a Sweet Escape
So why should you go all-in on strawberries for your cake-artistry needs? I’m so glad you asked.
First, it’s elegance, simplified. There is something effortlessly chic about a cake adorned with fresh fruit. Even the most basic arrangement of sliced strawberries looks a million times more sophisticated than a pile of waxy sprinkles. It says “I have great taste” without you having to say a thing.
Second, they add a burst of fresh flavor and texture. Unlike sugary fondant or gritty sprinkles, fresh strawberries bring a bright, juicy, slightly tart flavor that cuts through the sweetness of the cake and frosting. It’s a decoration you actually want to eat. What a concept, right?

Finally, these techniques are ridiculously versatile. Whether you’ve made a rich chocolate stout cake, a light-as-air angel food cake, or a simple vanilla sheet cake, these strawberry decorations will look and taste amazing. They are the universal accessory that goes with every outfit.
What You’ll Need: Your Decoration Station
This isn’t a complex recipe, it’s a guide to artistry! Here’s your simple toolkit.
- The Star of the Show:
- 1-2 pints of fresh, firm, ripe strawberries. Look for berries that are bright red, have fresh green tops, and aren’t mushy. The success of your decorations depends heavily on the quality of your berries.
- The Supporting Cast:
- A fully baked and frosted cake of your choice.
- 1 cup of good-quality melting chocolate (dark, milk, or white wafers work best).
- 1-2 tablespoons of seedless strawberry or apricot jam (optional, for a shiny glaze).
- Fresh mint leaves, blueberries, or other herbs for accent (optional, but fancy).
The Artist’s Tools & Gadgets
You don’t need a huge toolbox, just a few key items.
- A sharp Paring Knife: This is your primary sculpting tool.
- Cutting Board
- Microwave-Safe Bowl: For melting chocolate.
- Parchment Paper or wax paper.
- Piping Bag or a Ziploc bag (for drizzling).
- Toothpicks: Surprisingly useful little helpers.
- Pastry Brush: If you decide to use a glaze.
Step-by-Step Instructions: Your Strawberry Masterclass
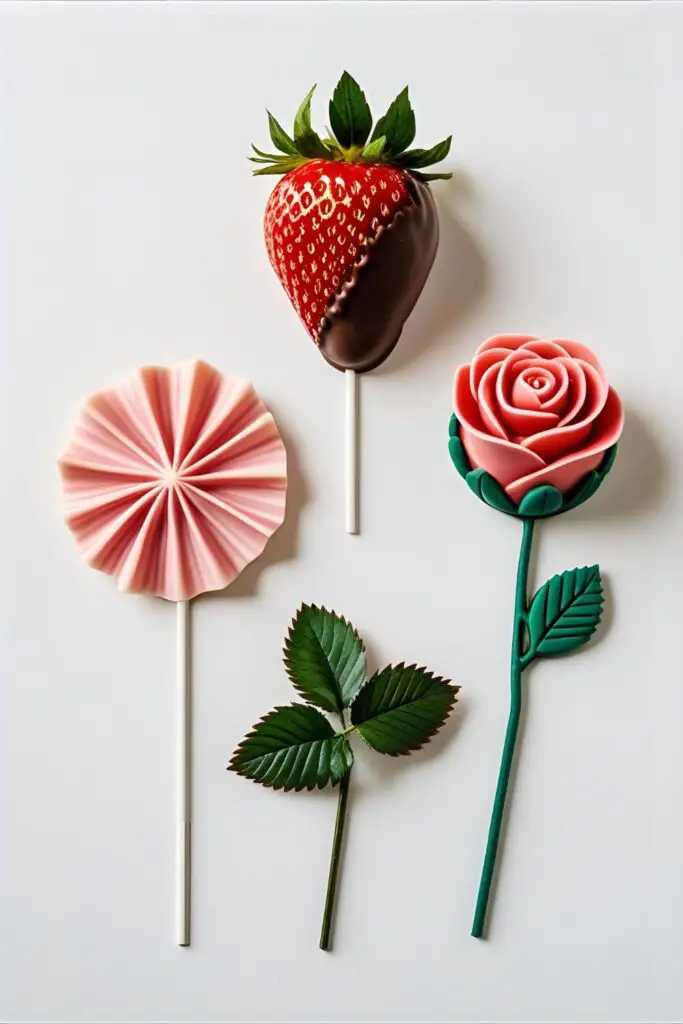
Ready to transform some berries? We’re going to cover three main techniques, from simple to show-stopper.
H3: Technique 1: The Classic Strawberry Fan (Beginner-Friendly)
This is the easiest way to make a big impact.
- Select & Wash: Choose a nice, plump strawberry. Gently wash and thoroughly pat it dry. A wet strawberry will make your frosting weep.
- Make the Slices: Place the strawberry on your cutting board with the pointy end facing you. Using your paring knife, make thin vertical slices from just below the green top down to the tip. Do not cut all the way through the top! You want the slices to stay connected at the stem.
- Fan It Out: Gently press down on the strawberry with your finger. The slices will fan out beautifully.
- Place on Cake: Carefully lift your strawberry fan with a knife or small spatula and place it on your cake. Repeat to create a beautiful border or a simple, elegant centerpiece.
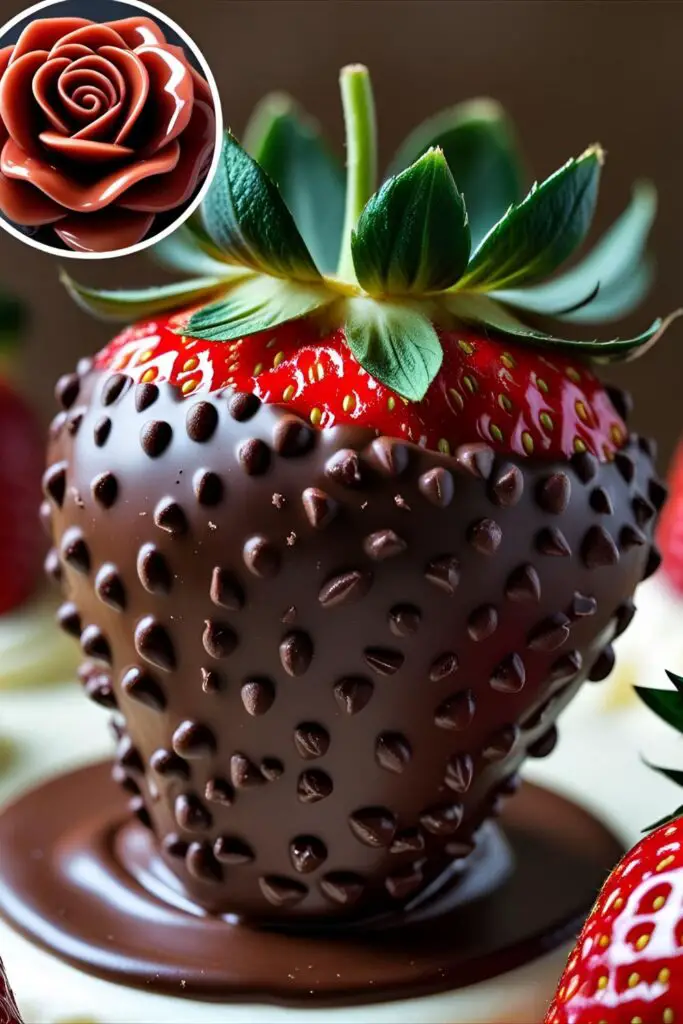
H3: Technique 2: The Dazzling Chocolate-Dipped Strawberry (Crowd-Pleaser)
Everyone loves these. They are a classic for a reason.
- Prep Your Berries & Station: Wash and completely dry your strawberries, leaving the green tops on for a handle. Line a baking sheet with parchment paper.
- Melt the Chocolate: Place your chocolate wafers in a microwave-safe bowl. Microwave in 30-second bursts, stirring in between, until fully melted and smooth. Be careful not to overheat it, or it will seize.
- Dip and Drip: Hold a strawberry by its green leaves and dip it about three-quarters of the way into the melted chocolate. Lift it out and let the excess chocolate drip back into the bowl.
- Set It Down: Place the dipped strawberry on your parchment-lined baking sheet.
- Get Fancy (Optional): While the chocolate is still wet, you can sprinkle it with chopped nuts, sprinkles, or edible glitter. For a classic look, let the first coat set, then drizzle a contrasting color of chocolate over the top using a piping bag.
- Chill to Set: Place the tray in the refrigerator for 10-15 minutes, or until the chocolate is firm. Arrange these beauties on top of your cake.
H3: Technique 3: The Show-Stopping Strawberry Rose (Advanced)

This is the one that gets all the oohs and aahs. It takes a little practice, but it’s so worth it.
- Choose a Big Berry: You need a large, firm strawberry for this. Wash and dry it completely.
- The First Petal: Hold the strawberry by its green top. Starting near the base, use your paring knife to make a small, downward cut to create the first “petal.” Do not cut the petal all the way off.
- Create the First Layer: Rotate the strawberry and make 3-4 more small petals around the base, slightly overlapping them.
- The Next Layer: Move up the strawberry and make another layer of petals, staggering them between the petals of the first layer. These petals should be slightly smaller and angled more upright.
- The Bud: Continue with one or two more layers, with the petals getting smaller and smaller as you approach the tip. You can gently fluff the petals out with the tip of your knife.
- Finish it: Once you reach the top, you can slice off the very tip to create a flat center or leave it pointy. Voila! A rose. Place these carefully on your cake for a stunning effect.
Calories & Nutritional Info
We’re talking about fruit here, people. Let’s not overthink it.
- Serving Size: A few glorious strawberries.
- Calories: For a few plain strawberries, practically none. For a few chocolate-dipped ones, maybe 100-150 calories. It’s fine.
- Vitamins: It’s loaded with Vitamin C, which basically means this is a health food. 😉
- Joy Factor: Extremely high.
Disclaimer: These decorations are mostly fruit. The cake they are sitting on, however, is another story.
Common Mistakes to Avoid (Or, How Not to Have a Berry Bad Time)
- Using Sad, Mushy Strawberries: This is the biggest mistake. If your berries are soft, overripe, or bruised, they will not slice cleanly, they will not hold their shape, and they will look sad. Use firm, fresh berries.
- The Slippery Slope: Placing wet strawberries on your cake is a recipe for disaster. The water will cause the frosting to get slimy and can make your decorations slide right off. Pat every single berry completely dry.
- Seized Chocolate: If you overheat your chocolate, it will turn into a clumpy, grainy mess. Melt it in short 30-second intervals and stir every time.
- Decorating Too Far in Advance: Fresh strawberries are best added the day of serving. If you put them on the cake too early (like the day before), they can start to weep and bleed their color onto your beautiful frosting.
Variations & Customizations
Once you’ve mastered the basics, get creative!
- The Tuxedo Strawberry: Dip your strawberry in melted white chocolate and let it set completely. Then, dip it at a 45-degree angle on two sides into melted dark chocolate to create a “jacket.” Use a toothpick to dot on a “bow tie” and “buttons.”
- The Shimmering Glaze: For a professional bakery look, warm up a few tablespoons of seedless strawberry or apricot jam with a tiny splash of water until it’s a brushable consistency. Gently brush this glaze over your fresh strawberries (the fans or roses) to give them a beautiful, long-lasting shine.
- Herbalicious Elegance: Don’t underestimate the power of a green accent. Tucking a few fresh mint leaves, tiny basil sprigs, or even a sprig of rosemary around your strawberry decorations adds a pop of color and a sophisticated aroma.
FAQ: Your Berry Important Questions
Let’s answer some common questions about decorating with strawberries.
H3: How do I keep strawberries from bleeding onto the cake?
The best way is to decorate your cake as close to serving time as possible. Patting the strawberries completely dry before placing them on the cake is also crucial. A thin layer of clear glaze can also help seal the berries.
H3: How far in advance can I decorate a cake with fresh strawberries?

For the best look and texture, it’s ideal to decorate the cake no more than 4-6 hours before serving. Chocolate-dipped strawberries hold up a bit better and can be placed on the cake further in advance.
H3: Can I use frozen strawberries for decorating?
Absolutely not. Frozen strawberries release a ton of water as they thaw and will turn into a mushy, watery mess on your cake. You must use fresh strawberries for these techniques.
H3: How do I get a professional-looking shine on my strawberries?
The bakery secret is a simple glaze. Gently warm some seedless apricot or strawberry jam with a tiny bit of water and brush it lightly over the cut surfaces of the berries.
H3: What’s the best way to wash strawberries?
The best way is to wash them right before you plan to use them. A quick rinse under cool water is perfect. Don’t let them soak.
H3: How should I arrange the strawberries on the cake?
Have fun with it! You can create a classic border, a crescent moon shape on one side, a cascading pile down the side, or a simple, elegant cluster in the center. There are no rules!
H3: What cake flavors pair best with strawberry decorations?
Strawberry is a team player! It goes beautifully with vanilla, chocolate, lemon, almond, and of course, strawberry cake.
Final Thoughts: You’re a Berry Good Decorator
See? That wasn’t so hard. You’ve now got a whole arsenal of strawberry cake decorations up your sleeve. You can officially turn any plain cake into a masterpiece with nothing more than a pint of berries and a little creativity.
So go forth and decorate. Fan, dip, and carve your way to cake glory. And the next time someone brings a boring-looking cake to a party, you can just smile to yourself, knowing you have the power to make it a work of art.