The Ultimate Stitch and Angel Cake Recipe (It’s Cute, Fluffy, and a Little Chaotic)
You have a mission, should you choose to accept it: create a cake for a Disney fan that perfectly captures the spirit of everyone’s favorite genetic experiments. You could go to the store and get a cake with a plastic character topper, but where’s the adventure in that? Where’s the ʻohana? No, you’re here because you want to create something special, something with personality, something as unique as Experiment 626 and his beloved boojiboo, Angel.
Well, you’ve come to the right place. We’re about to dive headfirst into the world of edible art to create a stitch and angel cake that’s so cute and fluffy, you won’t know whether to photograph it or devour it immediately.
So, put on your favorite Hawaiian shirt, queue up the Elvis Presley soundtrack, and get ready to bake a cake that is truly out of this world.
Why This Recipe is Awesome (Besides Being Adorable)
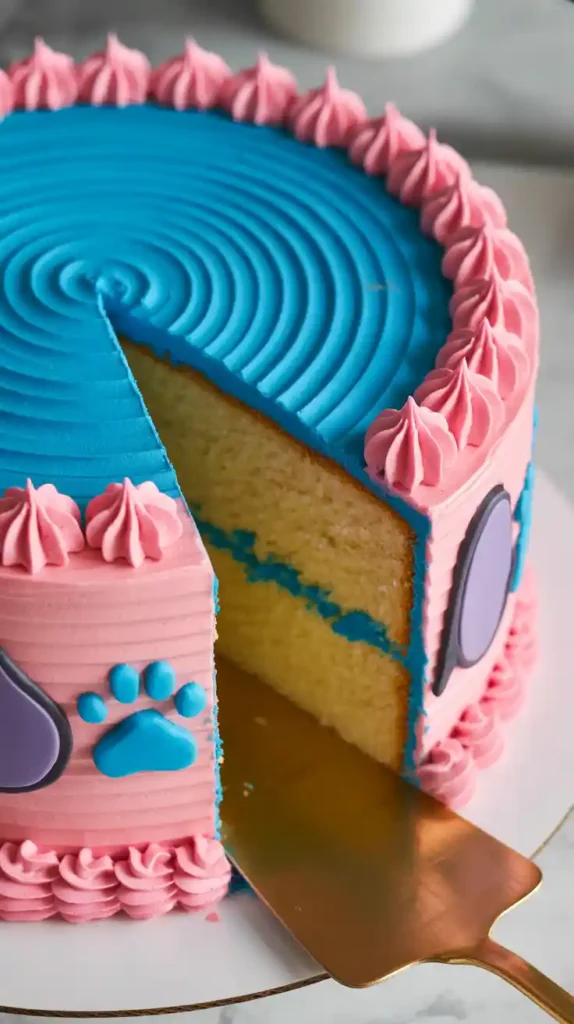
First and foremost, the visual payoff is HUGE. This cake, with its iconic half-pink, half-blue design, is an absolute showstopper. It’s instantly recognizable, unbelievably photogenic, and guaranteed to be the star of any birthday party or celebration. Prepare for a flood of “You made that?!” compliments.
Second, while it looks impressively complex, the design is surprisingly straightforward. I’ll walk you through a simple technique to get that clean, split-color effect without wanting to cause city-wide destruction like a certain someone. It’s all about a little patience and a lot of buttercream.
Finally, under all that colorful frosting is a delicious, moist, and crowd-pleasing vanilla cake. It’s the perfect, reliable base for our chaotic-but-cute design. This isn’t just a novelty cake; it’s a genuinely delicious dessert that people will actually want to eat.
Ingredients You’ll Need

To create our dynamic duo, we need a solid foundation and some very specific colors.
For the “ʻOhana Means Family” Vanilla Cake:
- 3 cups (360g) all-purpose flour
- 2 teaspoons baking powder
- ½ teaspoon salt
- 1 ½ cups (300g) granulated sugar
- 1 cup (226g) unsalted butter, softened to room temperature
- 4 large eggs, at room temperature
- 1 cup (240ml) whole milk, at room temperature
- 2 teaspoons pure vanilla extract
For the “Cute and Fluffy” Buttercream:
- 2 cups (454g) unsalted butter, softened
- 6-8 cups (720-960g) powdered sugar, sifted
- ⅓ cup (80ml) whole milk or heavy cream
- 2 teaspoons pure vanilla extract
- Pinch of salt
- Royal Blue or Sky Blue gel food coloring
- Pink or Electric Pink gel food coloring
- Black gel food coloring
For the Details (Optional, but recommended):
- Small amount of white and black fondant for the ears and eyes.
Tools & Kitchen Gadgets Used
Every experiment needs a proper lab. Here are the tools for this delicious creation.
- Stand Mixer or a Hand Mixer: For whipping up a perfectly fluffy cake and buttercream.
- Two 8-inch or 9-inch Round Cake Pans: Your canvas for this edible art project.
- Parchment Paper: The unsung hero that prevents cake-sticking tragedies.
- Wire Cooling Racks: Essential for cooling your cakes properly.
- Offset Spatula & Bench Scraper: Your best friends for achieving a smooth, clean frosting finish.
- Piping Bags: You’ll want at least four for the different colors.
- Piping Tips: A medium star tip (like a Wilton #1M or #21) for the main texture, and a small round tip (like a Wilton #3) for details.
- Toothpicks or a Scribe Tool: For sketching out your design on the cake.
Step-by-Step Instructions: Time to Get a Little Weird
Ready to create some adorable chaos? Let’s break this down.
H3: First Form: Bake the Cake Canvas
- Prep Your Space: Preheat your oven to 350°F (175°C). Grease your cake pans, line the bottoms with parchment, and grease the parchment again. Trust me.
- Combine the Dry Stuff: In a medium bowl, whisk together the flour, baking powder, and salt.
- Cream Butter and Sugar: In your mixer, beat the softened butter and sugar on medium-high speed for a solid 5 minutes until it’s super pale and fluffy. This is a critical step for a light, tender cake.
- Add the Eggs: Add the room temperature eggs one at a time, mixing well after each addition. Then, beat in the vanilla.
- Alternate and Combine: On low speed, add the dry ingredients in three additions, alternating with the milk in two additions (Dry, Milk, Dry, Milk, Dry). Mix only until the flour just disappears. Do not, I repeat, do not overmix!
- Bake and Cool: Divide the batter between your pans and bake for 30-35 minutes. A toothpick inserted into the center should come out clean. Let the cakes cool in the pans for 15 minutes before turning them out onto wire racks to cool completely. This is non-negotiable.
H3: Second Form: Create the Colorful Frosting
- Whip the Buttercream: In your mixer, beat the softened butter until creamy. Gradually add 6 cups of the powdered sugar, followed by the milk, vanilla, and salt. Beat on high speed for 5 minutes until it’s incredibly light and fluffy. Adjust with more sugar or milk as needed for a stiff-but-spreadable consistency.
- Divide and Color:
- Scoop out about ½ cup of frosting and place it in a small bowl. This will be for black details.
- Divide the remaining frosting into two equal halves.
- For Stitch Blue: Add sky blue or royal blue gel coloring to one half until you achieve that perfect, vibrant Stitch blue.
- For Angel Pink: Add pink gel coloring to the other half until you get a bright, beautiful Angel pink.
- For Black: Add a small amount of black gel coloring to the small bowl of frosting.
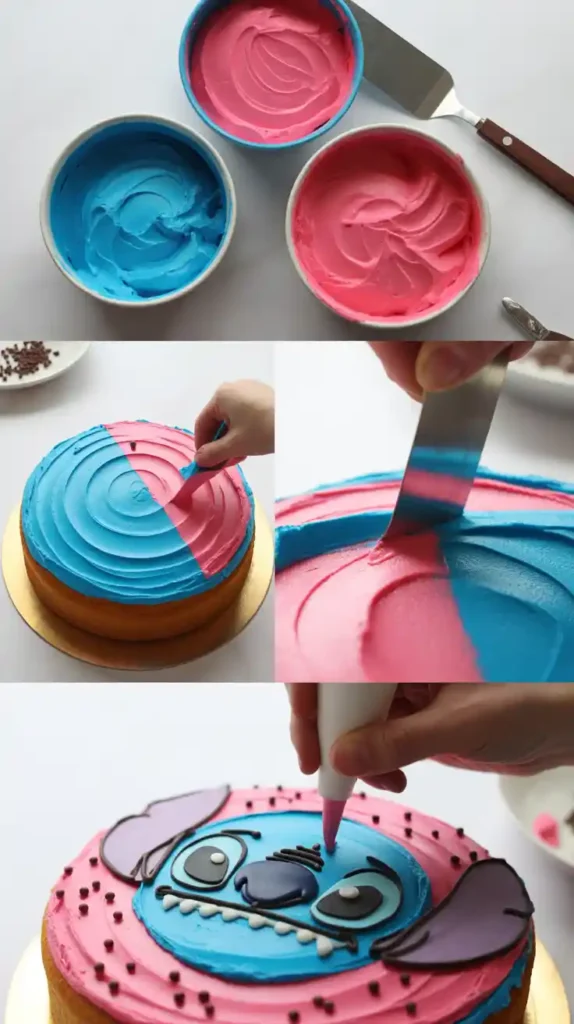
H3: Third Form: Bring Your Experiments to Life
- Assemble and Crumb Coat: Place one cooled cake layer on your cake stand. Frost the top with a thin layer of uncolored (or lightly colored) frosting. Place the second cake layer on top. Now, apply a very thin layer of frosting over the entire cake to trap the crumbs. Chill the cake in the fridge for 30 minutes until the crumb coat is firm.
- The Great Divide: Using a toothpick or the edge of a spatula, gently draw a wavy line down the center of the cake. This is your guide for the two colors.
- Frosting, Part One: On one side of the line, apply the pink frosting. On the other side, apply the blue frosting. Don’t worry about it being perfectly neat yet, just get the color on there.
- Create the Clean Line: Take your clean bench scraper or long offset spatula. Hold it vertically against the side of the cake. In one smooth, confident motion, turn your cake turntable (or walk around the cake) to smooth the frosting and create a crisp line where the two colors meet. Clean your spatula after each swipe!
- The Details: Now for the fun part!
- Using a piping bag with black frosting and a small round tip, pipe on Stitch’s large nose and eyes on the blue side, and Angel’s smaller features on the pink side.
- For the ears and antennae, the easiest method is to cut the shapes out of fondant a day ahead so they can harden. Gently press them into the top of the cake.
- You can use a piping bag with a star tip to add a fluffy, fur-like texture or a simple shell border around the top and bottom edges.
Calories & Nutritional Info

This cake is fueled by chaos, love, and a significant amount of sugar.
- Calories per slice (1/12th of cake): Approximately 650-750 kcal
- Main Benefit: Has been shown to increase levels of happiness, nostalgia, and party-starting energy.
- Note: This is a celebration cake designed to be a showstopper. It’s a treat! Enjoy the delicious, fluffy chaos.
Common Mistakes to Avoid (Don’t Be a Gantu)
Even brilliant scientists make mistakes. Here’s how to avoid some common ones.
- The Murky Middle: Your beautiful blue and pink have blended into a weird, bruised purple color down the middle. This happens when you don’t chill the cake properly after the crumb coat. A cold, firm base is essential for a clean line.
- Sad, Droopy Ears: You tried to make the ears out of pure buttercream, and now they’re melting into sad puddles. Buttercream doesn’t defy gravity. For sturdy ears that stand up, use fondant, ideally with a little tylose powder mixed in to help it harden.
- Using Liquid Food Coloring: You will thin out your frosting and end up with pastel, watery colors instead of the vibrant shades you need. Always use concentrated gel food coloring for deep, true colors without compromising texture.
- Frosting a Warm Cake: I will say this on every cake recipe until the end of time. If you try to frost a cake that is even slightly warm, you will have created a sweet, buttery landslide. Cool. Your. Cake. Completely.
Variations & Customizations (More Experiments!)
Ready to create your own unique experiment?
- Tropical Flavor Twist: Infuse the cake with Hawaiian vibes! Add ½ cup of pineapple juice to the milk and fold 1 cup of shredded coconut into the batter. A pineapple filling between the layers would be chef’s kiss.
- ʻOhana Cupcake Crew: Instead of one big cake, make a batch of cupcakes. Frost half of them blue for Stitch and half of them pink for Angel. It’s perfect for parties and easier to serve.
- Marbled Mayhem Surprise: For a fun surprise inside, divide your cake batter in two before baking. Tint one half light blue and the other light pink. Alternate spooning the batters into the cake pans to create a marbled effect.
FAQ Section: Your Questions for Jumba Jookiba
- What flavor is a Stitch and Angel cake? It can be any flavor you like! I use a classic vanilla cake because it’s a crowd-pleaser, but a coconut, pineapple, or even a blue-colored (using butterfly pea powder) vanilla cake would be amazing and on-theme.
- Can I make this cake using fondant instead of buttercream? Yes, you can cover the entire cake in fondant for a super-smooth look. You’d cover half in blue and half in pink. It’s a different skillset but looks very clean and professional.
- What’s the best way to make the ears stand up? Fondant is your best bet. Roll it out, cut the shapes, and you can insert a toothpick or a piece of dry spaghetti into the bottom of each ear. Let them dry completely for 24 hours before inserting them into the chilled cake.
- Is this cake hard for a beginner baker? I’d call it an “enthusiastic beginner” project. The cake and frosting are simple. The decorating just takes a bit of patience. If you follow the steps, you can totally do it!
- How do I get the frosting so smooth? A chilled crumb coat is the number one secret. After that, using a bench scraper on the sides and a long offset spatula on the top is key. And remember, a little imperfection just adds to the chaotic charm of Stitch!
- Can I make this cake a few days ahead of my party? Yes! You can bake the cake layers, let them cool, wrap them well, and freeze them for up to a month. You can frost the cake a day before the event and keep it in the fridge.
- How should I store the finished cake? Due to the buttercream, you should store the cake in a cake carrier or loosely covered in the refrigerator. Let it sit at room temperature for 30-60 minutes before serving for the best taste and texture.
Final Thoughts
You did it. You wrestled with butter, sugar, and food coloring and created a masterpiece of adorable, edible chaos. You’ve made a cake that proves that even things that are a little weird and different can be the most wonderful.
Now, go gather your ʻohana. Because ʻohana means family, and family means nobody gets left behind… or gets a smaller slice of cake. Enjoy every last, fluffy bite.