The Simple Cake Design Guide for People Who Can’t Pipe a Straight Line
You’ve done the hard part. You baked a cake, and it didn’t come out of the oven looking like a charcoal briquette. Congratulations! But now it’s sitting there on your counter, naked and afraid, and you’re scrolling through Pinterest, looking at cakes with more architectural integrity than your house. You see the flawless piping, the intricate sugar flowers, and you just… give up and decide to call it “rustic.” Sound familiar? Well, today we’re reclaiming cake decorating for the rest of us with this guide to simple cake design.
Forget the fondant nightmares and the piping-induced hand cramps. We are going to explore a few ridiculously easy, yet stunningly beautiful, ways to decorate a cake that require almost zero artistic talent. This isn’t about becoming a master pastry chef overnight; it’s about learning the secrets to a beautiful simple cake design that will make everyone think you are.
Why Simple is the New Stunning
So, why are we embracing simplicity? Why should you put down that complicated-looking piping tip?
First, it’s maximum “wow” for minimum effort. The techniques we’re going to cover look incredibly chic and intentional. A cake with beautiful, swoopy frosting or a perfect cascade of fresh berries looks way more impressive than a cake with a few sad, lopsided piped rosettes. You’ll be working smarter, not harder.
Second, you literally don’t need any special skills. Can you spread frosting with a spatula or the back of a spoon? Can you strategically place a berry? Can you, and I mean this seriously, just dump sprinkles on a cake? Then you have all the qualifications you need. This is stress-free decorating at its finest.
Finally, these designs are timeless and versatile. They work for birthdays, anniversaries, holidays, or a “congrats on making it through Monday” cake. They look great on a rich chocolate cake, a light lemon cake, or even a store-bought cake you need to zhuzh up in a hurry.
The Baker’s Palette: What You’ll Need

To create your work of art, you need a canvas and some “paint.”
- The Canvas (The Cake):
- One baked and cooled 8-inch layer cake. A simple vanilla or yellow cake is a perfect canvas, but any flavor works. I’ll include a simple vanilla recipe below.
- Simple Vanilla Cake: 2 ½ cups all-purpose flour, 2 tsp baking powder, ½ tsp salt, 1 cup softened butter, 1 ½ cups sugar, 4 eggs, 1 cup buttermilk, 2 tsp vanilla extract.
- The “Paint” (The Frosting):
- One batch of simple American Buttercream. This stuff is easy to make, easy to color, and perfect for these techniques.
- Buttercream Recipe: 1 ½ cups softened butter, 4-5 cups sifted powdered sugar, ¼ cup milk or cream, 2 tsp vanilla, pinch of salt.
- The Art Supplies (The Fun Stuff!):
- Sprinkles! Jimmies, nonpareils, sanding sugar, chunky sprinkles—get a variety.
- Fresh fruit: Berries like strawberries, raspberries, and blueberries are perfect.
- Fresh herbs: A sprig of rosemary or mint adds a touch of elegance.
- Good-quality chocolate and heavy cream for an optional (but easy) drip.
The Minimalist’s Toolbox
The best part about simple cake design is that you don’t need a ton of gear.
- Cake Turntable: This is the one tool that will make your life infinitely easier.
- Offset Spatula: For applying frosting.
- Bench Scraper: The secret to getting those smooth sides for your canvas.
- A regular spoon or a small spatula.
- Squeeze Bottle (optional, for the chocolate drip).
Step-by-Step Instructions: Let’s Decorate!
First things first, you need a canvas. Bake your favorite 8-inch layer cake and let it cool completely. Whip up your buttercream. Now, let’s get to the fun part.
H3: First, A Perfect Canvas
- Level and Stack: If your cake layers have a dome, level them with a serrated knife. Place the first layer on your turntable.
- Fill and Crumb Coat: Add a layer of frosting, then top with your second cake layer. Apply a thin layer of frosting all over the cake to trap the crumbs. This is your crumb coat.
- Chill Out: Pop the cake in the fridge for at least 30 minutes. This firms up the crumb coat and is the secret to a clean final layer of frosting.
- The Final Coat: Apply a generous, final layer of frosting. Use your bench scraper to get the sides nice and smooth, and your offset spatula for the top. Now you have a blank canvas, ready for art.
H3: Simple Cake Design 1: The Swoops and Swirls
This is the easiest and, IMO, one of the most beautiful techniques.
- After applying your final coat of frosting, simply take the back of a spoon or a small offset spatula.
- Gently press the tip into the frosting and “swoop” or “swoosh” it upwards or in a spiral pattern.
- Continue this all around the cake. Don’t overthink it! The beauty is in the organic, slightly random texture. It’s elegant, rustic, and takes literally two minutes.
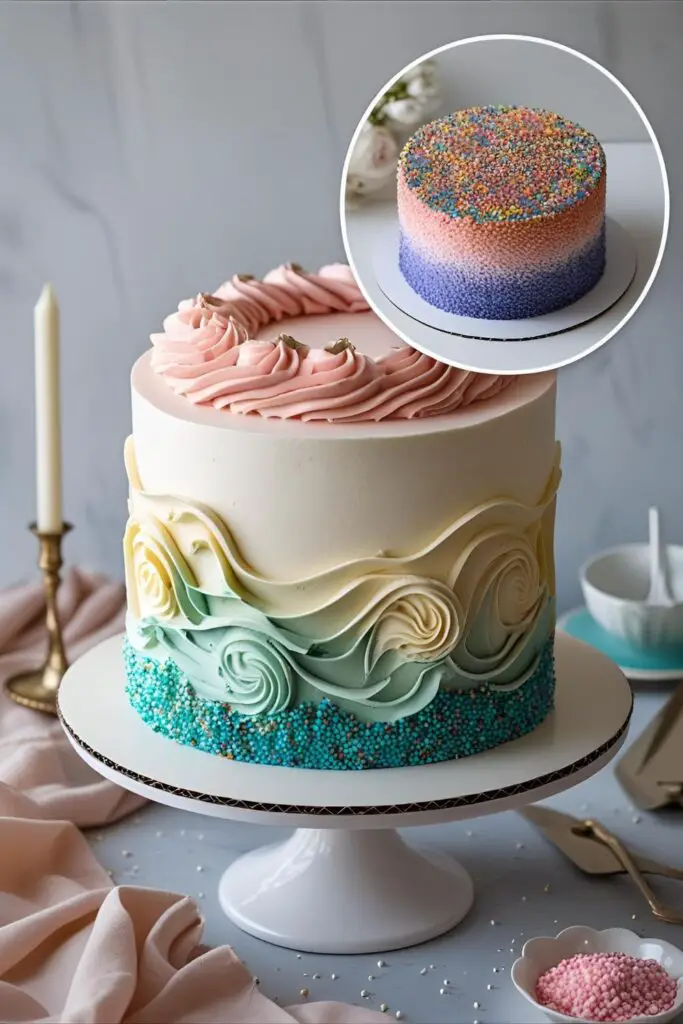
H3: Simple Cake Design 2: The Sprinkle Ombre
This looks so impressive, but it’s just playing with sprinkles.
- Frost your cake with smooth sides.
- Choose 3-4 types of sprinkles in a similar color family (e.g., light pink, dark pink, red, and white).
- Place your cake (on its stand) on a large baking sheet to catch the mess.
- Take your darkest sprinkle color and, using your hand, gently press the sprinkles onto the bottom 1-2 inches of the cake.
- Take the next lightest color and apply it just above the first layer, overlapping slightly.
- Continue with the lighter colors as you move up the cake, leaving the top portion plain or with just a few sparse sprinkles. It’s a beautiful, modern gradient effect!
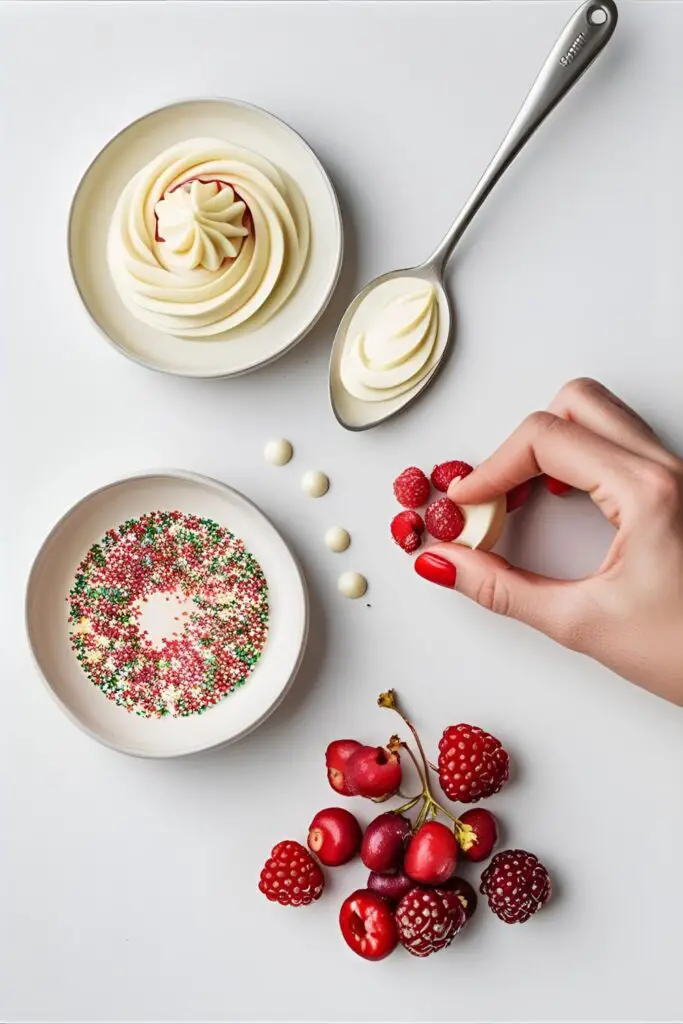
H3: Simple Cake Design 3: The Rustic Fruit & Herb Topper
This design is fresh, beautiful, and a total classic.
- Frost your cake smoothly or with the “swoop” technique.
- Wash and thoroughly dry your fresh berries.
- Create a beautiful, organic pile or a crescent moon shape on top of the cake with the berries. Think about varying the heights and textures.
- Tuck in one or two small sprigs of fresh mint or rosemary. The pop of green makes it look incredibly professional. That’s it. You’re done.
Calories & Nutritional Info

It’s a cake. Let’s not ruin a good time with facts.
- Calories: A slice of simple vanilla cake with buttercream will be around 500-700 calories.
- Nutritional Value: Contains happiness, joy, and the satisfaction of creating something beautiful.
- Serving Suggestion: Best served to impressed friends and family.
Common Mistakes to Avoid (Or, How to Keep it Simple, Stupid)
- Overthinking It: The whole point of a simple cake design is that it’s supposed to look organic and effortless. If you try to make every swoop perfect or every sprinkle perfectly aligned, you’ll drive yourself crazy and ruin the effect. Embrace the imperfection.
- A Messy Canvas: No matter how simple your design, it won’t look good on a messy canvas. Don’t skip the crumb coat and chill step. It’s the key to a clean final coat of frosting without any pesky crumbs.
- Sprinkle Bleed: If you’re using nonpareils (the little balls), be aware that their color can bleed into light-colored frosting over time. Jimmies (the long sprinkles) are usually a safer bet.
- A Crowded Mess: Less is more. Don’t try to do swoops AND an ombre AND a fruit pile. Pick one simple cake design and let it be the star of the show.
Variations & Customizations
Feel like mixing and matching? These simple designs play well together.
- Swoops & Fruit: Create the beautiful textured swoops all over your cake, then add a simple, small cluster of fresh berries and a mint sprig right in the center. It’s rustic-chic perfection.
- The Minimalist Drip: Frost your cake with smooth sides. Create a simple, elegant chocolate drip (just equal parts hot cream and chopped chocolate, stirred until smooth and cooled slightly). This plus a single perfect strawberry on top is a whole mood.
- Monochromatic Magic: Use different shades of the same color for your design. For example, a light blue cake with a sprinkle ombre using various shades of blue sprinkles. It’s a very modern and chic look.
FAQ: Your Simple Questions, Answered
Let’s demystify some cake decorating basics.
H3: What’s the easiest frosting for beginners?
A simple American buttercream (butter, powdered sugar, milk, vanilla) is by far the easiest. It’s stable, easy to color, and requires no special techniques like cooking sugar or whipping egg whites.
H3: How do I get really smooth sides on my cake?
A crumb coat, a cake turntable, and a bench scraper are the holy trinity. The turntable allows for smooth, continuous motion, and the bench scraper gives you a perfectly straight edge.
H3: How do I apply sprinkles without them getting everywhere?
Place your cake on a large, rimmed baking sheet before you start. This will catch 90% of the runaway sprinkles, making cleanup a breeze.
H3: What is the absolute easiest way to decorate a cake?

The “swoops and swirls” method. All it requires is a frosted cake and a spoon. It’s virtually impossible to mess up and always looks beautiful.
H3: Can I use these simple cake design ideas on a store-bought cake?
YES! This is the ultimate hack. Buy a plain, frosted cake from the grocery store bakery, bring it home, and add your own rustic fruit topper or beautiful sprinkle design. Instant upgrade!
H3: How do I keep fresh fruit from making the cake soggy?
Make sure your fruit is washed and patted completely dry before you place it on the cake. Also, it’s best to add the fruit within a few hours of serving.
H3: What’s the easiest way to do a chocolate drip?
Melt equal parts (by weight) of chopped chocolate and hot heavy cream. Let it sit for 5 minutes, then stir until smooth. Let it cool until it’s slightly warm but not hot, then pour it into a squeeze bottle for easy application on a chilled cake.
Final Thoughts: You Are Now a Cake Designer
And there you have it. You are now officially a cake designer. You have the power to transform any humble cake into a work of art using simple, stress-free techniques. You can walk into any party, cake in hand, with the quiet confidence of someone who knows they have the best-looking dessert in the room.
So go on, embrace the swoops, play with the sprinkles, and have fun with it. Because a beautiful cake shouldn’t be a source of stress; it should be a source of joy—both to make and to eat.