Hey there, fellow food enthusiast! Have you ever grilled or pan-fried a beautiful steak, only to slice into it and find a sad, gray band just under the crust, with only a small pink center? Or worse, a steak that’s overcooked on the outside but still raw in the middle? Ugh. It’s frustrating, right? But what if I told you there’s a method that guarantees edge-to-edge, perfectly cooked meat with an incredible, crispy crust every single time? Yep, it’s called the reverse sear, and today we’re focusing on how to execute a flawless reverse sear steak in oven. This technique will elevate your home-cooked steaks from “pretty good” to “OMG, you made this?!”
Why Reverse Sear? The Science Behind the Sizzle
Traditional steak cooking usually involves a quick, high-heat sear, followed by lowering the heat to finish the steak. This often results in that undesirable gray band. The reverse sear steak method flips that script entirely, and the science behind it is fascinatingly simple, yet profoundly effective.
Even Cooking: Farewell, Gray Bands!
The primary genius of the reverse seared steak method lies in its low and slow initial cook. You start your steak in a relatively cool oven. This gentle heat gradually brings the internal temperature of the steak up to your desired doneness, ensuring a consistent color and temperature throughout the entire cut, from edge to edge. Think of it as a slow, tender hug for your steak. No shocking temperature changes, no stressed-out muscle fibers, just perfectly uniform doneness. This is how you achieve that coveted medium rare steak in oven perfection, without the guesswork.
The Perfect Crust: That Maillard Magic
After the gentle oven bake, your steak emerges looking a bit… well, pale. But don’t you dare touch that perfectly even, beautiful, slightly raised temperature! This is where the second act, the high-heat sear, comes in. Because the steak is already at the correct internal temperature (or very close), you can now blast it with intense heat for a short period. This rapid searing creates the glorious, deeply browned, flavorful crust known as the Maillard reaction, without overcooking the interior. It’s crispy, savory, and exactly what you crave from a steakhouse. This is the ultimate technique for seared steak that truly delivers.
More Forgiving: Less Stress, More Steak
Compared to traditional high-heat searing where a minute too long can ruin your steak, the reverse sear steak in oven method is incredibly forgiving. The slow oven cook gives you a wider window to pull the steak at its target temperature. This means less stress for you and more consistent results. This makes cooking ribeye steak or any other thick cut far less intimidating, even for beginner cooks. You’ll be hitting those ideal steak times like a seasoned pro!
The Right Cut: Your Steak’s Starring Role

While reverse searing can improve almost any steak, some cuts are simply made for this method. Generally, you want a steak that’s at least 1.5 inches thick (ideally 2 inches or more) for the reverse sear to truly shine. Thinner steaks cook too quickly in the oven for the method to be as effective.
- Ribeye: The King of Flavor: The Ribeye steak is often considered the prime candidate for reverse searing. Its generous marbling (intramuscular fat) renders beautifully during the slow oven cook, making the steak incredibly tender and flavorful. Then, that fat crisps up during the sear, creating a truly sensational crust. If you’re looking for a reverse sear ribeye experience, this is it!
- New York Strip: Leaner, But Still Meaner: The New York Strip Steak (or Ny Strip Steak) is another excellent choice. It has a nice balance of tenderness and chew, with a distinct fat cap along one side that gets wonderfully crispy when seared. If you’re tackling New York Steak Recipes Cast Iron, reverse searing is a top contender.
- Porterhouse: For the Truly Ambitious: A Porterhouse steak recipe demands respect, and the reverse sear delivers. This cut combines a tenderloin on one side and a New York Strip on the other. Reverse searing helps achieve even doneness across both distinct muscle types.
- Sirloin: A Budget-Friendly Star: While leaner, a thick Sirloin Steak can also benefit greatly from the reverse sear, especially if you’re exploring Sirloin Steak Recipes. It helps ensure tenderness where traditional methods might leave it a bit tough.
- Thickness Matters! (Crucial for Reverse Sear Steak): As mentioned, the thicker the steak, the more pronounced the benefits of reverse searing. A 2-inch thick reverse seared ribeye steak will achieve a much more dramatic temperature gradient and a superior crust than a 1-inch steak using this method.
Essential Equipment: Gear Up for Greatness
You don’t need a professional kitchen, but a few key pieces of equipment make the reverse sear process a breeze.
- The Oven: Your trusty oven, set to a low temperature.
- Wire Rack & Baking Sheet: Place your steak on a wire rack set inside a rimmed baking sheet. This allows air to circulate around the entire steak during the oven phase, ensuring even cooking.
- The Cast Iron Advantage: Medium Rare Steak Cast Iron Ready: For the searing phase, a cast iron skillet is non-negotiable. It gets incredibly hot and retains heat like no other pan, delivering that deep, glorious crust. If you don’t have one, a very heavy-bottomed, oven-safe stainless steel skillet can work, but seriously, invest in cast iron. It’s a game-changer for seared ribeye steak cast iron perfection.
- The Thermometer: Your Best Friend: An instant-read meat thermometer is absolutely essential for reverse searing. This method relies on precise internal temperature. Guessing will lead to disappointment, and we don’t want that!
Prep Perfection: Getting Your Steak Ready
These steps might seem minor, but they are crucial for a successful reverse sear steak in oven. Don’t skip them!
- The Chill-Out Session: Room Temperature Rules (Optional, but Recommended): While reverse searing is forgiving, letting your steak sit out at room temperature for 30-60 minutes before it goes into the oven can help it cook more evenly from the very beginning. This isn’t as critical as with traditional searing, but it still contributes to perfection.
- The Dry Truth: No Moisture, No Mercy (for the crust!): Pat your steak aggressively dry with paper towels. I mean, bone dry. Any surface moisture will create steam in the oven and especially in the searing pan, preventing that beautiful, crispy crust from forming. Moisture is the enemy of sear.
- Seasoning Liberally: Flavortown Express: Don’t be shy with the seasoning. Coarse salt (like kosher or sea salt) and freshly cracked black pepper are your best friends. Sprinkle generously on all sides. You can also add garlic powder or onion powder. For an even deeper flavor, consider a “dry brine” by salting the steak a few hours or even overnight in the fridge. This further draws out moisture and allows the salt to penetrate deeper.
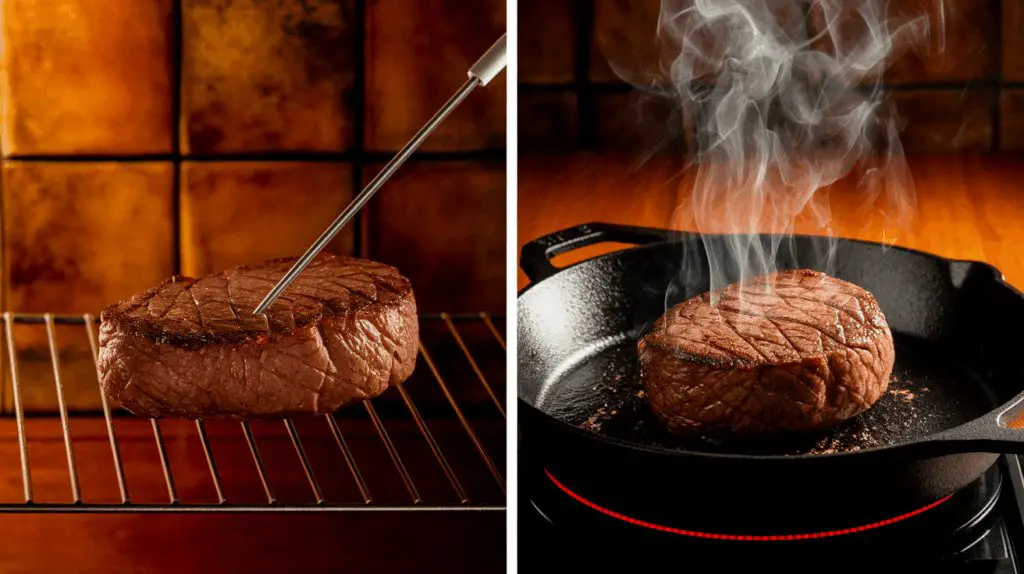
The Oven Phase: The Gentle Ascent to Perfection
This is where the reverse sear truly begins. It’s low, it’s slow, and it’s where the magic of even cooking happens.
- Preheat Your Oven Low and Slow: Set your oven to a low temperature, typically 225°F (107°C) or even 250°F (120°C). Accuracy matters here, so if you have an oven thermometer, use it.
- Place Steak on Rack: Put your seasoned, patted-dry steak on the wire rack over the baking sheet.
- Bake to Target Temperature: Place the steak in the preheated oven. Now, bake until the internal temperature reaches about 10-15 degrees below your desired final doneness. This is where your instant-read thermometer comes in!
- For medium rare steak in oven (final target 130-135°F), pull it from the oven when it hits 115-120°F (46-49°C).
- For medium (final target 135-140°F), pull it at 120-125°F (49-52°C).
- Steak Times in the oven will vary greatly depending on steak thickness, oven calibration, and starting temperature. For a 1.5-inch thick steak, this could take anywhere from 30-60 minutes. For a 2-inch steak, it might be 45-75 minutes. Don’t rely on time; rely on the thermometer!
- Rest (Briefly!): Once the steak reaches its pre-sear target temperature, remove it from the oven and let it rest on the rack for 10-15 minutes. This short rest allows the surface to cool slightly and any internal moisture to equalize, which will help with an even better sear.
The Searing Finale: Building That Bark
This is the high-octane part, where you create that show-stopping, crusty exterior. You’re just minutes away from juicy steak glory!
- Preheat Your Cast Iron Skillet: While the steak is resting, place your cast iron skillet on your stovetop over high heat. Let it heat up for a good 5-10 minutes, until it’s smoking lightly. You want it screaming hot!
- Add High Smoke Point Oil: Add a tablespoon or two of high smoke point oil (grapeseed, avocado, canola) to the hot pan. It should shimmer immediately.
- Sear the Steak: Carefully place the steak into the smoking hot pan. It should sizzle intensely!
- Sear for 60-90 seconds per side. Don’t move it during this time. You’re going for deep browning.
- For a thick reverse seared ribeye steak, you might sear the sides too, standing it up on its edges for 30-60 seconds each, to get that all-around crust. This is where your seared ribeye steak cast iron technique really shines!
- The Butter Bath: Flavor Infusion (Optional, but Divine!): For the last 30-60 seconds of searing, drop in a knob of unsalted butter (1-2 tablespoons), a few smashed garlic cloves, and a sprig of fresh rosemary or thyme. Tilt the pan slightly and use a spoon to continuously baste the steak with the melting, aromatic butter. This adds incredible flavor and further aids in crust development.
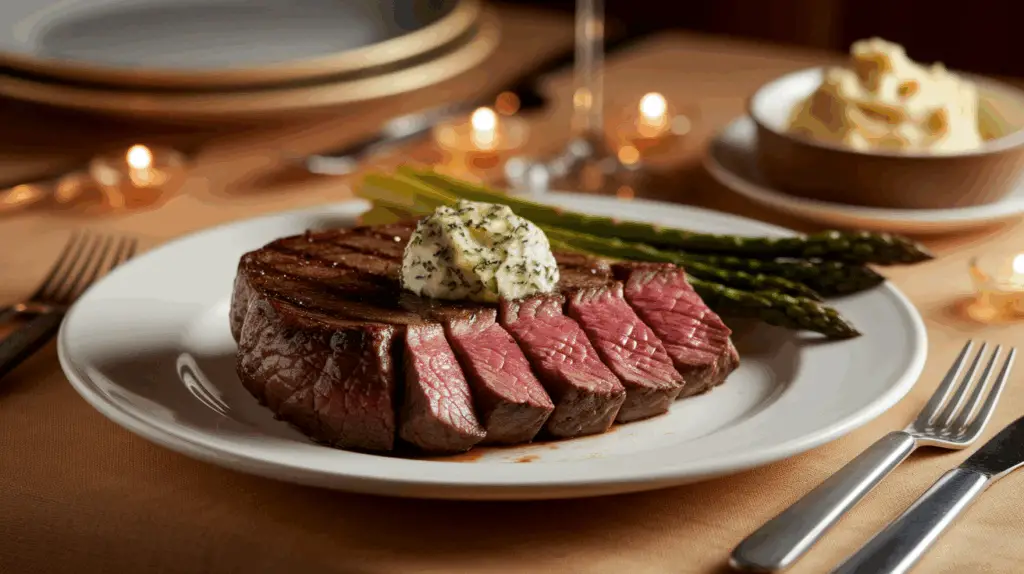
The Rest is Best: Patience, My Friend!
You’ve done it! The steak is cooked, the crust is perfect. But don’t you dare cut into it yet!
- Rest, Rest, Rest: Immediately transfer the seared steak to a clean cutting board. Tent it loosely with foil (don’t wrap it tightly, or you’ll steam the crust).
- Time: Let it rest for 5-10 minutes for a 1.5-inch steak, longer for thicker cuts (up to 15 minutes for a 2-inch steak or porterhouse steak recipe).
- Why? This is crucial for juicy steak. During searing, the juices rush to the center. Resting allows those juices to redistribute throughout the meat, ensuring every bite is tender and moist. If you cut too soon, all those delicious juices will spill onto your board. You didn’t work this hard for juice on a cutting board, did you?!
Reverse Searing Other Cuts & Beyond
The reverse sear technique isn’t just for classic steakhouse cuts. It’s adaptable and fantastic for various other beef types!
- New York Steak Recipes Cast Iron & Strip Steak Recipe: As mentioned, these cuts are prime candidates. They benefit immensely from the even cook and superior crust this method provides.
- Thinner Cuts: Flank Steak and Skirt Steak Considerations: While reverse searing is best for thicker steaks, you can adapt the principle for Flank Steak or Skirt Steak. Instead of a low oven, you might do a very brief warm-up in a low oven (5-10 minutes) just to take the chill off and ensure a more even starting temp, then proceed with the high-heat sear. These cuts are often best for quick, hot cooking anyway due to their grain structure.
- What About a New York Strip Steak Roast? For a larger New York Strip Steak Roast or a much thicker prime rib, the principle of low and slow then high heat still applies, but you’re now talking about a true roast, not an individual steak. The initial oven cook will be much longer, and the final sear might be done by cranking the oven up to high or on a very large flat-top grill.
- The Ultimate Indulgence: Wagyu Steak: If you’re lucky enough to get your hands on Wagyu Steak or Wagyu Beef, reverse searing is a fantastic method. The high fat content of Wagyu renders beautifully at lower temperatures, leading to an incredibly tender result, and the final sear creates a delicate crust without burning the precious fat.
- Reverse Sear vs. Sous Vide Cooking: Both reverse searing and Sous Vide Cooking aim for edge-to-edge doneness. Sous vide achieves it by precisely cooking the steak in a temperature-controlled water bath, then searing. Reverse searing achieves it in a low oven, then searing. Both are excellent, but reverse searing requires less specialized equipment than sous vide. If you don’t have a sous vide machine, the reverse sear is your next best friend for perfection.
- Pellet Grill Ribeye Steaks: If you’re a grill enthusiast, the reverse sear concept is also widely used for Pellet Grill Ribeye Steaks. Pellet grills excel at maintaining low, consistent temperatures, making them perfect for the “low and slow” phase, followed by a blast of high heat for the sear. It’s the same principle, just a different heat source!
Common Mistakes to Avoid
Even with a foolproof method, a few missteps can derail your steak journey.
- Not Patting Dry: Seriously, this is a non-negotiable. Wet steak won’t sear.
- Not Using a Thermometer: Guessing doneness is the fastest way to disappointment. Get an instant-read thermometer.
- Rushing the Oven Phase: Patience, young padawan! The low-temp bake needs time to work its magic.
- Not Resting the Steak: You’ve done all that work, don’t let the juices run out on your cutting board. Rest that steak!
- Not Getting the Pan Hot Enough for the Sear: A lukewarm pan will just steam your steak, not sear it. Get it smoking!
- Overcrowding the Pan: If cooking multiple steaks, work in batches. Crowding lowers the pan temperature and prevents a proper sear.
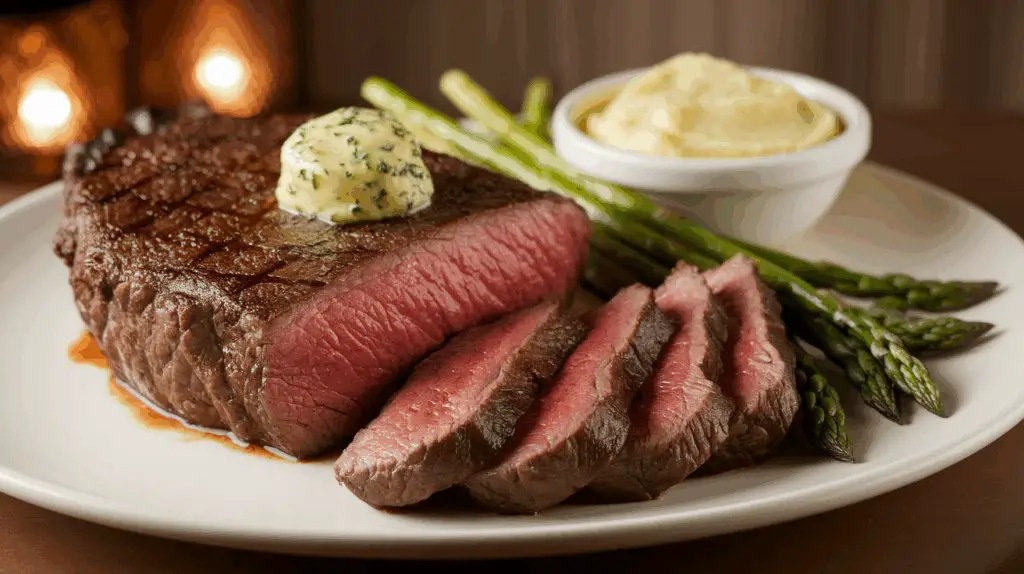
What to Serve With Your Masterpiece
A perfect steak deserves perfect accompaniments. Your reverse sear steak in oven will shine with these delicious pairings:
- Classic Sides: Creamy mashed potatoes, crispy roasted asparagus or broccoli, a fresh green salad with a bright vinaigrette.
- Sauces: A simple pan sauce made by deglazing the skillet with a splash of wine or broth, or a compound butter (think garlic-herb butter or blue cheese butter) melting on top.
- Potatoes Galore: From classic baked potatoes to crispy smashed potatoes, the humble spud is always a welcome companion.
- Grilled Veggies: If you still want that grill flavor, quickly grill some bell peppers, onions, or zucchini while your steak rests.
Frequently Asked Questions
Q1: What does “reverse sear” mean for steak? A1: Reverse searing means cooking a steak slowly at a low temperature in the oven until it reaches almost the desired internal doneness, then finishing it with a quick, high-heat sear on the stovetop or grill to develop a crispy crust.
Q2: What is the best temperature for reverse searing steak in the oven? A2: The best oven temperature for reverse searing steak is typically between 225°F (107°C) and 275°F (135°C). A lower temperature allows for a more even cook and a wider window for pulling the steak.
Q3: How long does reverse searing a steak take? A3: The total time for reverse searing varies greatly by steak thickness. For a 1.5-inch steak, it can take 30-60 minutes in the oven, plus 2-4 minutes for searing. A 2-inch steak might take 45-75 minutes in the oven. Always use a meat thermometer.
Q4: Do I need a cast iron skillet for reverse searing? A4: While not strictly mandatory, a cast iron skillet is highly recommended for the searing step of the reverse sear method. Its ability to get and retain very high heat ensures the best possible crust.
Q5: What internal temperature should I aim for when reverse searing for medium-rare? A5: For a final medium-rare (130-135°F / 54-57°C), remove the steak from the oven when it reaches 115-120°F (46-49°C). The temperature will rise during searing and resting.
Q6: What kinds of steaks are best for reverse searing? A6: Thicker cuts of steak (at least 1.5 inches thick), such as ribeye, New York strip, porterhouse, and thick sirloin, are ideal for reverse searing because they benefit most from the slow, even cooking.
Q7: Is it necessary to rest the steak after reverse searing? A7: Yes, resting the steak after reverse searing is crucial. It allows the juices to redistribute throughout the meat, ensuring a tender and juicy final result. Rest for 5-15 minutes depending on thickness.
Conclusion
So there you have it, aspiring steak master! Mastering the reverse sear steak in oven is truly a game-changer for anyone who loves a perfectly cooked steak. It eliminates the dreaded gray band, delivers an unparalleled crispy crust, and consistently produces a juicy, tender interior. With a good thermometer, a hot cast iron skillet, and a little patience, you’ll be cooking steaks that rival your favorite steakhouse. Go forth, practice this magical method, and prepare for some serious steak envy from your dinner guests! Happy searing! 🙂