The Ultimate Red Birthday Cake: A Guide to Delicious Drama
Let’s talk about cakes that make an entrance. Some cakes are shy, content to sit quietly in the corner. And then there are the cakes that kick down the door, wearing a fabulous feather boa, and demand to be the center of attention. That, my friends, is a red birthday cake.
There is nothing subtle about a red cake. It’s the color of passion, of celebration, of drama. It’s the cake you make when you want to make a statement. But for too long, we’ve been let down by sad, brownish-maroon imposters that only vaguely hint at the vibrant dessert they’re supposed to be.
No more. Today, we’re reclaiming the color red. We are making a truly, unapologetically, gloriously vibrant Red Velvet cake that is as intensely delicious as it is stunning to look at. This is your guide to baking a masterpiece that doesn’t just whisper “happy birthday”—it belts it from the rooftops.
Why This Recipe Is an Absolute Showstopper
In a world full of cake options, why is this specific red birthday cake the one you need to master?
First and foremost, the flavor is iconic and unbeatable. This is the real deal: a classic Red Velvet cake with a moist, tender crumb, a subtle hint of cocoa, and that signature tangy finish. Paired with a rich, smooth, and tangy cream cheese frosting, it’s a flavor combination that is beloved for a reason. It is, IMO, perfect.

Second, it is a visual knockout. We’re not messing around with weak food coloring here. This recipe is designed to produce a stunning, deep crimson crumb that provides a breathtaking contrast to the pristine white frosting. It’s a cake that elicits gasps when you cut the first slice.
Finally, it’s a lesson in delicious science. This isn’t just a vanilla cake with red food coloring. The unique combination of buttermilk, vinegar, and cocoa powder creates a chemical reaction that results in an incredibly soft, velvety texture. You’re not just baking; you’re a culinary chemist creating perfection.
The Ingredients for a Crimson Masterpiece
To create the ultimate red birthday cake, you need the right lineup of classic ingredients.
For the Vibrant Red Velvet Cake:
- 2 1/2 cups cake flour (for a finer, more velvety crumb)
- 1 1/2 cups granulated sugar
- 1 teaspoon baking soda
- 1 tablespoon unsweetened cocoa powder (just enough for flavor!)
- 1 teaspoon salt
- 2 large eggs, room temperature
- 1 1/2 cups vegetable oil
- 1 cup buttermilk, room temperature
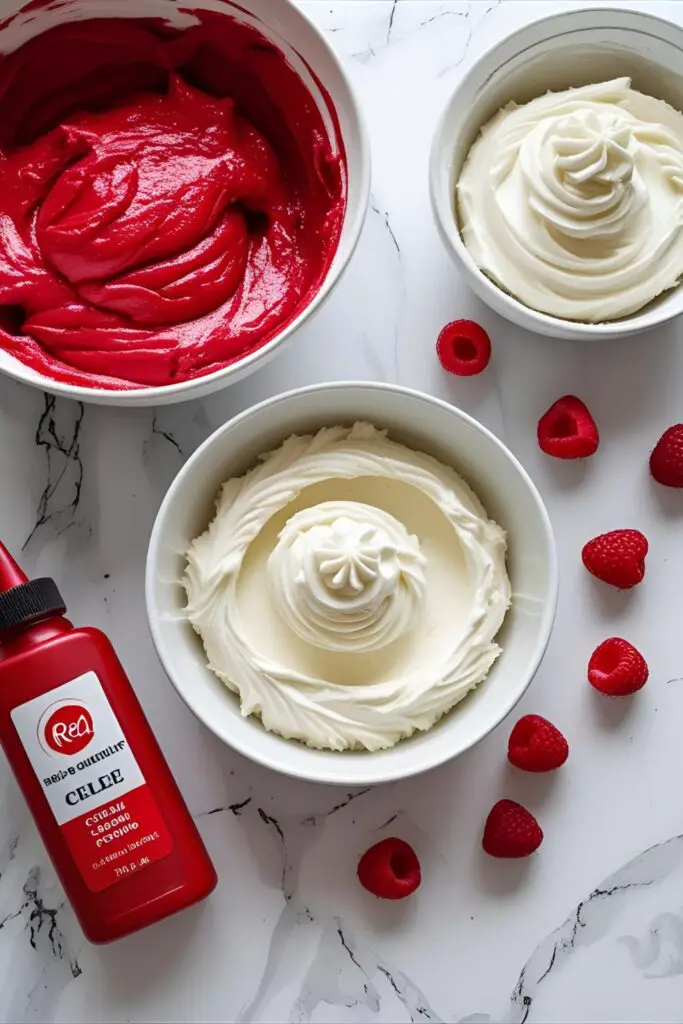
- 1 tablespoon (1/2 oz) red gel food coloring (the good stuff!)
- 1 teaspoon white vinegar
- 1 teaspoon vanilla extract
For the Perfect Cream Cheese Frosting:
- 16 oz (2 blocks) full-fat, brick-style cream cheese, softened
- 1 cup unsalted butter, softened
- 4-5 cups powdered sugar, sifted
- 2 teaspoons vanilla extract
- A pinch of salt
The Baker’s Toolkit
You don’t need a professional lab, but these tools will ensure a successful experiment.
- A Stand Mixer: A powerful KitchenAid Stand Mixer is your best friend for creating a smooth, emulsified cake batter and a perfectly whipped, lump-free cream cheese frosting.
- Round Cake Pans: Two 9-inch round cake pans are the classic size for this party-starting cake.
- A Sifter: For sifting your dry ingredients. This is especially important for the cocoa powder to prevent any lumpy bits in your final cake.
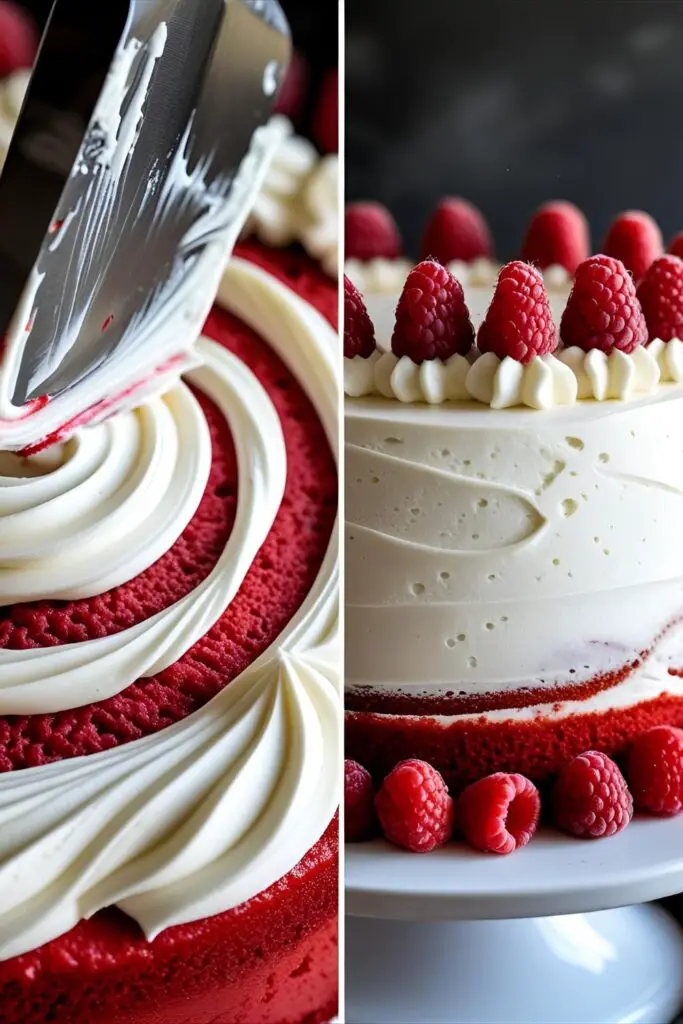
- An Offset Spatula and Bench Scraper: The essential duo for achieving a flawless, professional frosting finish on your red birthday cake.
- High-Quality Red Gel Food Coloring: This is the most crucial “tool” for this recipe. A brand like Americolor Super Red or Chefmaster will give you a vibrant color without a bitter aftertaste.
Step-by-Step: The Path to Red Velvet Royalty

Ready to create some edible drama? Let’s get to it.
Part 1: The Red Velvet Foundation
Step 1: Prep Your Station Preheat your oven to 350°F (175°C). Grease and flour your cake pans. In a large bowl, sift together the cake flour, sugar, baking soda, cocoa powder, and salt.
Step 2: The Red Elixir In a separate medium bowl, whisk together the eggs, oil, buttermilk, red gel food coloring, vinegar, and vanilla until it’s a uniform, gloriously red liquid.
Step 3: Combine and Conquer Pour the wet ingredients into the dry ingredients and beat on medium speed for about two minutes, until the batter is smooth and well combined. Scrape down the sides of the bowl to make sure everything is incorporated.
Step 4: Bake to Perfection Divide the batter evenly between your two prepared pans. Bake for 30-35 minutes, or until a toothpick inserted into the center comes out clean. Let the cakes cool in the pans for 15 minutes before turning them out onto a wire rack to cool completely.
Part 2: The Frosting and Final Assembly
Step 5: The Cream Cheese Dream While the cakes cool, make the frosting. In your stand mixer, beat the softened cream cheese and butter together on high speed for 5 minutes until very light and smooth. On low speed, gradually add the sifted powdered sugar. Once incorporated, add the vanilla and salt and beat on high for another 2-3 minutes until incredibly fluffy.

Step 6: The Grand Assembly Level your completely cooled cake layers if they have a dome. Place one layer on your serving platter. Top with a thick, generous layer of cream cheese frosting. Place the second layer on top.
Step 7: The Snowy Finish Apply a thin “crumb coat” of frosting all over the cake to trap any red crumbs. Chill the cake for 30 minutes. After chilling, apply a final, generous coat of frosting. You can either use a bench scraper to make it perfectly smooth or an offset spatula to create beautiful, rustic swirls.
Step 8: The Garnish A classic way to decorate a red birthday cake is to use the cake scraps from leveling. Crumble them up and press them around the base or sprinkle them on top. You can also garnish with fresh raspberries or elegant white chocolate shavings.
Calories & Nutritional Info
A formal report on this crimson creation.
- Serving Size: One dramatic slice.
- Statement-Making Level: 100%
- Calories: It’s a celebration cake. Let’s not ruin the moment with numbers. (But if you must know, it’s about 700 per slice. It’s decadence, darling.)
- Primary Benefit: The ultimate cure for a case of the blahs.
Common Mistakes to Avoid (Don’t See Red)
Let’s keep your cake looking ravishing, not ragged.
- The “Brownish-Velvet” Disappointment: You used weak, liquid food coloring. To get that iconic, vibrant color, you must use a high-quality, concentrated red gel food coloring. There is no substitute.
- The Runny, Weeping Frosting: Your cream cheese frosting is a soupy mess. You used the soft cream cheese from a tub. You must use full-fat, brick-style cream cheese. Also, make sure your butter and cream cheese are softened but still cool, not melty.
- The Dry, Crumbly Crumb: You over-baked your cake. Red Velvet cake has a fine crumb that can dry out if baked for too long. Start checking for doneness a few minutes early.
- The Bitter Bite: Your cake has a slight chemical aftertaste. This can happen with lower-quality red food colorings when you have to use a large amount. Investing in a good “no-taste” red gel color is worth it.
Variations & Customizations
A red birthday cake is a concept. Feel free to play with it!
- The “Bleeding” Red Heart: For an extra dramatic flair, bake the cake in a heart-shaped pan. Add a surprise raspberry coulis filling in the center that “bleeds” beautifully when you cut the first slice.
- The Red and White Ombre: A stunning visual twist. Divide your cream cheese frosting and tint portions into various shades of red and pink. Frost the cake with horizontal stripes of each color, then smooth them together with a bench scraper for a beautiful ombre effect.
- The Natural Red Cake (For the Dye-Averse): If you’re avoiding food coloring, you can achieve a more natural, earthy red by incorporating beet puree into a vanilla or chocolate cake recipe. The flavor is very mild, and the color is surprisingly beautiful.
Frequently Asked Questions (Your Red-Hot Q&A)
You’ve got questions about the ultimate red birthday cake? I’ve got the answers.
1. What flavor is Red Velvet cake, actually? It’s not just vanilla with red dye! A true Red Velvet has a unique flavor profile from the combination of buttermilk, vinegar, and a touch of cocoa powder. It’s slightly tangy with a very mild chocolate note, which is why it pairs so perfectly with cream cheese frosting.
2. How do you make a red cake without a bitter taste? The key is to use a high-quality, “no-taste” red gel food coloring. Brands like Americolor and Chefmaster are popular because you can use a lot to achieve a deep color without a chemical aftertaste.
3. Why did my red velvet cake turn out brown? This is usually one of two culprits: not enough red food coloring, or you used a “natural” cocoa powder instead of Dutch-processed, which can sometimes react with the other ingredients and dull the color. But 99% of the time, the answer is to use more (and better) red gel color.
4. What is the best frosting for a red birthday cake? Cream cheese frosting is the classic, undisputed champion. Its tanginess is the perfect counterbalance to the sweet cake. A Swiss meringue buttercream is another elegant, less-sweet option.
5. Can I make this cake ahead of time? Yes! Red Velvet cake’s flavor actually improves overnight. You can bake the layers up to two days in advance and store them well-wrapped. The fully frosted cake can be made the day before and stored in the fridge.
6. How do you get a truly vibrant red color? Use gel food coloring, not liquid. Be generous with it—you’ll likely need at least a full tablespoon for the vibrant color in this recipe. Also, the color will deepen slightly as the cake bates and the frosting sits.
7. Do I really have to use buttermilk and vinegar? Yes! This is the science part. The acidity in the buttermilk and vinegar reacts with the baking soda to create a super light, tender, and “velvety” crumb. Don’t skip them!
Final Thoughts
Congratulations, you have officially mastered the art of the dramatic entrance… in cake form. You’ve created a bold, beautiful, and unapologetically vibrant red birthday cake that is guaranteed to be the star of any celebration. You’ve learned that the secret to a perfect Red Velvet isn’t just color, but chemistry.
So go on, present your crimson masterpiece. Watch as people’s eyes light up. And when you cut into it and reveal that stunning red crumb, get ready for the applause. You’ve earned it.