Why These Petite Fours Are Seriously Awesome (Tiny But Mighty)
Think petite fours are just for fancy tea parties? Think again! Here’s why mastering petite fours how to make is a seriously awesome skill to have in your culinary arsenal.
First off, they’re the ultimate customizable treat. Cake flavor, filling, glaze, decorations – you control it all! It’s like a mini edible art project.
Second, they’re perfect for practice. Working with layers, frosting, and glazes on a small scale helps you hone your baking and decorating techniques without the pressure of a full-sized cake disaster. Think of it as dessert-based training wheels.
Finally, they make people happy. Seriously, who can resist a perfectly formed, bite-sized piece of deliciousness? They’re like edible little gifts.
The Petite Players (Ingredients)
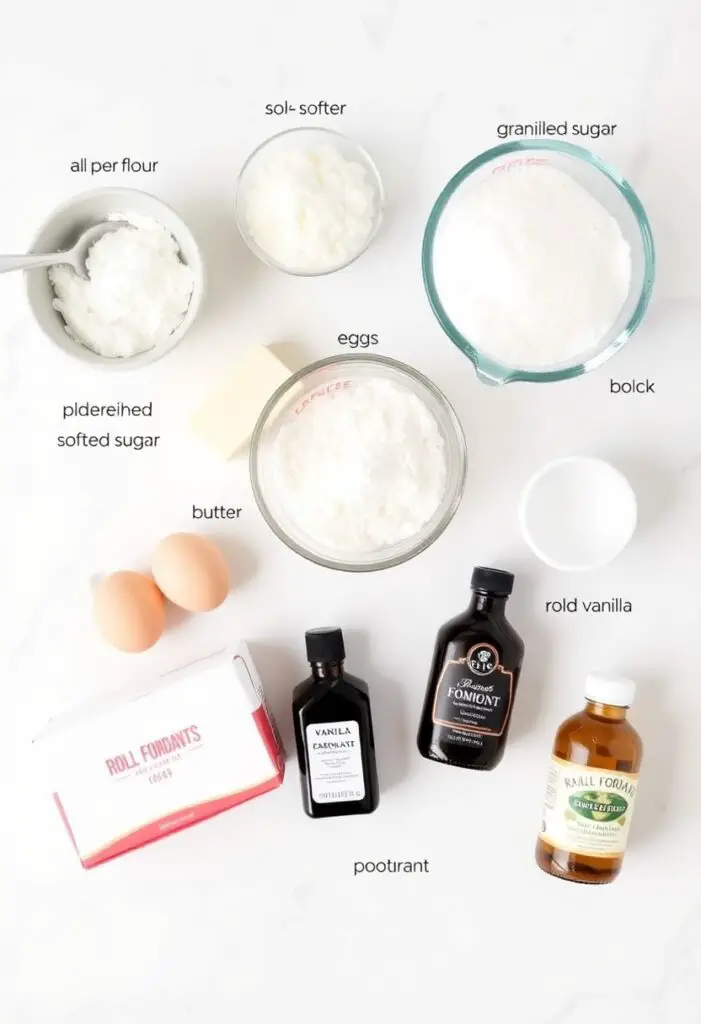
Let’s break down the essentials for our classic vanilla bean petite fours. Feel free to swap in your favorite cake, frosting, and glaze flavors once you’ve got the hang of the technique.
For the Vanilla Bean Cake Layers:
- Unsalted Butter: ½ cup (1 stick), softened.
- Granulated Sugar: ¾ cup.
- Large Eggs: 2.
- Pure Vanilla Extract: 1 teaspoon.
- Vanilla Bean Paste (or seeds from 1 vanilla bean): 1 teaspoon. That vanilla bean is key for that gourmet touch!
- All-Purpose Flour: 1 ½ cups.
- Baking Powder: 1 ½ teaspoons.
- Salt: ¼ teaspoon.
- Whole Milk: ½ cup.
For the Vanilla Bean Buttercream Filling:
- Unsalted Butter: ½ cup (1 stick), softened.
- Powdered Sugar: 2-3 cups (start with 2 and add more for desired thickness).
- Pure Vanilla Extract: 1 teaspoon.
- Vanilla Bean Paste (or seeds from ½ vanilla bean): ½ teaspoon.
- Heavy Cream or Milk: 2-4 tablespoons, just enough to make it smooth and spreadable.
For the Fondant Glaze:
- Ready-Made Rolled Fondant: About 1 pound. Making your own is a whole other adventure for another day!
- Powdered Sugar: For dusting your work surface – essential to prevent sticking.
- Gel Food Coloring: Optional, for adding a pop of color.
Your Petite Fours Assembly Line (Tools & Kitchen Gadgets)

Time to gather your miniature-making tools!
- Electric Mixer (Handheld or Stand Mixer): For whipping up that fluffy goodness.
- Mixing Bowls: In various sizes.
- Rubber Spatulas: For getting every last bit of batter and frosting.
- Measuring Cups and Spoons.
- 9×13 inch Baking Pan: Our cake layer headquarters.
- Parchment Paper: For easy cake removal – trust me on this one.
- Offset Spatula: For smooth frosting application.
- Serrated Knife: For leveling those cake layers like a pro.
- Ruler: Precision is your friend when it comes to petite fours.
- Pizza Cutter or Sharp Knife: For slicing those perfect little squares.
- Small Bowls: For any melted chocolate or decorative elements.
- Wire Rack: For letting the glaze set without creating a sticky situation.
Step-by-Step: From Big Cake to Tiny Treasures
Ready to shrink your desserts? Let’s go!
Step 1: Bake the Cake Layers (The Foundation)
Preheat your oven to 350°F (175°C). Grease and line a 9×13 inch baking pan with parchment paper, leaving some overhang – like little handles for easy lifting later.
In your trusty electric mixer, cream together the softened butter and granulated sugar until it’s light and fluffy – think pale yellow and airy. Beat in the eggs one at a time, followed by the vanilla extract and vanilla bean paste.
In a separate bowl, whisk together the flour, baking powder, and salt. Gradually add these dry ingredients to the wet ingredients, alternating with the milk, mixing until just combined. Overmixing = tough cake, and nobody wants that.
Pour the batter into your prepared pan and spread it evenly. Bake for 20-25 minutes, or until a toothpick inserted into the center comes out clean. Let it cool in the pan for a bit before inverting it onto a wire rack to cool completely. Cool cake is crucial for the next steps, unless you enjoy crumbly chaos.
Step 2: Whip Up the Vanilla Bean Buttercream (The Glue)

In a clean bowl, beat the softened butter until it’s smooth and creamy. Gradually add the powdered sugar, starting on low speed to avoid a sugar explosion (been there, dusted that), then increase to medium-high until it’s light and fluffy.
Stir in the vanilla extract and vanilla bean paste. If your buttercream seems too stiff, add heavy cream or milk, one tablespoon at a time, until it reaches a smooth, spreadable consistency.
Step 3: Assemble the Layers (The Sandwich)
Once your cake is completely cool (seriously, don’t rush this!), use your serrated knife to trim off any domed tops or crusty edges to create nice, flat layers. Carefully slice the cake horizontally into two or three even layers. Steady hands are your friend here.
Place one cake layer on a clean surface. Spread an even layer of that glorious vanilla bean buttercream over the top. Gently place the next cake layer on top, and repeat if you have a third layer. Finish with a final, even coating of buttercream on the top layer.
Pop the assembled cake into the refrigerator for at least 30 minutes to let that buttercream firm up. This will make cutting a breeze (or at least less of a crumbly nightmare).
Step 4: Cut into Petite Fours (The Shrinking Act)
Once the cake is chilled and firm, trim off the edges with a sharp knife or pizza cutter to create clean, straight sides. Now comes the precise part: carefully cut the cake into small, even squares or rectangles, aiming for around 1-inch by 1-inch pieces. A ruler can be surprisingly helpful here. Uniformity is key for that professional look.

Place the cut petite fours on a wire rack set over a baking sheet. This catches any excess glaze drips.
Step 5: Glaze with Fondant (The Glossy Finish)
Lightly dust your work surface with powdered sugar. Roll out your ready-made fondant to about ⅛ inch thickness. You want it thin enough to drape nicely but not so thin it rips at the slightest touch.
If you’re feeling colorful, knead in a few drops of gel food coloring until you get the hue you desire. Remember, a little goes a long way with gel color!
Carefully lift the rolled fondant and drape it over the chilled petite fours. Gently smooth it over the tops and sides, using your hands or a fondant smoother to eliminate any air bubbles.
Use your sharp knife or pizza cutter to trim away the excess fondant around the base.
Step 6: Decorate (The Sparkle and Shine)
This is where your creativity can really shine! Here are a few ideas to jazz up your petite fours:
- Melted Chocolate Drizzle: A classic for a reason! Drizzle dark, milk, or white chocolate over the fondant.
- Sprinkles: Because who doesn’t love sprinkles?
- Edible Flowers: For a touch of elegance.
- Small Candies or Pearls: Add some texture and visual interest.
- Royal Icing: Pipe delicate swirls or dots.
Let the glazed and decorated petite fours sit at room temperature for a few hours to allow the fondant to set.
Calories & Nutritional Info (Tiny but Mighty in Sugar)

Let’s not kid ourselves, these are sweet treats! Here’s a guesstimate for one petite four:
- Serving Size: 1 petite four (about 1 inch by 1 inch)
- Estimated Calories: 120-180 (depending on your frosting and glaze thickness)
- Main Components: Primarily carbohydrates and sugar from the cake and fondant, with fat from the butter in the cake and buttercream.
- Nutritional Note: These are definitely an occasional indulgence. Enjoy the tiny deliciousness!
Common Mistakes to Avoid (Don’t Let Your Petite Fours Fall Flat)
- Cake Not Cool Enough: Frosting warm cake = melty mess. Ensure your cake layers are completely cool before assembly.
- Overmixing the Cake Batter: This develops too much gluten, leading to a tougher cake. Mix until just combined.
- Uneven Frosting Layers: Nobody wants a lopsided petite four. Use an offset spatula for smooth, even frosting.
- Fondant That Tears: Rolling your fondant too thin or working with dry fondant can cause tears. Dust your surface with powdered sugar and knead the fondant until pliable.
- Rushing the Chilling Process: That chill time helps everything firm up for clean cutting. Don’t skip it!
- Dull Knife Debacle: A dull knife will drag and tear your delicate petite fours. Use a sharp knife or pizza cutter.
Variations & Customizations (Petite Fours Your Way!)
The beauty of petite fours lies in their endless adaptability.
1. Chocolate Extravaganza
Use chocolate cake layers, chocolate buttercream, and a dark chocolate ganache or fondant. You can even add a hint of coffee to the cake for extra depth.
2. Lemon Dream
Whip up lemon cake layers, a tangy lemon curd filling (instead of buttercream, or alongside it!), and a bright yellow lemon-flavored fondant. A sprinkle of candied lemon zest on top would be chef’s kiss.
3. Almond Delight
Make almond-flavored cake layers, almond buttercream, and cover with white fondant. Top with a slivered almond for a nutty finish.
FAQ: Your Petite Fours Ponderings, Answered
Let’s tackle those tiny treat tribulations.
1. Are petite fours hard to make for beginners? They require patience and attention to detail, but they’re definitely achievable! Just take it one step at a time.
2. How long do petite fours stay fresh? Stored in an airtight container at room temperature, they’ll stay fresh for about 2-3 days. In the fridge, they can last up to a week.
3. Can I freeze petite fours? Yes, you can! Wrap them individually in plastic wrap and then place them in an airtight container. Thaw them overnight in the refrigerator. The fondant might get slightly sticky upon thawing.
4. What’s the best cake to use for petite fours? A firm but moist cake works best, like a butter cake or pound cake. Avoid very crumbly cakes.
5. How do I get a smooth fondant finish? Knead your fondant well until it’s pliable, roll it out evenly, and use a fondant smoother to gently remove any air bubbles.
6. Can I make petite fours without fondant? Absolutely! You can use melted chocolate, a glaze made from powdered sugar and liquid, or even a simple dusting of powdered sugar.
7. What are some other filling ideas besides buttercream? Fruit curds, ganache, jams, and even thin layers of marzipan work well.
Final Thoughts
There you have it! You’ve braved the world of miniature cakes and emerged victorious. You now know petite fours how to make, and you’re ready to impress everyone with your tiny, elegant creations. So go forth, bake small, and enjoy the big smiles these little bites will bring. Just try not to pop them all in your mouth in one go… unless you’re into that kind of thing. No judgment here. Happy shrinking!