The Heart Shape Cake Guide That Will Steal Your Heart
Let’s be real. Nothing says “I love you,” “I like you a lot,” or “I’m sorry I ate the last slice of pizza” quite like baking a cake. But baking a heart shape cake? That’s next-level stuff. It’s the grand gesture of the baking world. But maybe you’ve been put off, thinking you need a special pan you’ll only use once a year, or that it’s too complicated. Well, I’m here to tell you that creating a perfect heart shape cake is so much easier than you think.
Forget everything you thought you knew about complex cake geometry. We’re going to break it all down. In fact, I’m going to show you two ways to do it: the easy way (with a heart-shaped pan) and the genius way (with pans you already own). You’re about to become a confectionary cupid, and it’s going to be awesome.
Why This Heart Shape Cake Method is a Total Sweetheart
So, why is this guide the only one you’ll ever need to win hearts and minds?
First, it gives you options. Don’t have a heart-shaped pan collecting dust in your cabinet? Who does?! The DIY method using a square and a round pan is a game-changing hack that will make you feel like a certified genius. It’s baking, but with a satisfying dash of arts and crafts.
Second, it’s a show-stopper, every time. There is something undeniably special about a heart-shaped dessert. It’s perfect for Valentine’s Day, anniversaries, birthdays, or just because. It’s a guaranteed way to make someone feel loved (and to get major props for your skills).

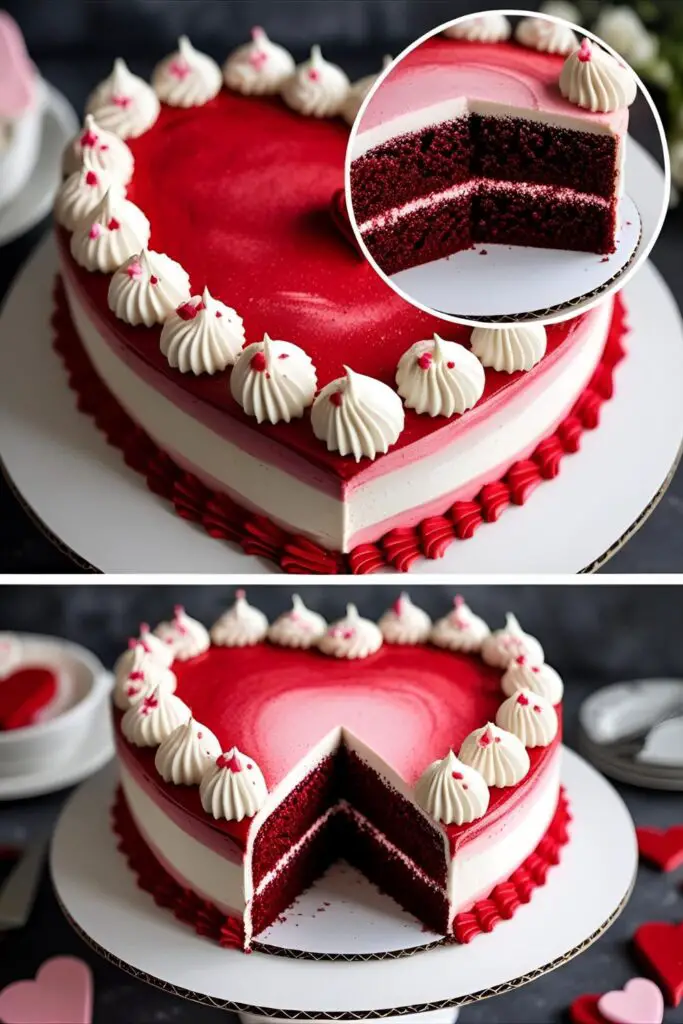
Finally, we’re pairing it with the perfect recipe. To really sell the “love” theme, we’re making a classic, tangy, and vibrant Red Velvet Cake with silky cream cheese frosting. The dramatic red crumb inside the heart shape? Chef’s kiss.
Your List of Lovely Ingredients
We’re making a classic Red Velvet cake. It’s sturdy enough to be shaped and the color is just thematic perfection.
- For the Red Velvet Cake:
- 2 ½ cups all-purpose flour
- 1 ½ cups granulated sugar
- 1 teaspoon baking soda
- 1 teaspoon salt
- 1 tablespoon unsweetened cocoa powder
- 1 ½ cups vegetable oil
- 1 cup buttermilk, at room temperature
- 2 large eggs, at room temperature
- 2 tablespoons (1 oz) red gel food coloring
- 1 teaspoon white vinegar
- 1 teaspoon vanilla extract
- For the Cream Cheese Frosting:
- 16 oz (2 blocks) full-fat cream cheese, softened
- 1 cup (2 sticks) unsalted butter, softened
- 4 cups powdered sugar, sifted
- 2 teaspoons vanilla extract
- Pinch of salt
Key Substitutions: You can use any sturdy cake recipe you love—a rich chocolate cake or a dense vanilla pound cake would also work beautifully for shaping.
The Tools of the Heart
Depending on your chosen method, your tools will vary slightly.
- Method 1:
- One 9-inch Heart-Shaped Cake Pan
- Method 2 (The DIY Hack):
- One 8-inch Square Cake Pan
- One 8-inch Round Cake Pan
- Tools for Both Methods:
- Stand Mixer or a reliable Hand Mixer
- Parchment Paper
- Wire Cooling Rack
- Cake Turntable
- Large Serrated Knife
- Offset Spatula
Step-by-Step Instructions: Let’s Get This Shape Right
Ready to wear your heart on a cake stand? Let’s do it.
H3: Step 1: Bake the Red Velvet Cake
- Prep Your Pans: Preheat your oven to 350°F (175°C). Grease and flour your chosen cake pan(s) (either the heart pan OR the square and round pans). Line the bottom(s) with parchment paper.
- Mix the Dry: In a large bowl, whisk together the flour, sugar, baking soda, salt, and cocoa powder.
- Mix the Wet: In a separate medium bowl, whisk together the oil, buttermilk, eggs, red food coloring, vinegar, and vanilla.
- Combine: Pour the wet ingredients into the dry ingredients and mix on low speed until just combined. Scrape down the bowl and mix for another 30 seconds. Do not overmix.
- Bake It:
- For the heart pan: Pour all the batter in and bake for 40-50 minutes.
- For the DIY pans: Divide the batter evenly between the square and round pans. Bake for 30-35 minutes.
- The cake is done when a toothpick inserted into the center comes out clean.
- Cool Completely: Let the cake(s) cool in their pans for 15 minutes before turning them out onto a wire rack to cool 100% completely. This is extra important for the DIY method.
H3: Step 2: Make the Cream Cheese Frosting
- Beat Cream Cheese & Butter: In your stand mixer, beat the softened cream cheese and butter on medium-high speed until it’s light and fluffy, about 3-4 minutes.
- Add Sugar & Vanilla: On low speed, gradually add the sifted powdered sugar. Once it’s incorporated, add the vanilla and salt.
- Whip It: Increase the speed to medium-high and beat for another 2-3 minutes until the frosting is silky smooth. If it’s too thick, add a splash of milk; if it’s too thin, add more powdered sugar.
H3: Step 3: Assembling Your Heart Shape Cake
This is where the magic happens. Choose your path!
- Method 1: The Easy Way (With a Heart Pan)
- Simply place your completely cooled heart-shaped cake on a stand and frost it. You’re done. Go have a snack, you earned it.
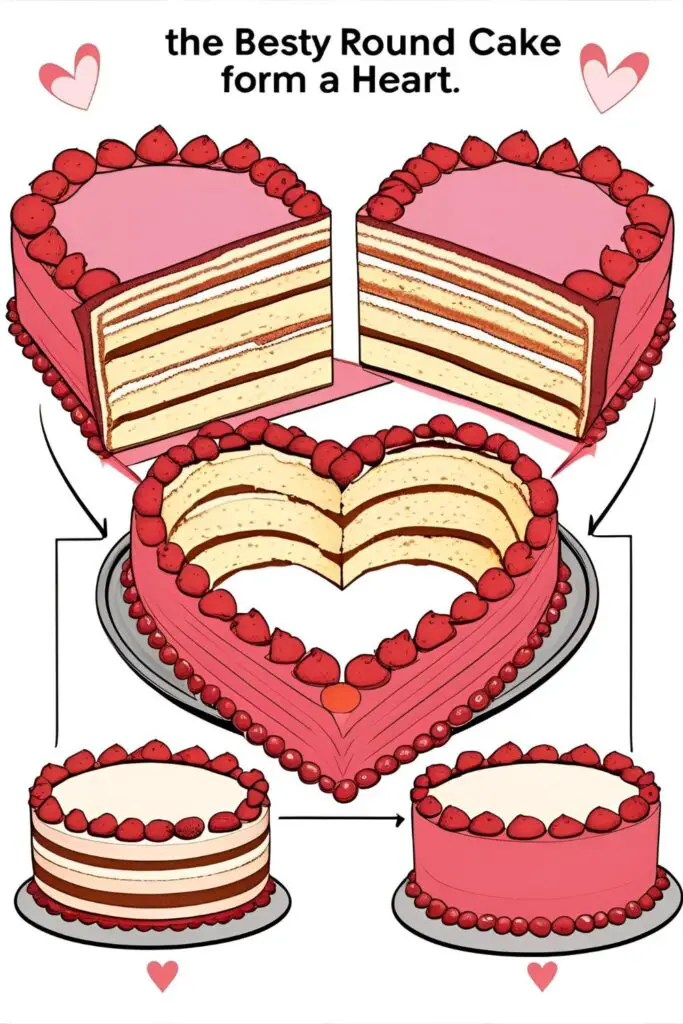
- Method 2: The Genius Way (The DIY Hack)
- Cut the Circle: Take your round cake and carefully cut it exactly in half with a serrated knife. You now have two perfect half-circles.
- Position the Square: Place your square cake on your serving platter or cake board, but position it like a diamond, with one corner pointing towards you.
- Assemble the Heart: Take one of your half-circles and place the flat, cut-side against one of the top edges of the diamond. It will fit perfectly. Do the same with the other half-circle on the other top edge.
- Behold! You have just created a perfect heart shape cake. Take a moment to admire your own genius.
H3: Step 4: Frosting Your Creation
- The “Glue” Coat: For the DIY heart, use a little frosting to “glue” the pieces together.
- Crumb Coat: Apply a thin layer of frosting all over the cake. For the DIY heart, pay special attention to the seams to create a smooth, unified shape. Chill the cake for 30 minutes.
- Final Frosting: Frost the entire cake with a generous layer of your beautiful cream cheese frosting. Decorate with sprinkles, chocolate shavings, or fresh berries.
Calories & Nutritional Info

This cake is made of love. And also butter and sugar.
- Calories: A loving slice will set you back about 600-800 calories.
- Fat: A heartfelt amount.
- Serving Suggestion: Best served with zero guilt.
- Good for the Soul: 100%.
Common Mistakes to Avoid (Or, How Not to Have a Broken Heart)
- A Lopsided Heart: If you’re using the DIY method, the most crucial step is cutting the round cake perfectly in half. If your halves are uneven, your heart will be lopsided. Use a ruler if you have to!
- A Cracked Heart: Don’t try to assemble or frost your cake pieces when they are even slightly warm. They will be fragile and prone to cracking. They must be completely cool.
- Runny Cream Cheese Frosting: This usually happens when your cream cheese or butter is too soft/warm. You want it softened, not melty. If your frosting is too runny, chill it in the fridge for 20-30 minutes to help it firm up.
- Pale Red Velvet: To get that signature deep red, you need to use a good amount of gel food coloring. The liquid kind from the grocery store won’t be concentrated enough and will water down your batter.
Variations & Customizations
Feel like playing with the theme? Here are some ideas.
- The “Black Heart”: For a moody, gothic romance vibe, make a dark chocolate cake (using black cocoa for extra drama) and frost it with black buttercream. It’s dramatic and stunning.
- The “Broken Heart”: A fun, cheeky idea for an anti-Valentine’s Day party. Assemble the DIY heart but leave a small gap between the pieces. Frost them separately and use red or black piping gel to draw a jagged “crack” down the middle.
- Vintage Romance: Decorate your finished heart shape cake with intricate, Lambeth-style piping. Use various star and ruffle tips to create elaborate, old-school borders and flourishes in shades of pink and white.
FAQ: Questions From the Heart
Let’s answer the questions you’re dying to ask.
H3: What’s the best cake recipe to use for a shaped cake?
A sturdy, slightly dense cake is best. Pound cake, butter cake, and this Red Velvet recipe are all fantastic because they are less likely to crumble or break when you’re assembling them.
H3: How do I make the DIY heart shape look seamless?
A good, thick crumb coat is your best friend. It will fill in any small gaps between the cake pieces. Once you apply the final coat of frosting, no one will ever know it started as a square and a circle.
H3: Can I make a heart shape cake with just round pans?
Yes! You can bake two round cakes. Keep one whole. Cut a “V” shape out of one side of it. Then, cut the second round cake into two “crescent moon” shapes and attach them to the top humps of the first cake. It’s a bit more carving, but totally doable.
H3: What are some easy decorating ideas for a heart shape cake?

The shape itself does most of the work! You can simply cover it in festive sprinkles, arrange fresh berries around the border, or top it with beautiful chocolate curls.
H3: How do I get a really vibrant red color in Red Velvet cake?
Use a high-quality gel food coloring. You’ll need about 1-2 tablespoons for a deep, rich red.
H3: Can I make this cake ahead of time?
Absolutely. Bake the cake layers, cool, and wrap them well. They can be stored at room temperature for up to 2 days. The frosted cake can be stored in the fridge for up to 3 days.
H3: My cream cheese frosting is too runny! Help!
This is a common problem. The easiest fix is to chill it. Put the whole bowl in the fridge for 20-30 minutes, then re-whip it. If it’s still too soft, you can beat in more sifted powdered sugar until it reaches the right consistency.
Final Thoughts: You’ve Mastered the Matters of the Heart
There you have it. You are no longer just a baker; you are a cake surgeon, a geometric artist, a cupid of confection. You have the power to create a perfect heart shape cake whenever the mood strikes, with or without the “proper” equipment.
So go on, bake your heart out. Share it with someone you love, or just make it for yourself (because self-love is the most important love of all, right?). You’ve totally got this.