Instant Pot Whole Chicken: The Easiest, Juiciest ‘Roast’ Chicken Ever
Let’s paint a picture. It’s a Tuesday night in Barishal. You have a vision of a beautiful, golden-brown roast chicken, the kind of meal that usually requires hours of oven-tending and a general “Sunday dinner” vibe. Then, reality hits. You have laundry to do, emails to answer, and definitely not four hours to babysit a bird in the oven. So, what’s the move? Do you give up and make scrambled eggs again? Absolutely not.
What if I told you that you could make a perfect whole chicken instant pot style, and have it on the table in about an hour? Yes, an entire, juicy, fall-off-the-bone chicken. It sounds like witchcraft, but I promise, it’s just the magic of pressure cooking. Get ready to completely revolutionize your weeknight dinner game.
Why This Recipe Is Basically a Cheat Code for Dinner
Still skeptical? Let me lay out the glorious, undeniable facts about why this method is superior.
First, it is insanely fast. A traditional roast chicken can take hours. This? We’re talking about 30-40 minutes of actual cooking time. You can spend the rest of that time doing… well, anything else. It’s the ultimate “set it and forget it” main course.
Second, the chicken is unbelievably juicy. The pressure cooker environment is like a steam sauna for your chicken, locking in every last drop of moisture. Forget dry, disappointing chicken breasts; this method makes the entire bird succulent and tender.
And the best part? The bonus liquid gold. At the end of this super-fast, super-easy process, you are gifted a pot of the most incredible, rich, and gelatinous chicken broth you’ve ever had. It’s a two-for-one deal that feels like you’ve hacked the kitchen.
The Ingredient Lineup: Simplicity is Key
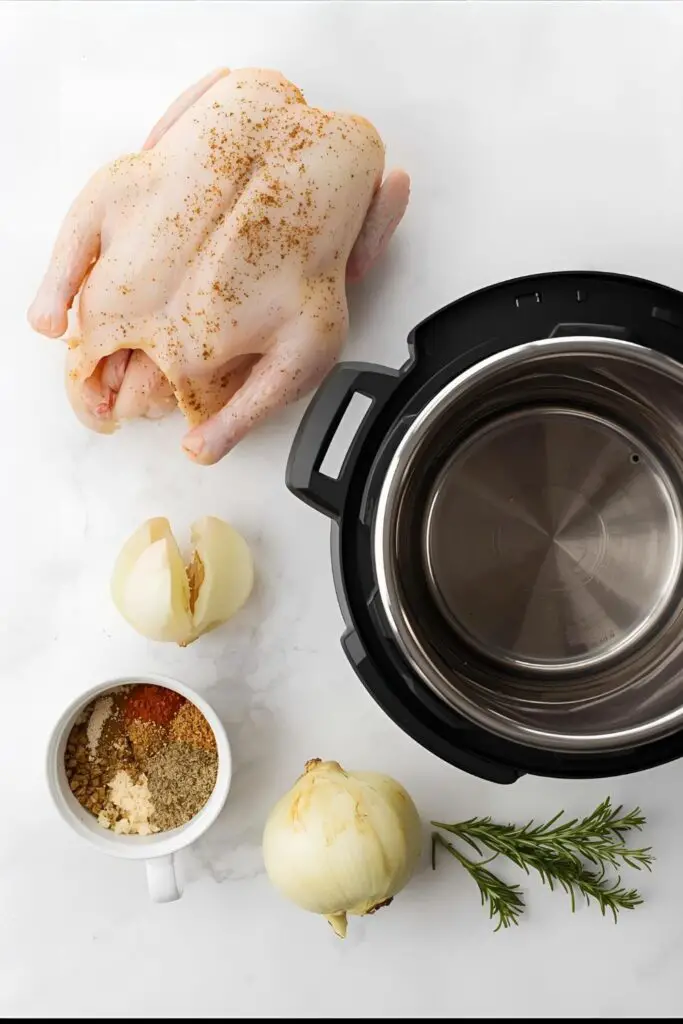
You don’t need a pantry full of fancy stuff to make this happen. We’re keeping it classic and delicious.
The Main Event:
- 1 Whole Chicken (about 3 to 4 lbs): Make sure it’s a size that will comfortably fit in your Instant Pot. Don’t try to cram a giant bird in there; it’s not a clown car.
- 1 tbsp Olive Oil or other neutral oil: For getting a nice sear.
The Flavorful Dry Rub:
- 1 tsp Smoked Paprika: Adds a lovely color and a hint of smokiness.
- 1 tsp Garlic Powder:
- 1 tsp Onion Powder:
- 1 tsp Dried Thyme or Rosemary:
- 1 tsp Kosher Salt:
- 1/2 tsp Black Pepper:
The Aromatics (for inside the pot):
- 1 cup Chicken Broth or Water: This is essential for the pot to build pressure.
- 1 small Onion, quartered:
- 3-4 cloves Garlic, smashed:
- Optional: 1 Lemon, halved, and a few sprigs of fresh thyme or rosemary.
Your Kitchen Command Center: Tools & Gadgets
To pull off this culinary magic trick, you’ll need a few key items.
- An Instant Pot (6-quart or larger): This is, unsurprisingly, the star of the show.
- The Trivet: The little metal rack that came with your Instant Pot. Don’t lose it!
- Tongs: A sturdy pair for searing and lifting the hot chicken.
- A Small Bowl: For mixing your dry rub.
- Instant-Read Meat Thermometer: Non-negotiable. This is the only way to know for sure if your chicken is cooked to a safe temperature.
- A Cutting Board: For carving your masterpiece.
Let’s Do This: Step-by-Step to Instant Chicken Glory
Ready to feel like a weeknight dinner superhero? Follow these simple steps.
Step 1: Prep and Rub the Bird
First, remove any giblets from the chicken cavity (save them for gravy or stock if you’re ambitious!). Pat the entire chicken thoroughly dry with paper towels. A dry bird is a happy bird that sears beautifully.
In your small bowl, mix together the smoked paprika, garlic powder, onion powder, dried thyme, salt, and pepper. Rub this glorious mixture all over the entire surface of the chicken. Get it in all the nooks and crannies.
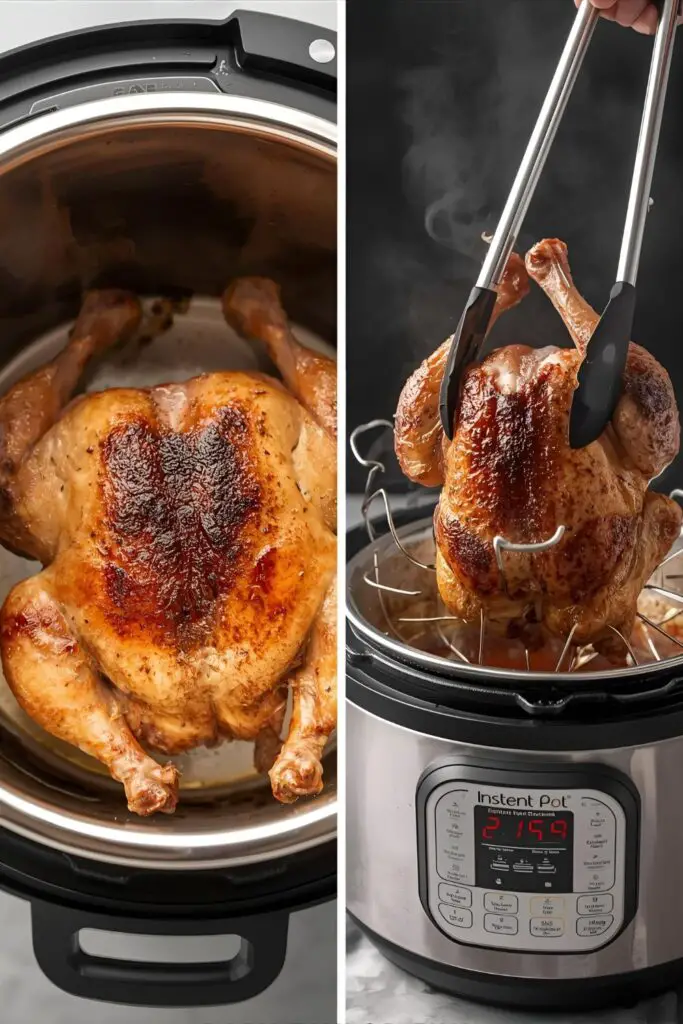
Step 2: Sear for Flavor
Set your Instant Pot to the ‘Sauté’ function on high. Add the olive oil. Once the oil is shimmering hot, carefully place the chicken, breast-side down, into the pot. Sear for 3-4 minutes, until the skin is golden brown and crispy. Flip it over using your tongs and sear the other side for another 3-4 minutes. This step builds a massive amount of flavor. Don’t skip it!
Step 3: The All-Important Deglaze
Remove the seared chicken from the pot and set it aside for a moment. Pour the chicken broth or water into the hot pot. Use a wooden spoon or spatula to scrape up all those delicious browned bits from the bottom of the pot. This is the most important step to prevent the dreaded ‘Burn’ notice!
Step 4: Time to Pressure Cook
Turn off the ‘Sauté’ function. Place the trivet in the bottom of the pot. Place your seared chicken on top of the trivet, breast-side up. If you’re using aromatics like onion, garlic, or lemon, toss them into the liquid around the chicken.
Secure the lid, make sure the steam release valve is set to ‘Sealing’. Cook on High Pressure. The rule of thumb is 6 minutes per pound. So for a 4-pound chicken, you’d set it for 24 minutes.
Step 5: The Patient Release
Once the cooking time is up, do not immediately release the pressure. Let the pot sit for a 15-minute Natural Release. This is crucial for keeping the chicken juicy. After 15 minutes have passed, you can carefully move the valve to ‘Venting’ to release any remaining steam.
Step 6: The Optional Crispy Skin Finale
The chicken will come out of the pot incredibly moist, but the skin will be soft. If you crave that crispy skin, carefully transfer the cooked chicken to a baking sheet. Pop it under your oven’s broiler for 3-5 minutes, watching it like a hawk until the skin is golden and crisp.
Step 7: Rest, Carve, and Enjoy
Let the chicken rest for at least 10 minutes before carving. This allows the juices to redistribute throughout the meat. Carve it up, serve it, and get ready for the applause. Don’t forget to save that amazing broth in the pot!
Calories & Nutritional Info

This is a pretty healthy main course! The numbers will vary based on the size of your chicken and whether you eat the skin. Here is an estimate for a 4oz serving of mixed white and dark meat (without skin):
- Calories: Approximately 180-220 kcal
- Protein: A fantastic 30-35g
- Fat: Around 5-8g
- Carbohydrates: Less than 1g
- Note: This is a lean protein powerhouse! The leftover broth is also incredibly nutritious and low in calories.
Common Mistakes to Avoid (Instant Pot Pitfalls)
- Forgetting to Deglaze: I’ll say it again for the people in the back: Scrape the bottom of the pot after searing! Those brown bits are flavor, but they will also trigger the ‘Burn’ error if you don’t loosen them up with the liquid.
- Using a Chicken That’s Too Big: Before you do anything, make sure your chicken actually fits in the pot and allows the lid to close properly. It sounds obvious, but… you’d be surprised.
- Skipping the Natural Release: I know you’re hungry, but patience is key. A quick release will suck all the moisture out of the meat, leaving you with dry chicken. Let it natural release for 15 minutes.
- Not Using the Trivet: The trivet keeps the chicken elevated out of the liquid, allowing it to steam-roast instead of boil. It’s essential for the right texture.
Variations & Customizations
Feel like changing things up? Go for it!
- Lemon Herb Chicken: Stuff the cavity of the chicken with a halved lemon and a generous handful of fresh rosemary and thyme. Use lemon pepper in your dry rub for extra zing.
- Spicy Southwest Chicken: Create a rub with chili powder, cumin, oregano, and a pinch of cayenne. Toss a halved jalapeño and some onion into the pot for an extra kick.
- Garlic Lover’s Dream: Stuff the cavity with an entire head of garlic (top sliced off) and add even more smashed cloves to the pot. Use extra garlic powder in the rub. You can’t have too much garlic, right?
Frequently Asked Questions (Your Instant Pot Inquiries)
1. How long do I cook a whole chicken in the Instant Pot? The general rule is 6 minutes per pound on High Pressure, followed by a 15-minute natural release.
2. Can you put a frozen whole chicken in the Instant Pot? Yes, you can! You won’t be able to sear it, so you’ll lose some flavor. You’ll also need to increase the cooking time significantly, usually to about 10-12 minutes per pound.
3. How do I get crispy skin on my Instant Pot chicken? The only way to get truly crispy skin is to finish the chicken under the oven broiler for a few minutes after it comes out of the Instant Pot.
4. What do I do with the liquid left in the pot? That’s liquid gold! Strain it and use it as a base for soups, stews, sauces, or for cooking rice and grains. It’s the best chicken broth you’ll ever have.
5. Why did I get the “Burn” notice? Most likely, you didn’t deglaze the pot properly after searing, and some bits of food were stuck to the bottom. Always make sure to scrape the bottom clean with your liquid.
6. Is it better to cook the chicken breast-side up or down? I recommend searing breast-side down first for better color, then cooking it on the trivet breast-side up. This helps the breast meat, which can dry out faster, stay extra juicy.
7. Do I have to use the trivet? Yes! The trivet is essential. It keeps the chicken from sitting and boiling in the liquid at the bottom of the pot, ensuring it cooks evenly with steam.
Final Thoughts
You did it. You stared a whole raw chicken in the face on a busy weeknight and, with the help of your trusty Instant Pot, you emerged victorious. You are now the master of speedy, succulent, “roast” chicken. You’ve unlocked a new level of dinner efficiency.
Go on, enjoy your ridiculously juicy chicken. Make some soup with that amazing broth tomorrow. And the next time someone says they don’t have time to make a nice dinner, just smile knowingly. You’ve got a secret weapon.