Here is the recipe article, crafted to your specifications.
SEO Optimized Blog Title:
The Ultimate No-Bake Ice Cream Sandwich Cake (Seriously, It’s That Easy)
SEO Optimized Meta Description:
The easiest no-bake ice cream sandwich cake recipe ever! Layers of sandwiches, Cool Whip, and toppings make a perfect summer dessert for any crowd.
The Lazy Genius’s Guide to the Perfect Ice Cream Sandwich Cake
Picture this: It’s Saturday afternoon. You have people coming over tonight. You were supposed to make a dessert. You… forgot. Panic starts to set in, right? The oven seems like a medieval torture device in this heat, and the idea of creaming butter and sugar makes you want to lie on the floor. What if I told you that you could make a legendary, crowd-pleasing dessert in 15 minutes with zero baking? Enter the ice cream sandwich cake.
Yes, you heard me. This isn’t some complex, multi-day baking project. This is the dessert hack of the century. It’s the potluck hero, the birthday party savior, and the answer to your “what do I bring?!” prayers. This ridiculously easy ice cream sandwich cake is your new secret weapon, and frankly, it’s so simple it almost feels like cheating. Almost.
Why This Ice Cream Sandwich Cake Recipe Is Basically Magic

Still not convinced you need this in your life? Let’s break down why this recipe is pure, unadulterated genius.
First, it’s no-bake. Did I mention that already? In the dead of summer, the last thing anyone wants to do is preheat an oven to 350°F. This recipe keeps your kitchen cool and your sanity intact. It’s a beautiful thing.
Second, it requires zero culinary skill. Can you unwrap things? Can you spread stuff with a spatula? Congratulations, you have all the qualifications needed to make this ice cream sandwich cake. There are literally no complex techniques here. It’s an assembly job, and you’re the star architect.
Finally, everyone loves it. It’s a nostalgic symphony of soft chocolate wafers, creamy vanilla ice cream, fluffy whipped topping, and whatever glorious candy and sauces your heart desires. Kids go wild for it, and adults get that happy, childlike glee in their eyes. It’s a guaranteed win every single time.
Ingredients You’ll Need
This ingredient list is so short and sweet, you’ll barely need to write it down. It’s more of an “idea” than a strict recipe.
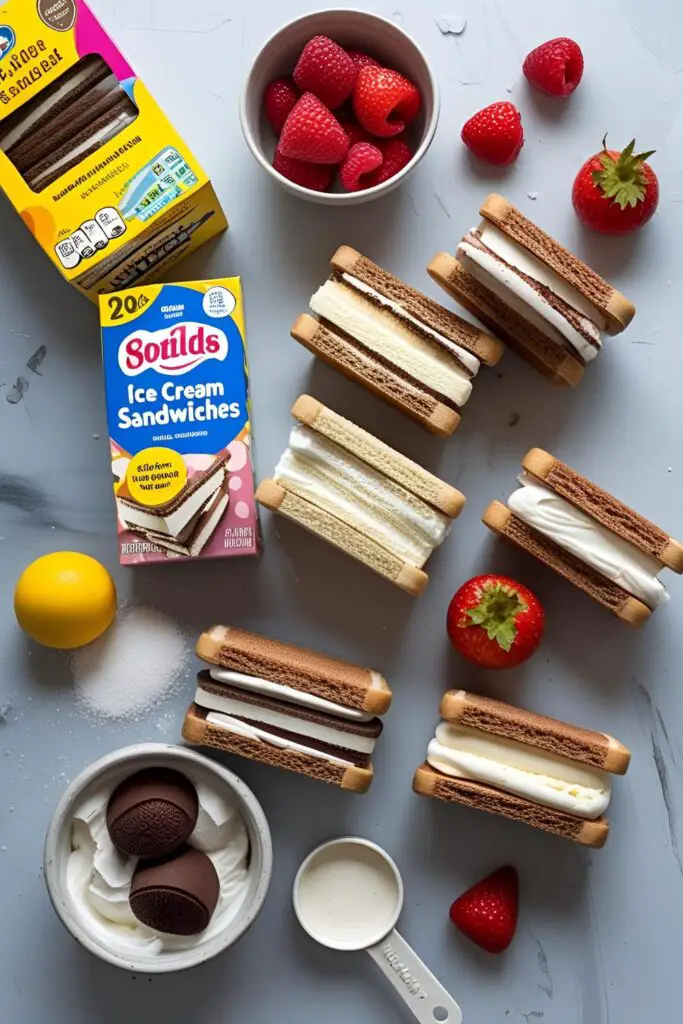
- 24 classic rectangular ice cream sandwiches: The cheap, basic ones are honestly the best for this. Don’t get too fancy.
- 1 large (16 oz) container of Cool Whip, thawed: Or, if you’re feeling ambitious, you can whip 2 cups of heavy cream to stiff peaks with a little sugar. But IMO, Cool Whip is classic here.
- 1 jar of hot fudge sauce (or chocolate syrup): The thick, jarred kind gives you a nice, distinct layer.
- 1 jar of caramel sauce: Because why not?
- Your favorite toppings: This is where you get to be an artist.
- Crushed Oreo cookies
- Chopped Reese’s Peanut Butter Cups
- M&M’s or Reese’s Pieces
- Crushed Heath bars or toffee bits
- Chocolate shavings
- Sprinkles!
Key Substitutions: Feel free to use any flavor of ice cream sandwich you can find! Mint chocolate chip, Neapolitan, or even cookies and cream sandwiches all work beautifully.
Tools & Kitchen Gadgets Used

Your toolbox for this masterpiece is laughably simple.
- 9×13 inch Baking Dish: Glass or metal works just fine. This is the foundation of your creation.
- Offset Spatula: This is your magic wand for getting those smooth, even layers of Cool Whip. A regular rubber spatula works too, but an offset one makes you feel like a pro.
- Plastic Wrap: Crucial for protecting your cake from the mysterious flavors of the freezer.
- A Sharp Knife: For when it’s time to cut those clean, beautiful slices.
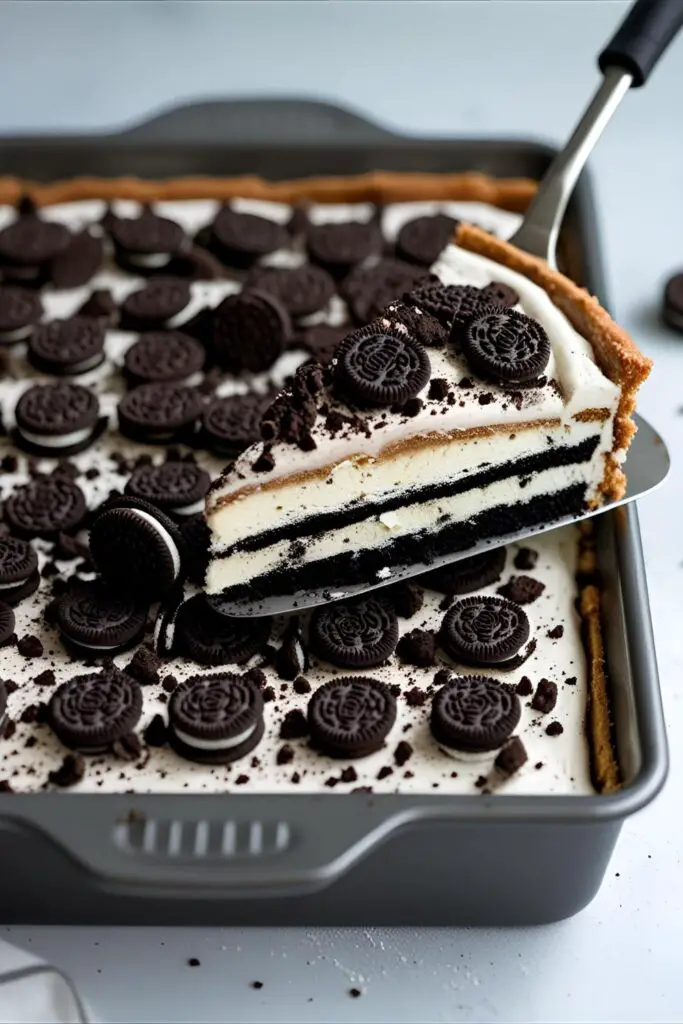
Step-by-Step Instructions: Assembling Your Masterpiece
Brace yourself for the easiest instructions you will ever read. Try not to blink, or you might miss a step.
H3: Layer One: The Foundation
- Work Fast! Your only enemy here is heat. Make sure your Cool Whip is thawed and your toppings are ready to go before you even think about unwrapping the sandwiches.
- Unwrap & Arrange: Quickly unwrap 12 of the ice cream sandwiches and arrange them in a single, tight layer in the bottom of your 9×13 inch dish. You might need to cut one or two in half to fill in any gaps perfectly. Don’t leave any space!
H3: Layer Two: The Good Stuff
- Spread the Whip: Plop about half of the Cool Whip on top of the sandwich layer. Use your offset spatula to spread it into a smooth, even layer that covers the sandwiches completely, right to the edges.
- Drizzle It On: Gently warm your hot fudge sauce for a few seconds in the microwave so it’s pourable but not hot. Drizzle a generous amount over the Cool Whip layer. Do the same with the caramel sauce. Get creative with your patterns!
H3: Layer Three & The Grand Finale
- Repeat the Layers: Unwrap the remaining 12 ice cream sandwiches and place them on top of the saucy Cool Whip layer, creating your second story of deliciousness.
- Top It Off: Spread the rest of the Cool Whip over the top layer of sandwiches. Now, go absolutely wild with your toppings. Sprinkle on the crushed Oreos, chopped candy, or whatever you chose. More is more.
- Freeze! Freeze! Freeze! Cover the dish tightly with plastic wrap. Place it in the freezer for at least 4 hours, but overnight is even better. This is the hardest part—the waiting. This step is non-negotiable; it needs to be frozen solid to slice cleanly.
Calories & Nutritional Info
Listen. Are you really asking? This is an ice cream sandwich cake. It is a monument to sugar and joy, not a pillar of health. But for the sake of transparency…
- Calories: Approximately 450-600 kcal per serving (assuming 12 servings)
- Fat: Around 20-30g
- Carbohydrates: Roughly 60-75g
- Sugar: A truly impressive 40-55g
- Happiness: 100% of your daily recommended value
Disclaimer: This dessert does not count if you eat it standing over the sink. Those are the rules.
Common Mistakes to Avoid (Don’t Be That Person)
It’s hard to mess this up, but believe me, people find a way. Avoid these rookie errors.
- Letting Everything Melt: You are on the clock as soon as those sandwiches come out of the freezer. Don’t decide to answer a text or start a load of laundry mid-assembly. Work quickly and with purpose.
- Using Hot Sauce: If you microwave your fudge or caramel until it’s bubbling hot, you will melt the Cool Whip and the sandwiches into a sad, soupy mess. You want it just barely pourable, not hot.
- Not Freezing It Long Enough: Are you impatient? Do you want a sloppy puddle on a plate instead of a clean slice of cake? Then by all means, try to serve it after only an hour. For the rest of us, a minimum of 4 hours in the freezer is essential.
- Forgetting the Plastic Wrap: Unless you want your cake to taste faintly of frozen peas and freezer burn, cover it tightly with plastic wrap. No excuses.
Variations & Customizations
The classic is great, but why not walk on the wild side? This ice cream sandwich cake is your canvas.
- Ultimate Peanut Butter Cup: Use chocolate ice cream sandwiches. Mix chopped Reese’s Peanut Butter Cups into the Cool Whip layers. Drizzle with hot fudge and melted peanut butter. Top with more chopped Reese’s Cups.
- Mint Chocolate Chip Mania: Find mint chocolate chip ice cream sandwiches. Drizzle with hot fudge and top with a mountain of crushed Andes mints or Junior Mints. It’s cool, refreshing, and decadent.
- Death by Chocolate: This one’s for the serious chocoholics. Use chocolate ice cream sandwiches. Mix mini chocolate chips into the Cool Whip. Drizzle with chocolate syrup and top with chocolate shavings and crushed Oreos. There’s no such thing as too much chocolate.
FAQ: Your Ice Cream Sandwich Cake Questions, Answered

Here are the answers to the questions that are probably already bubbling up in your brain.
H3: Can I make this ice cream sandwich cake ahead of time?
Yes! That’s one of its best features. You can make it up to a week in advance. Just keep it tightly covered in the freezer.
H3: How long does it really need to freeze?
I know I’ve said it before, but it’s important. A minimum of 4 hours is required for it to set up enough to slice. For best results and super clean slices, freeze it overnight.
H3: Can I use real whipped cream instead of Cool Whip?
You absolutely can. Whip 2 cups of heavy whipping cream with 1/4 cup of powdered sugar and 1 teaspoon of vanilla until stiff peaks form. FYI, homemade whipped cream doesn’t hold its shape as long as Cool Whip, so it might get a little softer faster once you serve it.
H3: How do I store leftovers?
If you have leftovers (which is a big “if”), cover the dish with plastic wrap and pop it right back in the freezer. It should keep for about a week.
H3: What are the best ice cream sandwiches to use?
Honestly, the standard, classic vanilla ice cream sandwiches with the soft chocolate wafer work best. They have the perfect texture and squish down just right.
H3: Can I make this in a different pan, like a round one?
Sure! You can make it in two 8 or 9-inch round pans to create a round layer cake. You’ll have to get creative with cutting the sandwiches to fit the round shape, but it’s totally doable. A square 8×8 or 9×9 pan also works for a smaller version.
H3: How do you get clean, pretty slices?
The secret is a long, sharp knife and hot water. Run the knife under hot water for a few seconds, wipe it dry, and then make your cut. Repeat for every single slice. This melts the ice cream just enough to give you a clean cut without dragging everything.
Final Thoughts: Welcome to a Lazier, More Delicious Life
You did it. You created a show-stopping dessert, and your kitchen is still clean. You barely broke a sweat. You are a certified dessert genius. Go ahead and take a bow.
Now you hold the power. The next time a party invite lands, you won’t feel a shred of panic. You’ll just smile, knowing your trusty ice cream sandwich cake recipe is tucked safely in your back pocket, ready to steal the show. You’re welcome.