How to Slow Cook Ribs in the Oven (For Fall-Off-the-Bone Perfection)
Let’s be honest, the idea of making perfect, fall-off-the-bone ribs can be intimidating. You see the pitmasters on TV with their giant smokers and secret mops, and you think, “Well, that’s not happening in my apartment.” But what if I told you that you could achieve that same glorious, tender, and succulent result with a tool you already own and barely have to watch? My friend, it’s time to embrace the magic of your oven. Today, you are going to learn how to slow cook ribs in the oven, a method so foolproof and delicious, you’ll wonder why you ever bothered with anything else.
Why This Recipe Is Awesome (It’s a Hands-Off Masterpiece)
Why are we ditching the grill and the smoker for the humble oven? Because this method is the ultimate “lazy genius” approach to perfect ribs. This recipe is awesome because:
- It Guarantees Tenderness: The low-and-slow oven method is the secret to breaking down all that tough connective tissue, resulting in meat that literally falls off the bone. No more tough, chewy ribs!
- It’s Incredibly Easy: This is a mostly hands-off process. You wrap them, pop them in the oven, and walk away for a few hours. Your oven does all the hard work while your home in Khulna fills with the most incredible BBQ aroma.
- The Flavor is Deep & Concentrated: Wrapping the ribs in foil creates a steamy environment that keeps them incredibly moist while concentrating all the flavors of the spice rub right into the meat.
- Perfect for Any Weather: Craving ribs in the middle of the rainy season? No problem. The oven is your all-weather BBQ pit.
You’re not just cooking ribs; you’re creating a masterpiece of tender, flavorful pork that will have everyone begging for your secret.
Ingredients: Your Rub & Ribs Arsenal
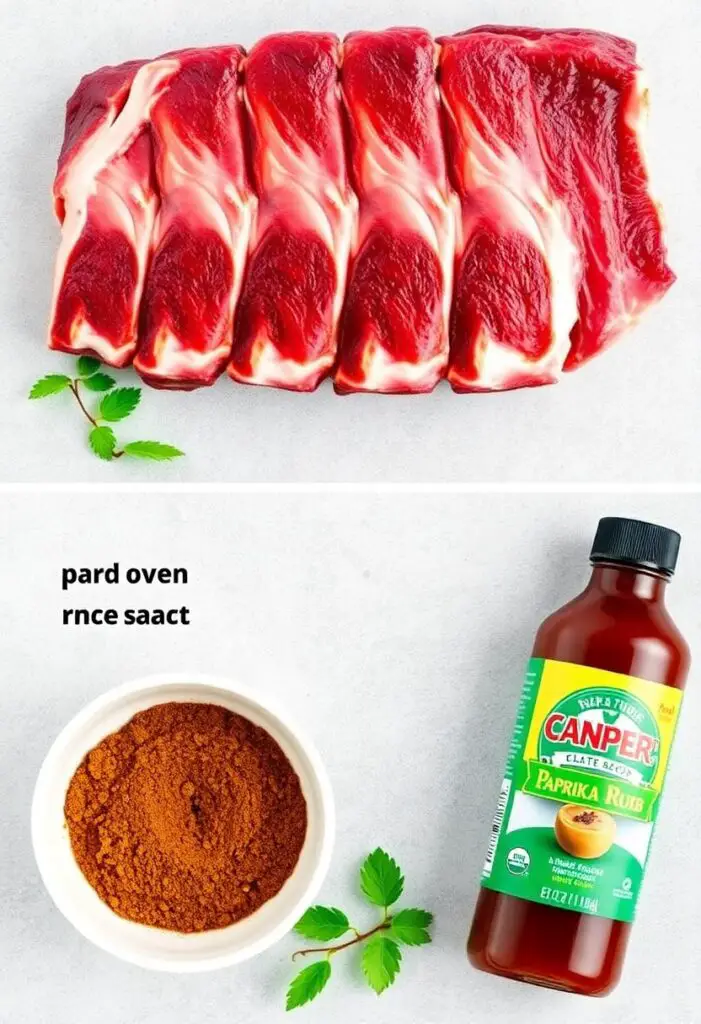
A great rack of ribs starts with a great spice rub.
For the All-Purpose BBQ Rub:
- ⅓ cup packed brown sugar
- 2 tablespoons smoked paprika
- 1 tablespoon black pepper
- 1 tablespoon kosher salt
- 1 tablespoon chili powder
- 1 tablespoon garlic powder
- 1 tablespoon onion powder
- 1 teaspoon cayenne pepper (optional, for a little kick)
For the Ribs:
- 1-2 racks of pork ribs (St. Louis style or baby back ribs both work great, about 3-4 lbs total)
- Yellow mustard (for the binder, optional)
- 1 cup of your favorite BBQ sauce
A Very Important Note on the Ribs:
- Whether you choose baby back ribs (leaner, more tender) or St. Louis style spare ribs (meatier, more fat), the most important prep step is removing the membrane from the back of the rack. It’s a thin, silvery skin that can be tough and prevents the rub from penetrating. More on that in the instructions!
Tools & Kitchen Gadgets Used: Your Indoor BBQ Station
- A Large Rimmed Baking Sheet
- Heavy-Duty Aluminum Foil (Don’t use the thin stuff!)
- A Small Bowl (for the rub)
- A Pastry Brush (for the sauce)
- Tongs
- A Sharp Knife
Step-by-Step Instructions: The Path to Indoor BBQ Glory

This is a three-act play: the prep, the long, lazy bake, and the final glorious saucing.
Act 1: The Prep (Don’t Skip the Membrane!)
- Prep Your Oven: Preheat your oven to a low and slow 275°F (135°C).
- Remove the Membrane: This is the most crucial prep step. Flip the rack of ribs so it’s bone-side up. Slide a butter knife under the thin, silvery membrane on the back of the ribs to loosen it. Then, using a paper towel to get a good grip, pull the entire membrane off. It should come off in one or two large pieces. This makes your ribs infinitely more tender.
- Rub It Down: Pat the ribs completely dry with paper towels. If you like, slather a very thin layer of yellow mustard all over the ribs. This acts as a binder to help the rub stick (you won’t taste it, I promise).
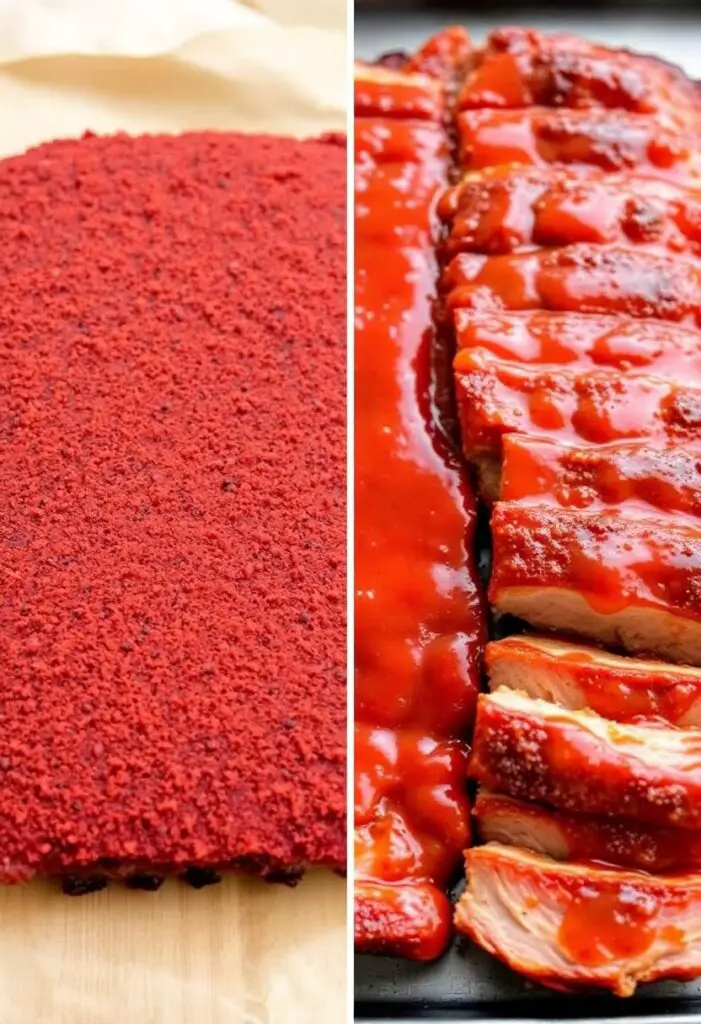
- The Spice Rub: In your small bowl, mix together all the dry rub ingredients. Generously coat the entire rack of ribs—top, bottom, and sides—with the spice mixture. Use your hands to really press it in. Don’t be shy!
Act 2: The Low and Slow Bake
- Wrap ‘Em Up: Tear off a large sheet of heavy-duty aluminum foil, big enough to completely encase your rack of ribs. Place the seasoned rack meat-side down on the foil. Tightly wrap the foil around the ribs, sealing the edges to create a secure packet.
- The Long Bake: Place the foil-wrapped ribs on your large, rimmed baking sheet. Place it in the oven and bake for 2.5 to 3 hours for baby back ribs, or 3.5 to 4 hours for St. Louis style ribs.
- The Tenderness Test: You’ll know they’re ready when the meat has shrunk back from the bones and is incredibly tender. If you pick up the rack with tongs, it should bend easily in the middle.
Act 3: The Sauce and Sear
- Unwrap and Sauce: Carefully open the foil packet (watch out for hot steam!). Discard the foil and any accumulated juices. Place the ribs back on the baking sheet, this time meat-side up.
- Turn Up the Heat: Increase your oven’s temperature to 400°F (200°C) or turn on the broiler.
- Get Saucy: Brush a generous layer of your favorite BBQ sauce all over the top of the ribs.
- The Final Finish: Place the sauced ribs back in the oven, uncovered, for 10-15 minutes (or just 3-5 minutes under the broiler). You want the sauce to be bubbly, caramelized, and slightly charred in spots.
- Rest and Slice: Let the ribs rest for 5-10 minutes before slicing between the bones and serving.
Calories & Nutritional Info (Per Serving, Estimated)
Let’s just say this is a “special occasion” and enjoy the moment. (This is for a serving of about 3-4 ribs.)
- Estimated Calories per serving: ~450-600 calories
- Pure Bliss: Off the charts.
Common Mistakes to Avoid: Don’t Ruin Your Ribs!
Avoid these common pitfalls for guaranteed fall-off-the-bone perfection.
- Forgetting to Remove the Membrane: This is the #1 mistake. That thin skin on the back of the ribs will be tough and chewy, and it prevents the rub from flavoring the meat. You must remove it.
- Cooking at Too High a Temperature: Ribs are a tough cut of meat that need low and slow heat to become tender. Blasting them at a high temperature will result in dry, tough meat.
- Saucing Too Early: If you put the BBQ sauce on at the beginning of the long bake, the sugar in the sauce will burn and become bitter by the time the ribs are tender. Sauce them only at the very end.
- Not Wrapping Them in Foil: The foil packet is essential for the oven method. It traps steam and moisture, which is what helps to break down the tough connective tissues and make the ribs fall-off-the-bone tender.
Variations & Customizations: Your Ribs, Your Rules
The classic is a masterpiece, but feel free to experiment.
- Spicy Chipotle Ribs: Add 1 tablespoon of chipotle powder to your dry rub. For the final glaze, mix your BBQ sauce with a little bit of the adobo sauce from a can of chipotle peppers.
- Mustard & Vinegar Ribs: For a Carolina-style twist, finish the ribs with a thin, tangy sauce made from apple cider vinegar, yellow mustard, a little brown sugar, and red pepper flakes, instead of a thick, sweet BBQ sauce.
- Asian-Inspired Sticky Ribs: Change up the rub with five-spice powder, ginger, and garlic. For the final glaze, use a mix of hoisin sauce, soy sauce, honey, and a little rice vinegar. Garnish with sesame seeds and green onions.
FAQ Section: All Your Rib-Related Quandaries
You have questions about this indoor BBQ adventure. I’ve got the answers.
- Q: What’s the difference between baby back and St. Louis style ribs? A: Baby back ribs are from the top of the rib cage and are smaller, leaner, and more tender. St. Louis style ribs are spare ribs that have been trimmed down; they are larger, flatter, and have more fat (which means more flavor!). Both work great with this method; St. Louis ribs just need a little more time.
- Q: Do I really have to remove the membrane on the back? A: Yes! I promise it’s worth the 30 seconds of effort. It makes the ribs more tender and allows the flavor of your rub to penetrate the meat.
- Q: Can I make these ahead of time? A: Absolutely! You can do the long, slow bake a day ahead. Let the foil-wrapped ribs cool, then refrigerate them. When you’re ready to serve, just unwrap them, sauce them, and do the final high-heat bake to warm them through and caramelize the sauce.
- Q: How do I know when the ribs are really done? A: The bend test is your best friend. Pick up the rack in the center with a pair of tongs. If it bends easily and the meat begins to crack on the surface, they are perfectly tender.
- Q: Can I use a different kind of rub? A: Of course! Use your favorite store-bought or homemade rub. The method is the most important part.
- Q: My sauce burned during the final step. What happened? A: Your oven was likely too hot, or you left them in for too long. The sugar in BBQ sauce caramelizes very quickly. Especially if you’re using the broiler, it can go from perfect to burnt in under a minute, so watch it closely!
- Q: Can I finish these on the grill instead of in the oven? A: Yes, and it’s a fantastic way to get a little extra smoky flavor! After the long, slow bake in the oven, just take the unwrapped ribs to a preheated grill. Sauce them and grill for a few minutes per side until the sauce is bubbly and slightly charred.
Final Thoughts: You Are Now an Indoor Pitmaster
You’ve done it. You have officially mastered the art of making spectacular, fall-off-the-bone ribs without a fancy smoker or a perfect summer day. You’ve harnessed the power of your oven to create a meal that is tender, juicy, and packed with flavor. So go on, get your hands dirty, and enjoy the delicious fruits of your (minimal) labor. Your family will thank you, your friends will be jealous, and your local BBQ joint might just wonder where you’ve been.