How to Roll Cinnamon Rolls Perfectly (For a Tight Swirl & No Gaps!)
You’ve done the hard part. You faced your fear of yeast, and you won. You’ve created a beautiful, pillowy soft dough that has risen like a champ. You feel invincible, like a true baking god. And then it comes time for the most crucial, make-or-break step in your journey: the roll-up. Suddenly, the fate of your entire morning rests on this single moment. This is where dreams of perfect, gooey swirls are made… or where they devolve into a sad, squished, leaky mess.
If you’ve ever ended up with cinnamon rolls that are tiny on the ends and gigantic in the middle, or that unravel in the oven and spill their precious filling everywhere, this guide is for you. We’re going to break down exactly how to roll cinnamon rolls so perfectly, so tightly, that every single bun is a picture-perfect masterpiece.
Forget a lopsided, sad-looking bake. Today, we’re mastering the swirl.
Why This Technique is a Total Game-Changer
Focusing on the roll isn’t just about aesthetics; it’s about the very soul of the cinnamon roll.
First, it guarantees the perfect goo-to-dough ratio in every bite. A tight, even roll means more layers of that buttery, cinnamon-sugar filling are packed into every spiral. No more disappointing, bready bites—just pure, swirly bliss from the edge to the very center.

Second, it prevents the dreaded filling leakage. When you roll and seal your dough correctly, all that delicious, melty goodness stays inside the bun where it belongs, creating a self-saucing, gooey bottom instead of a burnt, sugary puddle on your pan.
Finally, it delivers bakery-worthy results. This technique is the difference between a bake that looks homemade (in a “bless your heart for trying” kind of way) and one that looks professional. Your friends and family will be convinced you ordered them from a fancy bakery.
The Recipe You’ll Need (The Foundation)
You can’t roll what you haven’t made! Here is a simple, foolproof recipe that creates the perfect dough for rolling.
For the Perfect Dough:
- 1 cup (240ml) whole milk, warmed to about 110°F (43°C)
- 241 teaspoons (1 packet) active dry yeast
- 41 cup (50g) granulated sugar
- 1 large egg plus 1 egg yolk, at room temperature
- 41 cup (57g) unsalted butter, melted
- 321 cups (420g) all-purpose flour
- 1 teaspoon salt
For the No-Leak Filling:
- 21 cup (113g) unsalted butter, very soft but NOT melted
- 43 cup (165g) packed light brown sugar
- 2 tablespoons ground cinnamon
For the Classic Cream Cheese Frosting:
- 4 ounces (113g) cream cheese, softened
- 41 cup (57g) unsalted butter, softened
- 121 cups (180g) powdered sugar
- 1 teaspoon vanilla extract
The Rolling Pro’s Toolkit
These are the tools that will make you feel like you have your life together.
- Stand Mixer: For making the dough while you sip coffee.
- A large, clean work surface: You need room to operate.
- Rolling Pin: A heavy, straight one gives you the most even pressure.
- A Ruler or Tape Measure: Yes, seriously. This is the secret to a perfect rectangle.
- Bench Scraper: Invaluable for squaring up the edges of your dough.
- Offset Spatula: For applying the filling in a smooth, even layer.
- Unflavored Dental Floss: The ultimate hack for cutting perfect, non-squished rolls. It’s a game-changer.
- 9×13 inch Baking Pan: To bake your perfect creations.
Step-by-Step: The Ultimate Rolling Tutorial
Okay, your dough has risen. It’s puffy and beautiful. Let’s not mess this up.
H3: Part 1: The Dough (A Quick Recap)
- Make Your Dough: First, you need to have your dough ready. Follow your favorite recipe (like the one above!)—bloom the yeast, mix the ingredients, knead until smooth, and let it complete its first rise until doubled in size. This is our starting point.
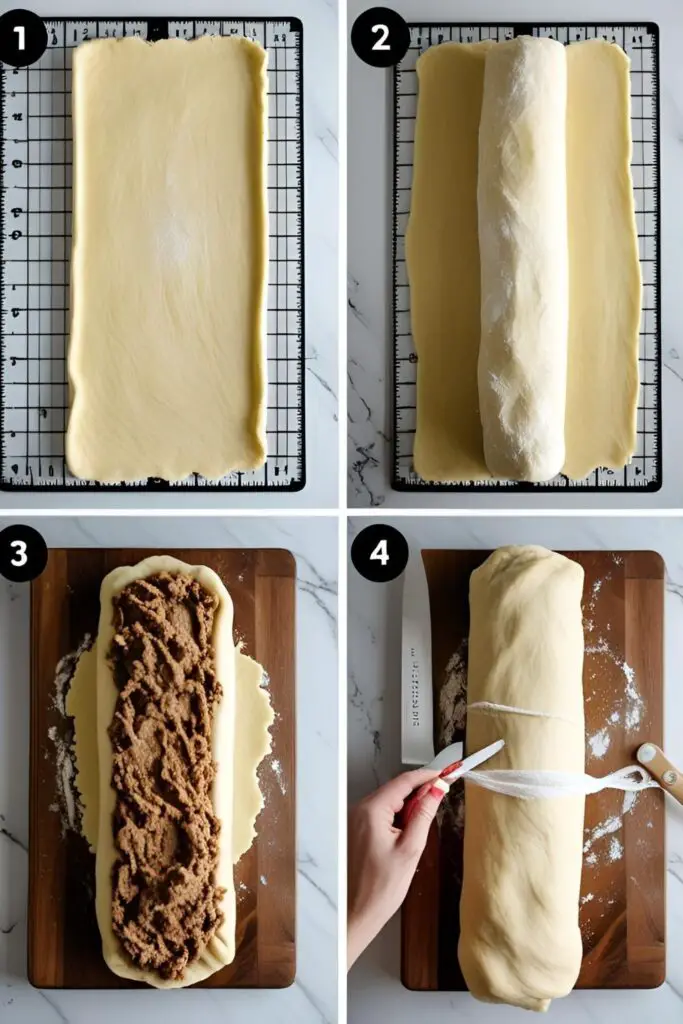
H3: Part 2: Creating the Perfect Rectangle
- Prep Your Surface: Lightly flour your clean work surface. Don’t go crazy with the flour; just enough to prevent sticking.
- The Initial Roll-Out: Gently punch down your risen dough and place it on the floured surface. Begin rolling it out, trying your best to form a rectangular shape from the get-go.
- Use Your Ruler! Your goal is a rectangle that is roughly 18 inches wide and 12 inches tall. Use your ruler or tape measure to check the dimensions. This precision is what ensures all your rolls will be the same size.
- Square the Corners: Is your rectangle looking a little… abstract? No problem. Use your bench scraper to gently push in the sides and square up the corners. A perfect rectangle is the foundation of a perfect roll.
H3: Part 3: Applying the Filling
- Create the Paste: Make sure your filling ingredients (softened butter, brown sugar, cinnamon) are mixed into a thick, spreadable paste. If your butter is melted, it will leak.
- Spread Evenly: Using your offset spatula, spread the filling paste over the entire surface of your dough rectangle, but leave a 21-inch clean border along the top 18-inch edge. This clean edge is what you’ll use to seal the log.
H3: Part 4: The Roll-Up – The Main Event
- Start Tight: Begin at the long (18-inch) edge closest to you. Take the edge of the dough and start rolling it up and away from you. The first couple of inches are the most important. Use your fingertips to roll this first section as tightly as you possibly can.
- Maintain Even Pressure: As you continue to roll the log away from you, focus on keeping the pressure even across the entire length. Gently pull the log back towards you as you roll forward to maintain tension. This is what prevents gaps from forming inside your swirl.
- Finish the Roll: Continue rolling until you reach the clean border you left at the top edge.
H3: Part 5: The Seal and The Slice
- Pinch to Seal: Bring the clean edge of the dough up and over the log. Firmly pinch the seam along the entire length to seal the log shut. Give the whole log a gentle roll so the seam is on the bottom.
- Grab the Floss: Take a long piece of unflavored dental floss. Slide it under the log. To cut a roll, bring the two ends of the floss up, cross them over the top of the log, and pull in opposite directions.
- Perfect, Clean Cuts: The floss will slice through the dough cleanly without squishing your beautiful, tight swirl. It’s a magical moment. Cut the log into 12 even 1.5-inch rolls.
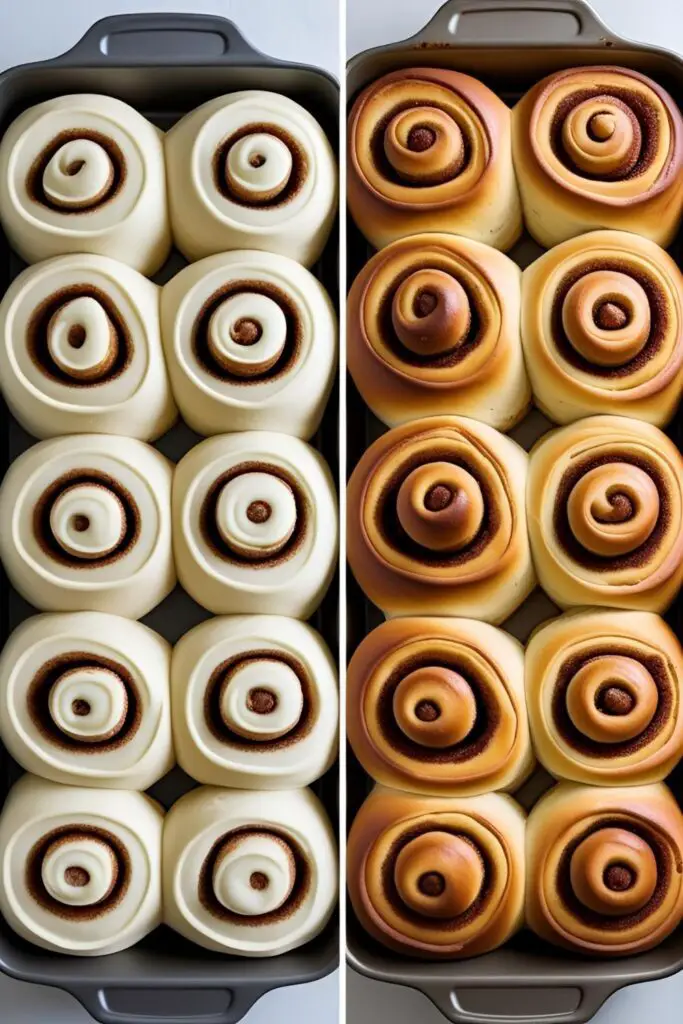
- The Second Rise & Bake: Place your perfectly cut rolls in a greased pan, let them do their second rise until puffy, and then bake to golden-brown perfection.
Nutritional Info (For Your Information)
Let’s just acknowledge the delicious reality.
- Serving Size: 1 perfectly rolled cinnamon roll
- Estimated Calories: Around 450-500 kcal
- Key Nutrients: Carbohydrates for energy, joy for the soul.
- FYI: The calories are what make it taste good. Don’t fight it.
Common Mistakes to Avoid When Rolling

This is where good intentions go to die. Don’t make these errors.
- The Lopsided Roll: You didn’t start with a proper rectangle. This leads to cone-shaped rolls on the ends and giant ones in the middle. Measure your dough!
- A Loose Roll with Gaps: You weren’t aggressive enough at the beginning. You have to start that roll as tight as humanly possible to get that perfect, multi-layered swirl.
- The Squished Roll Tragedy: You used a dull knife. It compresses the layers and squishes the roll into a sad oval. Use dental floss. It is the way.
- Leaky Filling Syndrome: Your seam wasn’t sealed properly. When you finish the roll, you need to pinch that seam shut with authority to lock in the filling.
- A Sticky Mess: You didn’t use enough flour on your work surface, and now your dough is glued down. Use just enough flour so the dough can move freely, but not so much that it becomes dry.
Variations & Customizations (How Fillings Affect the Roll)
Different fillings require slight adjustments to your technique.
- Jam or Fruit-Filled Rolls: If using a wetter filling like raspberry jam, be extra careful not to go all the way to the edges. Leave a larger border (about 1 inch) all around, as the filling will spread and can make sealing difficult.
- Nutty & Chunky Rolls: When adding chunky ingredients like chopped pecans or chocolate chips, press them gently into the filling paste so they adhere. Be mindful that very large chunks can tear the dough as you roll, so chop them relatively fine.
- Savory Rolls (e.g., Pesto & Cheese): Savory fillings are often less prone to leaking than sugary ones. You can be a bit more generous with these, but the principle of a tight roll and a good seal remains just as important for a good final structure.
Frequently Asked Questions (The Rolling Support Hotline)
Why are my cinnamon rolls uneven and cone-shaped?
This is almost always because you started rolling a piece of dough that was not a true rectangle. The uneven width causes the ends to be smaller. Use a ruler and a bench scraper to get a proper rectangle before you start.
How do I get a really tight swirl?
Tension is key. Start by pinching and rolling the first inch of the dough over itself as tightly as you can with your fingertips. As you continue to roll, gently pull the log back towards you with each forward push to keep that tension.
What is the absolute best way to cut cinnamon rolls?
Unflavored dental floss. It is superior to even the sharpest knife. It slices through the soft dough without compressing the layers at all, giving you perfectly round rolls.
My filling always leaks out the bottom of the pan. Why?
Two likely culprits: 1) Your roll wasn’t tight enough, leaving gaps for the filling to escape, or 2) You didn’t seal the final seam properly, and it unraveled during baking. Pinch that seam shut!
How big should I actually roll the dough?

For a standard recipe making 12 rolls, a rectangle of about 18 inches wide by 12 inches tall is a great target. This gives you a 1.5-inch roll when cut.
Should the dough be sticky when I’m rolling it out?
It should be soft and pliable, but not so sticky that it’s unmanageable. If it’s sticking to your surface or the rolling pin, add a very light dusting of flour. Don’t add too much, or you’ll make the dough tough.
I messed up the roll! Can I unroll it and start over?
Yes, within reason. If you’ve just started and it’s loose, you can unroll it a bit and try again. The dough is forgiving to a point. Just be gentle!
Final Thoughts
Congratulations! You are now a master of the swirl, a sultan of the spiral, a connoisseur of the cinnamon roll-up. You have faced the most intimidating step of the process and have come out the other side with the knowledge to create perfect, beautiful rolls every single time.
There is no greater satisfaction than slicing into a log of dough and seeing those perfect, uniform swirls. So go forth with confidence. May your rolls always be tight, your filling always be gooey, and your frosting always be plentiful.