How to Roast a Chicken in the Oven (For Crispy Skin & Juicy Meat, Every Time!)
Okay, confession time: for years, I was utterly terrified of roasting a whole chicken. It seemed like such a grown-up, complicated, Sunday-dinner-only kind of task. Visions of dry breasts and rubbery skin haunted my culinary dreams. But then, I discovered the simple truths of how to roast a chicken in the oven, and my world (and my dinner plate) changed forever. Forget those sad, pale, overcooked birds of your past. We’re about to unlock the secrets to a perfectly golden, crispy-skinned, ridiculously juicy, and incredibly flavorful roast chicken that will make you feel like a total kitchen wizard. And honestly? It’s easier than ordering takeout.
Why This Oven-Roasted Chicken Is Your New Go-To (It’s Pure Magic!)
Why should you bother roasting a chicken when pre-cooked options exist? Because this method offers a triple threat of awesomeness:
- Flavor Beyond Compare: This isn’t just chicken; it’s flavorful chicken. The high heat and strategic seasoning create a symphony of deliciousness that store-bought rotisserie chickens can only dream of.
- Crispy Skin, Juicy Meat: This is the holy grail, isn’t it? We’re talking shatteringly crisp skin that crackles with every bite, juxtaposed with incredibly tender, moist meat underneath. No more dry breast meat, thank goodness!
- Effortless Elegance: It looks super impressive on the table, but the actual hands-on time is minimal. It’s the perfect dish for a weeknight meal or for when you want to impress guests without breaking a sweat.
- Serious Leftover Potential: One chicken, endless possibilities! Sandwiches, salads, soups, tacos… the roasted chicken is the ultimate meal prep powerhouse.
You’re not just roasting a chicken; you’re creating a culinary experience that will make you wonder why you ever did anything else.
Ingredients: The Simplicity of Perfection
You don’t need a gourmet grocery store for this. Basic, good quality ingredients are all you need.
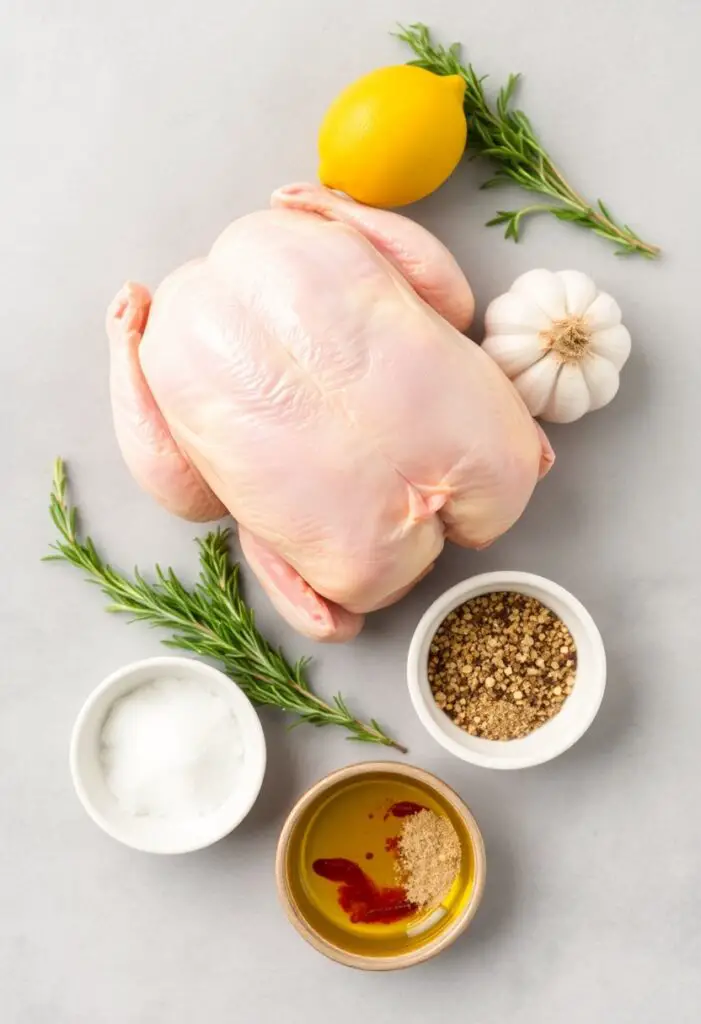
- 1 whole chicken, 3-4 pounds (Make sure to remove any giblets or neck from the cavity!)
- 2 tablespoons olive oil (or melted butter for extra richness)
- 1 tablespoon kosher salt
- 1 teaspoon freshly ground black pepper
- 1 teaspoon garlic powder
- ½ teaspoon smoked paprika (optional, but it adds amazing color and a hint of smoky flavor!)
- 1 lemon, halved
- ½ head of garlic, cut in half horizontally (no need to peel, we’re just after the aroma!)
- A few sprigs of fresh herbs like rosemary or thyme (optional, for aromatic goodness)
- Optional for a roasting bed: 1 large onion, roughly chopped; 2 carrots, roughly chopped; 2 celery stalks, roughly chopped. These catch drippings and add flavor to any pan sauce you might make.
The Golden Rule of Chicken:
- Always start with a fresh or fully thawed chicken. And seriously, before you do anything else, reach into that cavity and pull out the giblet packet. Trust me on this one. You don’t want to find that little surprise mid-carve.
Tools & Kitchen Gadgets Used: Your Roasting Arsenal
You likely have most of these lying around.
- Roasting Pan with a Rack: Essential for lifting the chicken out of its juices, ensuring crispy skin. If you don’t have one, a regular baking sheet with an oven-safe wire rack on top works perfectly.
- Cutting Board: For prep work and carving.
- Paper Towels: Your secret weapon for crispy skin.
- Small Bowl: For mixing your seasoning blend.
- Pastry Brush: (Optional) For evenly coating the chicken with oil.
- Kitchen Twine: (Optional) For trussing the chicken.
- Instant-Read Meat Thermometer: Your absolute best friend for perfectly cooked, safe chicken. No guesswork required!
- Aluminum Foil: For resting the chicken after it comes out of the oven.
- Tongs or Oven Mitts: For handling that hot bird.
Step-by-Step Instructions: Your Path to Roast Chicken Glory
Follow these steps precisely, and prepare for deliciousness. It’s truly easier than it looks!
Act 1: The Prep (Crucial for Crispy Skin!)
- Unpack & Inspect: Take your chicken out of its packaging. Reach into the cavity and remove any giblets or neck piece. You’ll thank me later.
- Dry, Dry, Dry: This is probably the most important step for crispy skin. Pat the entire chicken, inside and out, aggressively dry with paper towels. We want zero moisture on that skin. A wet chicken will steam, not roast.
- Oil & Season: In your small bowl, combine the kosher salt, black pepper, garlic powder, and smoked paprika. Drizzle the olive oil all over the chicken, then use your hands to rub it evenly over the skin. Now, liberally sprinkle your seasoning blend all over the bird, rubbing it into the skin. Don’t forget the underside!
- Aromatics In: Stuff the lemon halves, garlic halves, and fresh herb sprigs into the chicken’s cavity. These infuse the meat with amazing flavor as it roasts.
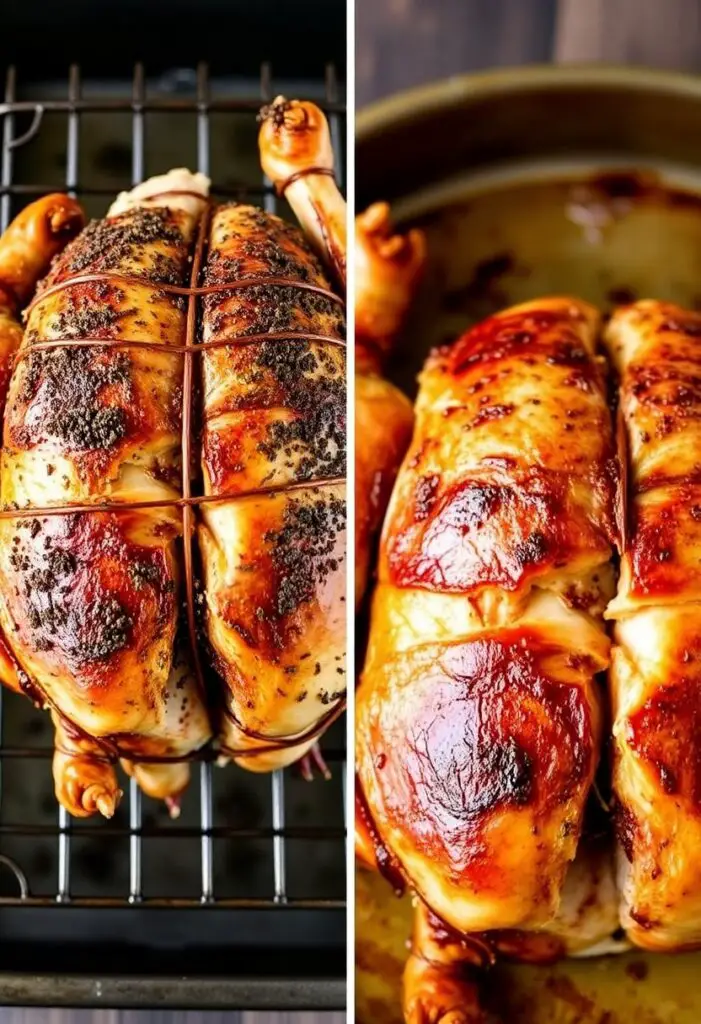
- Truss (Optional Pro Move): If you’re feeling fancy, you can truss the chicken. This involves tucking the wing tips under the breast and tying the legs together with kitchen twine. Trussing helps the chicken cook more evenly and makes it look neater. Don’t stress if you skip this; it will still be delicious!
Act 2: The Roast (Where the Magic Happens)
- Oven Preheat: Preheat your oven to a scorching 425°F (220°C). That initial high heat is key for getting that skin beautifully crisp.
- Veggie Bed (Optional): If using, scatter your chopped onion, carrots, and celery in the bottom of your roasting pan. Place the wire rack directly over the veggies.
- Position the Bird: Place your prepared chicken, breast-side up, on the wire rack in the roasting pan. The rack ensures air circulates around the whole bird, which means crispier skin all around.
- Initial Blast: Roast the chicken at 425°F (220°C) for 20-25 minutes. This high-heat phase kickstarts the browning process.
- Lower & Finish: After the initial high-heat blast, reduce the oven temperature to 375°F (190°C). Continue roasting for another 45-60 minutes, or until an instant-read meat thermometer inserted into the thickest part of the thigh (make sure you don’t hit the bone!) reads 165°F (74°C).
- Golden Perfection: If your chicken isn’t quite as golden as you’d like in the last 10 minutes of cooking, you can briefly increase the oven temperature back to 400-425°F (200-220°C) or even hit it with the broiler for a minute or two (but watch it closely – broiler can burn fast!).
Act 3: The Rest & Carve (Patience is a Virtue, Especially Here)
- The Sacred Rest: This step is non-negotiable for juicy chicken. Once your thermometer reads 165°F, remove the chicken from the oven and transfer it to a clean cutting board. Tent it loosely with aluminum foil and let it rest for at least 10-15 minutes. Seriously, just walk away. This allows all those delicious juices to redistribute throughout the meat, resulting in a much juicier bird. Carve too early, and all the juices will run out onto your board.
- Carve It Up: After resting, carve the chicken into your preferred pieces. It should be so tender, it practically falls apart.
- Serve & Revel: Serve your magnificent oven-roasted chicken with any pan drippings (if desired) and a side of your choice. Bask in the glory of your culinary achievement!
Calories & Nutritional Info (Per Serving, Estimated)
This is wholesome, satisfying goodness. (Estimates can vary based on chicken size, if you eat the skin, and serving size. This assumes roughly 4 servings from a 3-4lb bird.)
- Estimated Calories per serving: ~400-550 calories
- Protein: ~40-50g (Excellent source!)
- Fats: ~25-40g (Includes healthy fats from the chicken, especially if consuming skin.)
- Vitamins & Minerals: A good source of B vitamins (Niacin, B6, B12), Phosphorus, and Selenium.
Common Mistakes to Avoid: Don’t Let Your Roast Be a Bust!
Learn from the errors of others (and my own past mistakes).
- Wet Skin: I’ll say it again: wet skin means rubbery skin. Pat, pat, pat!
- Forgetting the Giblets: Seriously, this happens more often than you think. Always check the cavity!
- Under-seasoning: Chicken needs a good amount of salt and pepper to truly shine. Don’t be shy!
- Not Using a Rack: If the chicken sits directly in its juices, the bottom skin will get soggy. The rack is essential for all-around crispiness.
- Overcrowding the Pan: If you try to roast veggies and a chicken too tightly, nothing gets crispy. Give everything some breathing room.
- Not Resting the Chicken: This is where many home cooks falter. Skipping the rest means dry meat. Period.
- Not Using a Meat Thermometer: Guessing doneness is a recipe for either a dry bird or, worse, an unsafe one. Invest in a good instant-read thermometer!
Variations & Customizations: Your Oven, Your Flavor Adventure
Once you’ve nailed the basic roast, feel free to get creative!
- Garlic Herb Butter Roast: Soften ¼ cup of butter and mix it with 2-3 cloves of minced garlic and 1 tablespoon of finely chopped fresh rosemary and thyme. Gently separate the skin from the breast meat with your fingers and rub about half of this butter mixture directly onto the breast meat under the skin. Rub the rest over the outside. Heavenly!
- Spicy Lemon Pepper Chicken: Add a teaspoon of red pepper flakes and an extra teaspoon of lemon zest to your seasoning blend. The kick is fantastic!
- Mediterranean Roast: Stuff the cavity with a quartered red onion, a whole head of garlic (halved), and a handful of fresh oregano. Rub the outside with olive oil, salt, pepper, and a pinch of dried oregano. Serve with roasted potatoes.
FAQ Section: All Your Roasting Queries, Answered
You’ve got questions about this oven-baked marvel. I’ve got answers.
- Q: What is the ideal internal temperature for a roasted chicken? A: The thickest part of the thigh (avoiding the bone) should reach 165°F (74°C).
- Q: How long does it take to roast a whole chicken in the oven? A: For a 3-4 pound chicken, typically around 1 hour to 1 hour 15 minutes with this method. However, always rely on your thermometer, not just the clock.
- Q: Should I baste my chicken while it’s roasting? A: No! Opening the oven door repeatedly to baste drops the oven temperature and prolongs cooking, often leading to less crispy skin. The initial oil rub and aromatics are enough.
- Q: My chicken skin isn’t getting crispy! What am I doing wrong? A: Most likely, the skin wasn’t dry enough initially, or your oven temperature dropped too much. Ensure you pat it super dry, use a high initial temperature, and don’t open the oven door too often.
- Q: Can I use frozen chicken? A: Yes, but it must be completely thawed before roasting. A partially frozen chicken will cook unevenly and can be unsafe.
- Q: What can I do with the leftover chicken bones? A: Make chicken stock! It’s incredibly easy and gives you a rich, flavorful base for soups and sauces. Just simmer the bones with some aromatics (onion, carrot, celery) and water for a few hours.
- Q: Is it okay if the meat near the bone is still a little pink? A: As long as the internal temperature registers 165°F (74°C) in the thickest part of the thigh, any pinkness near the bone (especially in younger birds) is often due to pigments, not undercooking, and is perfectly safe to eat.
Final Thoughts: You Are Now an Oven Roasting Legend
There you have it. You’ve conquered the whole chicken, transforming it into a golden-skinned, juicy, flavor-packed masterpiece right in your own oven. You’ve learned the simple secrets, avoided the common pitfalls, and emerged victorious. Go forth, my friend, and roast with confidence! Your weeknight dinners (and your Sunday feasts) will never be the same. TBH, you might even start looking forward to carving.


