Beyond Salt & Pepper: Your Ultimate Guide on How to Season a Steak Like a Pro
Let’s talk steak. You’ve splurged on that gorgeous cut of ribeye or sirloin, ready to transform it into a culinary masterpiece. But then you stare at it, a little intimidated, wondering, “Is salt and pepper really enough?” Or worse, you sprinkle on some generic ‘steak seasoning’ and hope for the best. Stop! You’re leaving flavor on the table, my friend. Mastering how to season a steak is the difference between a good steak and a legendary steak. It’s not rocket science, but there are definitely some pro tips that will elevate your steak game from “meh” to “OMG, is this from a restaurant?!” Get ready to unlock the true potential of your beef.
Why Mastering Steak Seasoning Is Your Culinary Superpower
Why should you bother dedicating an entire article to something as seemingly simple as seasoning a steak? Because it’s the foundation of incredible flavor, that’s why! This isn’t just about sprinkling some stuff on; it’s about understanding how to coax the best out of your beef. This guide is awesome for a few reasons. First, flavor, glorious, mouth-watering flavor! We’re talking about enhancing, not overpowering, that inherent beefiness. Second, it’s ridiculously easy to implement. No fancy techniques required, just a bit of intentionality. And third, it impresses absolutely everyone. Trust me, when that perfectly seasoned, perfectly cooked steak hits the table, you’ll be the undisputed culinary hero. IMO, it’s a small effort for a huge reward.
Ingredients: Your Steak’s Best Friends
You don’t need a thousand ingredients to make a steak sing. Sometimes, less is definitely more, but we’ll cover the essentials and some fun additions.
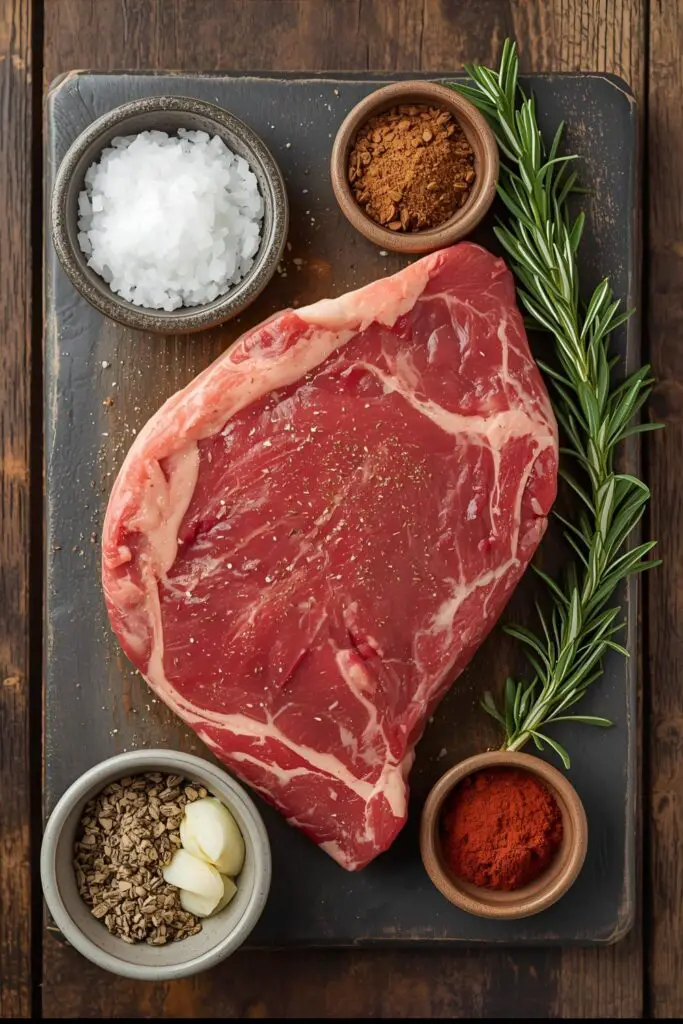
- Coarse Sea Salt: (e.g., Kosher salt, Maldon sea salt). This is non-negotiable. Regular table salt won’t give you the same crust or flavor.
- Freshly Ground Black Pepper: Another must-have. Freshly ground makes a huge difference compared to pre-ground.
- Garlic Powder: (Optional, but highly recommended for an earthy kick).
- Onion Powder: (Optional, complements garlic powder beautifully).
- Smoked Paprika: (Optional, adds a lovely depth and subtle smokiness).
- Cayenne Pepper or Red Pepper Flakes: (Optional, for a spicy kick).
- High-Quality Steak: (This isn’t an ingredient you apply, but it’s the canvas! Ribeye, New York Strip, Sirloin, Filet Mignon – choose wisely!).
- High-Smoke-Point Oil: (e.g., grapeseed, canola, avocado oil, for cooking, not for seasoning directly).
- Unsalted Butter: (For basting during cooking, optional but amazing for flavor).
- Fresh Herbs: (Rosemary, thyme – for infusing flavor during cooking).
Key Substitutions:
- Coarse Sea Salt: While Kosher or sea salt is ideal for its crystal size and even coverage, if you’re truly in a pinch, use regular table salt but reduce the amount by about half, as it’s much denser.
- Freshly Ground Black Pepper: Pre-ground pepper won’t give you the same vibrant aroma, but it’s better than no pepper!
- Spice Blends: Instead of individual powders, you can use a good quality pre-made steak rub. Just be mindful of its salt content!
- Herbs: Dried versions of rosemary or thyme can work if fresh aren’t available, but use less (about 1/3 the amount of fresh).
Tools & Kitchen Gadgets Used
You won’t need anything too fancy here. Just the basics to get that steak seasoned right.
- Small Mixing Bowl: For combining your custom spice blends.
- Measuring Spoons: For accurate spice ratios.
- Paper Towels: Absolutely crucial for patting that steak dry.
- Cutting Board: For prepping and seasoning your steak.
- Grinder (for fresh pepper): If you’re serious about your pepper.
- Plate or Baking Sheet: For resting your seasoned steak.
Step-by-Step Instructions: Your Path to Seasoning Mastery
Alright, let’s get that steak ready for its starring role! This is going to be quick and delicious.
H3: The Foundation: Prep Your Steak Like a Pro
- Bring to Room Temp: First things first, take your steak out of the fridge at least 30 minutes, but ideally 1-2 hours, before cooking. This allows the meat to relax and cook more evenly. Don’t skip this, it’s important!
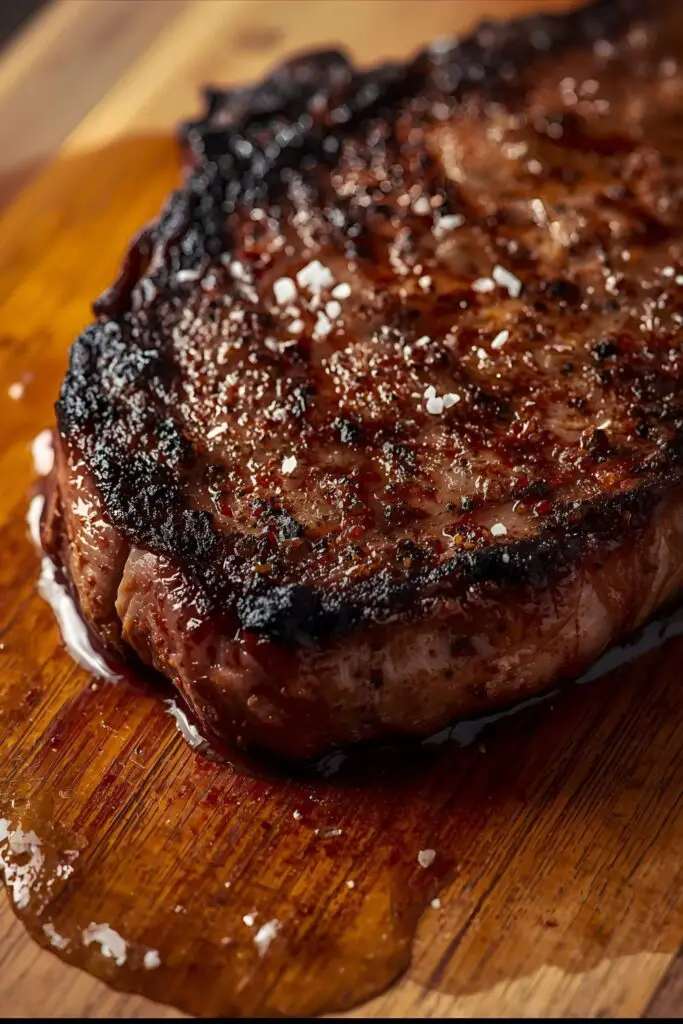
- Pat It DRY (Seriously Dry!): This is perhaps the single most crucial step for achieving an amazing crust. Use a generous amount of paper towels to vigorously pat both sides and all edges of the steak completely dry. We’re talking bone-dry. Any moisture on the surface creates steam, and steam prevents that gorgeous, crispy sear we’re after.
- Trim Excess Fat (Optional): If your steak has large, floppy pieces of exterior fat (beyond the delicious marbling), you can trim some of it off. However, leave a thin band of fat on cuts like New York strip; it renders down and adds incredible flavor.
H3: The Seasoning: Layering Flavor Like a Boss
- The Basic Duo: Salt & Pepper: This is your starting point. You need a generous amount of coarse sea salt. Think about how much surface area you have. Sprinkle it from a height to ensure even coverage. Then, follow with freshly ground black pepper.
- How Much Salt? A good rule of thumb is 1 teaspoon of coarse salt per pound of steak, but I often go a little heavier. You want it to look like a light snowfall.
- When to Salt? There are two camps:
- Early Salting (40 minutes to 24 hours before cooking): This allows the salt to draw out moisture, then reabsorb back into the meat, resulting in a deeper flavor and a drier surface for searing. This is my preferred method.
- Immediate Salting (just before cooking): If you’re short on time, salt just before it hits the pan. Avoid salting 5-30 minutes before, as the salt will only draw moisture to the surface without enough time to reabsorb, leading to a less crispy crust.
- Add the Flavor Boosters (Optional, but highly recommended): This is where you can get creative and build on that base.
- Combine Your Spices: In a small bowl, mix equal parts garlic powder and onion powder with your coarse salt and pepper. Add a pinch of smoked paprika for color and depth. A tiny bit of cayenne can add a subtle kick without making it overtly spicy.
- Apply Evenly: Sprinkle your custom blend generously over both sides and the edges of the dry steak. Press it gently into the meat to ensure it sticks. Don’t rub it in like a marinade; a nice, even coating is what you’re after.
H3: The Final Touches Before the Heat
- Let It Sit (Again): If you just seasoned the steak, let it sit on a plate at room temperature for another 15-20 minutes for the seasonings to adhere and for the surface to dry out a bit more.
- No Oil on the Steak!: Resist the urge to oil the steak itself. The oil goes in the pan. Oiling the steak can interfere with that perfect crust development. You wouldn’t want that, would you?
Calories & Nutritional Info (Estimated Per Serving)

Seasoning itself adds minimal calories or nutritional value, but it enhances the flavor of the protein-packed steak. This is a rough estimate for a 4-ounce serving of steak, assuming basic salt and pepper seasoning.
- Calories: ~0-5 calories (from seasoning blend)
- Sodium: Varies wildly based on how much salt you use. Be mindful if you’re watching sodium intake!
- Other Nutrients: Negligible from the seasonings alone. The steak itself provides protein, iron, zinc, and B vitamins.
Common Mistakes to Avoid (So Your Steak Isn’t a Flop)
Don’t let these seasoning blunders ruin your beautiful steak.
- Not Patting the Steak Dry: I cannot emphasize this enough. Wet steak = no sear = sad steak. Always, always pat it dry.
- Under-Seasoning: A bland steak is a crime. Don’t be shy with the salt and pepper! It needs more than you think, especially for a thick cut.
- Using Table Salt: Fine table salt often absorbs too quickly and can make your steak taste overly salty without contributing to that desirable crust. Opt for coarse salt.
- Seasoning Too Early or Too Late (If You’re Not Salting Early): If you’re not doing the long dry brine (early salting), then season immediately before cooking. The “5-30 minute window” after salting is the danger zone where moisture is drawn out but hasn’t reabsorbed, leading to a steamy surface.
- Not Seasoning the Edges: The edges of the steak contribute to the overall flavor profile and crust. Season all sides!
- Rubbing Instead of Sprinkling: Don’t rub the spices into the meat like a marinade. Sprinkle them evenly and then gently press to adhere.
Variations & Customizations: Season Your Steak, Your Way!
The basic salt and pepper is a classic for a reason, but here are some fun ways to mix things up!
- Smoky Heat Rub: Combine coarse salt, freshly ground black pepper, smoked paprika, garlic powder, onion powder, and a good pinch of cayenne pepper for a rub with depth and a kick. This is fantastic on almost any cut.
- Herbaceous Delight: Mix coarse salt, black pepper, and finely minced fresh rosemary and thyme. Press this onto the steak. The herbs will perfume the beef beautifully as it cooks.
- Espresso-Chili Rub: For a rich, dark crust with a hint of bitterness and heat, combine coarse salt, black pepper, fine espresso powder, chili powder, and a touch of brown sugar. This creates an incredible bark, especially on grilled steaks.
- Mediterranean Twist: Instead of the usual, try a mix of coarse salt, black pepper, dried oregano, dried basil, garlic powder, and a pinch of dried lemon peel. Great for lighter cuts or when you want something a little different.
FAQ Section: Because Even Seasoning Has Secrets
Q1: Should I put oil on a steak before seasoning?
A: Generally, no. Pat your steak dry first, then season it. The oil goes directly into your hot pan or onto your grill grates. Oiling the steak beforehand can interfere with the salt penetrating the meat and achieving a dry surface for a perfect sear.
Q2: How much salt should I use to season a steak?
A: A good rule of thumb is 1 teaspoon of coarse salt per pound of steak. However, this can vary based on personal preference and the cut of steak. You want the surface to look like it has a light, even coating of salt.
Q3: When should I season my steak with salt and pepper?
A: You have two main options: * Early (40 minutes to 24 hours before cooking): This is called a “dry brine” and is highly recommended. The salt draws out moisture, then reabsorbs, leading to a juicier steak and a better crust. * Just before cooking (within 5 minutes): If you don’t have time for a dry brine, season right before the steak hits the heat. Avoid seasoning 5-30 minutes before cooking, as the salt will draw moisture to the surface without enough time to reabsorb, making it harder to get a good sear.
Q4: What kind of salt is best for seasoning steak?

A: Coarse salts like Kosher salt or flaky sea salt (like Maldon) are best. Their larger crystal size allows for more even coverage and a better crust, and they don’t dissolve too quickly.
Q5: Can I use garlic powder and onion powder on steak?
A: Absolutely! Garlic powder and onion powder are fantastic additions to a steak seasoning blend. They add a delicious savory depth that complements the beef flavor beautifully. Just remember to use them in powder form, not fresh minced garlic, which can burn quickly at high searing temperatures.
Q6: Should I wash my steak before seasoning?
A: No, you should never wash raw steak (or any raw meat/poultry). Rinsing can spread bacteria around your kitchen sink and countertops. Instead, simply pat the steak thoroughly dry with paper towels before seasoning.
Q7: Does seasoning a steak prevent it from getting a good crust?
A: No, quite the opposite! Properly seasoned steak (especially with coarse salt and a dry surface) actually helps create a better crust. The salt helps draw out surface moisture and contributes to the Maillard reaction (the browning that creates delicious flavors).
Final Thoughts: Your Steak, Your Rules (Mostly)
There you have it. You’re no longer just throwing some random bits of spice at your beef; you’re intentionally seasoning a steak to unlock its full, glorious potential. No more bland bites, no more sad, pale crusts. Just perfectly flavored, perfectly seared masterpieces that will make your taste buds sing. Go forth, experiment with these tips, and remember: a little confidence (and a lot of salt) goes a long way. Your culinary destiny awaits! Now, who’s ready for some steak? Because, TBH, I’m practically drooling.