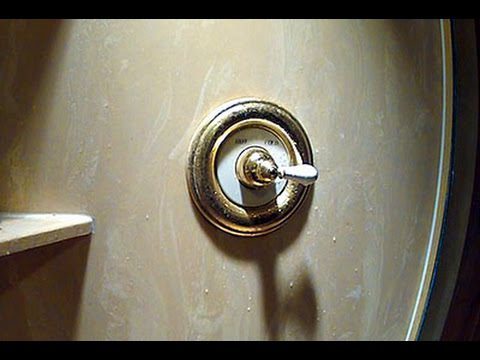
To remove an American Standard shower handle, first unscrew the set screw in the handle with an Allen wrench. Next, pull off the handle. Finally, use a Phillips screwdriver to unscrew the escutcheon plate and remove it from the wall.
- Unscrew and remove the handle
- This will expose the escutcheon plate, which is the metal or plastic plate that covers the hole in the shower wall
- Use a screwdriver to remove the screws that hold the escutcheon plate in place
- Pull the escutcheon plate off of the wall to expose the valve stem
- Use an adjustable wrench to loosen and remove the packing nut from around the valve stem
- This nut is usually brass or chrome-plated and may be difficult to remove if it is corroded or rusted in place
- With the packing nut removed, you should be able to pull out the valve stem and washer assembly from behind the shower wall 6
- Inspect all of these parts for wear and replace as necessary before reassembling
How to Remove American Standard Shower Handle Without Set Screw
Assuming you have an American Standard shower handle, there are only two types of handles: those with set screws and those without. If your handle has a set screw, simply remove the screw with an Allen wrench and pull the handle off. If your handle does not have a set screw, it is held on by a snap ring.
To remove the handle, insert a small flathead screwdriver or another tool behind the escutcheon plate (the metal or plastic plate that covers the hole in the wall). Gently pry off the escutcheon plate to reveal the snap ring holding on the handle. Use needle-nose pliers to remove the snap ring, then pull off the handle.
What Size Allen Wrench for American Standard Shower Handle
If you’re in the process of replacing or repairing an American Standard shower handle, you’ll need to know what size Allen wrench to use. The size is determined by the set screw that secures the handle to the valve stem. The most common size is 1/8″, but it’s always best to check before proceeding with your project.
Once you have the right sized Allen wrench, loosening and tightening the set screw is a straightforward process. Simply insert the wrench into the hole in the center of the set screw and turn clockwise or counterclockwise as needed. If the set screw is particularly tight, you may need to apply some pressure to get it moving.
With a little care and attention, using the right sized Allen wrench for your American Standard shower handle will ensure a successful repair or replacement job.
American Standard Cartridge Removal Tool
If you’re looking for an easy way to remove your American Standard cartridge, then you need the American Standard Cartridge Removal Tool. This tool is specifically designed to remove cartridges from American Standard faucets, and it makes the job quick and easy. Simply insert the tool into the top of the cartridge and turn it counterclockwise until the cartridge comes out.
It’s that simple! The American Standard Cartridge Removal Tool is a must-have for anyone who owns an American Standard faucet.
American Standard Shower Cartridge Removal
If you have a shower cartridge that needs to be removed, there are a few things you need to know. American Standard shower cartridges are made of brass and have a plastic housing. The brass body is held in place by two screws, one at the top and one at the bottom.
There is also a retainer clip that holds the cartridge in place. To remove the cartridge, you will need to remove all three of these pieces.
Start by removing the two screws at the top and bottom of the cartridge.
Then, use a flat head screwdriver to pry off the retainer clip. With the clip removed, you should be able to pull out the cartridge easily. If it is stuck, try lightly tapping on it with a hammer until it comes loose.
Once you have removed the old cartridge, take a look at the O-ring seal and make sure it is not damaged. If it looks okay, then you can reuse it when installing your new shower cartridge. If not, then pick up a replacement from your local hardware store before proceeding.
Now simply reverse these steps to install your new American Standard shower cartridge and get back to enjoying your showers!
American Standard 3 Handle Tub Shower Faucet Repair
If you have a three handle tub and shower faucet, then you know that this type of fixture can be a little bit trickier to repair than a single handle model. But don’t worry – we’re here to help! In this blog post, we’ll walk you through everything you need to know about American Standard 3 handle tub shower faucet repair.
The first thing you need to do is identify the problem. Is the water leaking from the spout? Or is it dripping from one of the handles?
If it’s the latter, then you likely have a faulty valve stem. To fix this, simply unscrew the cap on the back of the handle and remove the valve stem. Replace it with a new one and screw the cap back on.
If your issue is with a leaky spout, then it could be due to a number of different things. First, check to see if the O-ring seals are worn or damaged. If they are, simply replace them with new ones.
Another possible culprit is a broken diverter – this piece directs water from the tub spout up to the shower head.

Credit: www.doityourself.com
How Do You Remove an American Standard Shower Handle Without a Screw Set?
If you need to remove an American Standard shower handle without a screw set, you can use a few different methods. One is to use a pair of needle nose pliers to grip the base of the handle and twist it counterclockwise until it comes off. Another is to insert a putty knife or similar tool under the edge of the handle and pry it up.
You may also be able to remove the handle by unscrewing the escutcheon plate that covers the back of the handle.
How to Remove American Standard Faucet Handle Without Screws?
If you need to remove your American Standard faucet handle but can’t find the screws, don’t worry – there’s an easy way to do it without them. All you need is a flathead screwdriver and a little patience.
First, locate the small hole in the center of the handle.
This is where the set screw is located. Insert the tip of your screwdriver into the hole and turn counterclockwise until you feel the set screw loosen. You may need to apply some pressure to get it started, but be careful not to strip it.
Once the set screw is loose, gently pull on the handle until it comes off. If it’s stubborn, try wiggling it back and forth until it pops free. If all else fails, you can always use a little WD-40 or similar lubricant to help loosen things up.
Now that you know how to remove an American Standard faucet handle without screws, you can easily replace any worn out or damaged parts. Just be sure to check for leaks before putting everything back together!
How Do You Remove the Handle on an American Standard Bathroom Faucet?
Assuming you need to replace the entire handle and not just the knob, here are instructions for replacing the handle on an American Standard bathroom faucet:
1. Shut off the water at the shutoff valves under the sink. Place a bucket under the faucet to catch any water that may drip out when you remove the handle.
2. Use a Phillips screwdriver to remove the setscrew in the center of the handle. If there is no setscrew, look for a small button or cap on top of the handle; pry it off with a flathead screwdriver and remove any screws underneath.
3. Pull off the handle.
Some handles may be stuck on tight; use a pair of pliers if necessary, but be careful not to damage or break the handle.
4. Inspect O-rings and washers for wear and tear; replace if necessary before installing new handle. Lubricate O-rings with petroleum jelly before reinstalling them onto stem assembly (underneath sink).
How Do You Change an American Standard Shower Faucet Cartridge?
If you have a leaky American Standard shower faucet, you may need to replace the cartridge. Here’s how:
1. Shut off the water supply to your shower.
2. Remove the handle of your shower faucet. This will expose the cartridge.
3. Use a cartridge puller tool to remove the old cartridge from the housing.
You may also need to use a pliers to loosen the retaining nut before removing the old cartridge. If you don’t have a cartridge puller tool, you can carefully pry out the old cartridge with a screwdriver or another sharp object being careful not to damage the housing in which it sits.
4. Inspect your old cartridge for any damage and replace it with an identical new one if possible.
If you cannot find an identical replacement, consult with a plumbing professional or American Standard customer service for guidance on what type of replacement cartridge to use. Be sure to take note of whether your originalcartridge was metal or plastic as this will affect what type of replacement you can use..5 Insert your new cartridges into the housing making sure it is properly seated and orientated according to any instructions that came with it.
.6
American Standard Shower Cartridge Replacement Instructions – Shower Valve Pressure Balancing Unit
Conclusion
If you need to remove your American Standard shower handle, there are a few things you need to know. First, you will need to identify which type of handle you have. There are two types of American Standard shower handles: the set screw type and the push button type.
The set screw type has a small set screw that is located under the escutcheon plate, while the push button type has a button that needs to be pushed in order to release the handle.
Once you have identified which type of handle you have, removing it is a relatively simple process. For the set screw type, simply remove the escutcheon plate and unscrew the set screw.
For the push button type, push in on the button and twist the handle counter-clockwise until it comes off.
- Why Ease of Use is Crucial in Trucking Dispatch Software - September 22, 2024
- Better Communication With Dispatchers: How Trucking Dispatch Software Can Optimize Operations - September 7, 2024
- Maximizing Efficiency: The Importance of Accurate Location Tracking for Trucking Operations - August 23, 2024