How to Broil Steak in the Oven (Your Indoor Grilling Secret Weapon)
Let’s be honest, there are times when you crave the intense, charred flavor of a perfectly grilled steak, but the thought of firing up the barbecue is just… too much. Maybe it’s raining, maybe you live in an apartment with no outdoor space, or maybe you’re just too lazy to deal with charcoal. What if I told you that you have a secret, high-heat grilling machine hiding in plain sight in your kitchen? My friend, it’s time to get acquainted with your oven’s most misunderstood feature. Today, you are going to learn how to broil steak in the oven, and this method is so fast and effective, you might just break up with your grill.
Why This Recipe Is Awesome (It’s a 15-Minute Steakhouse Experience)
Why are we forsaking the grill and the cast-iron skillet for the mysterious broiler? Because broiling is a unique and powerful technique that delivers incredible results with minimal fuss. This method is awesome because:
- It’s Incredibly FAST: The broiler delivers intense, direct heat from above, cooking your steak in a matter of minutes. We’re talking from raw to rested and ready in under 15 minutes.
- You Get a Glorious Char: That high, direct heat is perfect for creating a beautiful, deeply browned, and flavorful crust that’s very similar to what you’d get on a high-end grill.
- It’s a Contained Operation: All the splattering and sizzling happens inside your oven, not all over your stovetop. Cleanup is a relative breeze.
- Perfectly Even Cooking: When done right, the intense heat cooks the steak quickly and evenly, giving you a beautiful wall-to-wall pink interior.
This isn’t just a backup plan for a rainy day in Khulna; it’s a first-class ticket to a perfect steak, any time you want.
Ingredients: The Simple Keys to Success
For a method this pure, you let the steak be the star.
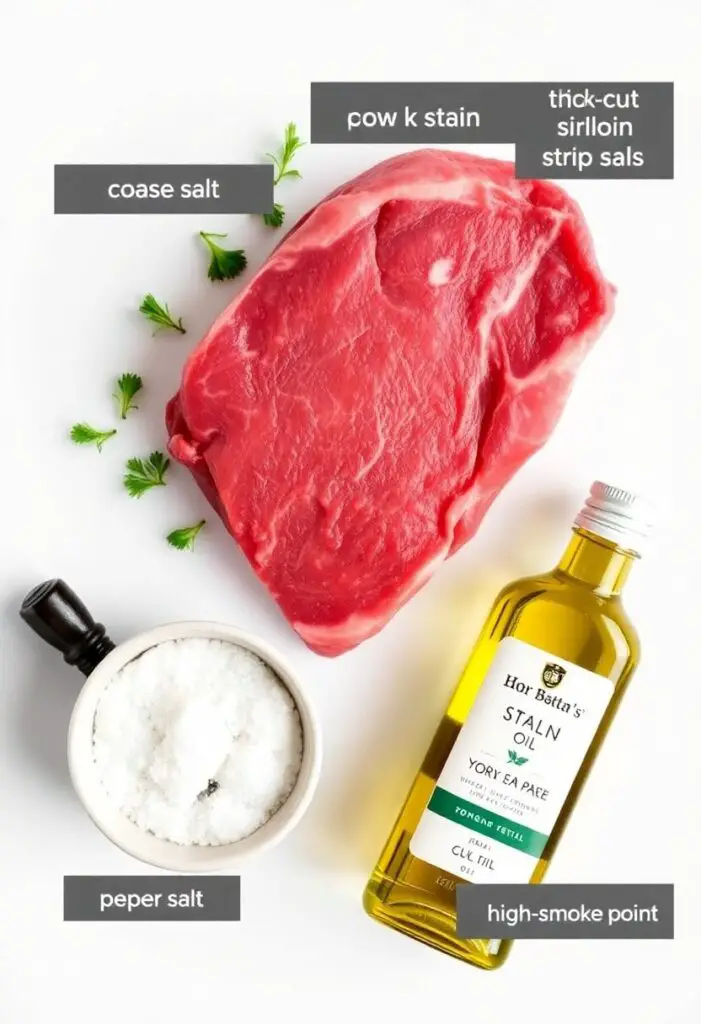
- 2 (1-inch thick) steaks, such as New York strip, sirloin, or ribeye (about 8-10 ounces each)
- 1 tablespoon high-smoke-point oil (like avocado, grapeseed, or canola oil)
- Kosher salt, to taste
- Freshly cracked black pepper, to taste
- Optional: 2 tablespoons of unsalted butter to top the steaks while they rest.
The Golden Rules of Your Steak:
- Thickness Matters: For broiling, a steak that is about 1-inch thick is the sweet spot. Too thin, and it will overcook before it gets a good char. Too thick, and the outside might burn before the inside is cooked.
- Bring it to Room Temp: Pull your steaks out of the fridge at least 30 minutes before cooking. A room-temperature steak cooks more evenly.
Tools & Kitchen Gadgets Used: Your Broiling Brigade

The right setup is crucial for broiler success.
- A Broiler Pan: This is a two-piece pan with a slotted top that allows fat to drip away, preventing your steak from frying in its own grease.
- (Or) a Rimmed Baking Sheet with an Oven-Safe Wire Rack: This is a perfect substitute for a broiler pan and works just as well.
- An Instant-Read Meat Thermometer: This is NON-NEGOTIABLE. It is the only way to guarantee your steak is cooked to the perfect temperature without guessing.
- Long Tongs
- Heavy-Duty Oven Mitts
- Paper Towels
Step-by-Step Instructions: The Path to Broiled Perfection
This moves fast. Do not walk away. Do not check your phone. Your attention is required.
Act 1: The Prep (Setting the Stage for a Perfect Char)
- Position Your Rack: This is a crucial first step. Adjust your oven rack so that the top of your steak will be 3 to 5 inches away from the broiler element. For a 1-inch thick steak, this usually means placing the rack in the second position from the top.
- Preheat Everything: Place your broiler pan or your baking sheet with the wire rack in the oven on the positioned rack. Turn your oven’s broiler on HIGH. Let everything preheat for at least 10 minutes. A hot pan is essential for a good sear.
- Pat It Bone Dry: While the oven is preheating, use paper towels to pat your room-temperature steaks completely dry. Moisture is the enemy of a good crust.
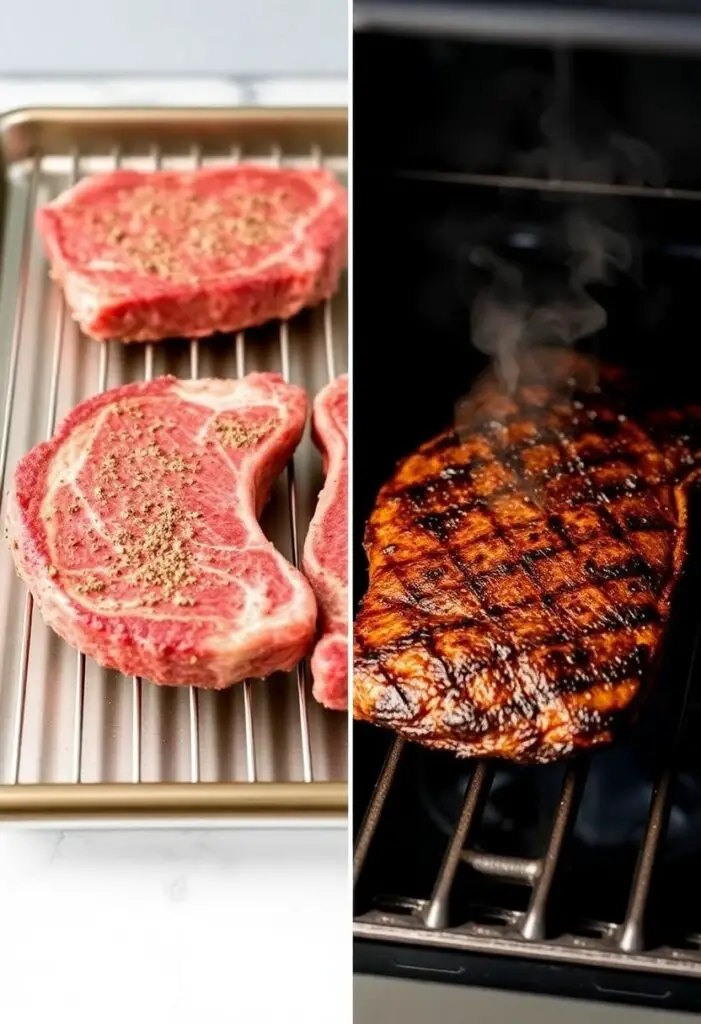
- Oil and Season: Rub the steaks all over with the oil, then season them very generously on all sides with kosher salt and black pepper.
Act 2: The Broil (The Fast and the Furious Part)
- Place the Steaks: Using your oven mitts, carefully pull the hot oven rack out. Quickly and carefully, place your seasoned steaks on the hot broiler pan or wire rack. You should hear a satisfying sizzle. Push the rack back in.
- The First Broil: Broil the steaks for 4 to 6 minutes on the first side. The exact time will depend on your steak’s thickness and your broiler’s intensity.
- The Flip: Carefully pull the rack out again. Using your long tongs, flip the steaks over.
- The Second Broil: Push the rack back in and broil for another 3 to 5 minutes on the second side, until the steak reaches your desired temperature.
Act 3: The Rest (The Most Important Inaction)
- Check the Temp: This is where you grab your meat thermometer. You are looking for:
- Medium-Rare: 130-135°F (54-57°C)
- Medium: 135-145°F (57-63°C)
- Pull the steak when it’s about 5 degrees below your target temperature, as it will continue to cook while it rests.
- Let It Rest: Immediately transfer the steaks to a clean cutting board. If you like, top each steak with a pat of butter. Tent them loosely with foil and let them rest for 5-10 minutes. This is the secret to a juicy steak. Do not skip this!
- Slice and Serve: After resting, slice the steak against the grain and serve immediately.
Calories & Nutritional Info (Per 6-ounce Serving)
This is a lean, mean, protein-packed meal.
- Estimated Calories per serving: ~300-400 calories
- Protein: ~40g
- Fat: ~15-25g
Common Mistakes to Avoid: Don’t Get Burned by Your Broiler!
Broiling is easy, but it’s also unforgiving. Avoid these mistakes.
- Walking Away: The broiler cooks incredibly fast. This is not a set-it-and-forget-it method. Stay in the kitchen and keep an eye on things.
- Not Preheating the Pan: Placing your steak on a cold pan under the broiler means the bottom won’t sear properly. Preheat your pan with the broiler.
- The Rack is in the Wrong Position: Too close, and the outside will burn before the inside cooks. Too far, and you won’t get a good char. That 3-5 inch distance is the sweet spot.
- Guessing the Doneness: A broiler can overcook a steak in 60 seconds flat. Using an instant-read meat thermometer is the only way to be sure.
Variations & Customizations: Your Broiler, Your Rules
The simple seasoning is perfect, but feel free to get creative.
- Garlic Herb Compound Butter: After the steak has rested, top it with a slice of compound butter made by mixing softened butter with minced garlic, fresh parsley, and chives.
- Spicy Chili-Rubbed Steak: Before broiling, rub the steaks with a mixture of chili powder, cumin, smoked paprika, and a pinch of cayenne for a Southwestern flair.
- Classic London Broil: This method is perfect for a flank steak or top round steak. Broil as directed, let it rest, and then slice it very thinly against the grain.
FAQ Section: All Your Broiling Questions, Answered
You have questions about this “upside-down grill.” I have the answers.
- Q: What exactly is the broiler in my oven? A: The broiler is the heating element at the very top of your oven. It provides intense, direct, downward heat, much like the flames of a grill.
- Q: Do I need a special broiler pan? A: A broiler pan is designed for this, but a heavy-duty rimmed baking sheet with a sturdy, oven-safe wire rack placed inside works just as well and is more versatile.
- Q: How do I stop my whole house from filling with smoke? A: A little smoke is normal. To minimize it, make sure your broiler pan is clean, choose a leaner cut of steak (like sirloin), and ensure your oven is clean of any old, burnt-on food.
- Q: How is broiling different from just baking a steak? A: Baking uses the lower element to fill the oven with ambient, indirect heat, cooking the steak slowly from all sides. Broiling uses the top element for intense, direct heat, cooking it very quickly from one side at a time, much like a grill.
- Q: My steak burned on the outside but was raw inside. What happened? A: Your oven rack was too close to the broiler element. The intense heat charred the outside before it had time to cook the inside. Move the rack down a position next time.
- Q: Can I broil a really thick steak, like a 2-inch filet mignon? A: It can be tricky. For very thick cuts, a better method is the reverse sear, where you bake it in a low oven first and then just use the broiler or a hot pan for the final sear.
- Q: What should I serve with broiled steak? A: It’s perfect with classic steakhouse sides like a baked potato, creamed spinach, or a simple green salad with a sharp vinaigrette.
Final Thoughts: You’ve Mastered the Indoor Grill
You’ve done it. You have tamed the mysterious broiler and harnessed its fiery power for good. You are now capable of producing a perfectly charred, juicy steak any night of the week, regardless of the weather. So go on, grab that beautiful steak, and get ready to enjoy a restaurant-quality meal that you made yourself. You might just start hoping for rain.