How to Can Potatoes (And Become a Meal Prep Superhero)
Picture this: It’s a chaotic Tuesday evening in Barishal. You want to make a hearty beef curry or some quick, crispy fried potatoes, but the thought of peeling, chopping, and boiling a pile of spuds makes you want to lie down and order takeout. Now, imagine reaching into your pantry and pulling out a jar of perfectly cooked, ready-to-use potatoes. That, my friend, is not a dream. It’s the superpower you get when you know how to can potatoes, and I’m here to be your slightly sarcastic guide on this journey to ultimate convenience.
Why This “Recipe” Is Awesome (It’s Basically a Time Machine)
Let’s be clear: canning potatoes isn’t about creating a fancy new dish. It’s about gifting your future self the precious, irreplaceable gift of time. Why is this process a total game-changer? Because you’ll have a shelf full of a staple ingredient that’s ready to go at a moment’s notice. No peeling. No chopping. Just open a jar and you’re halfway to dinner.
This is the perfect way to preserve a bumper crop from your garden or take advantage of a great sale at the market. A pantry stocked with these golden jars is a beautiful sight, and frankly, makes you look like a seasoned homesteader, even if you live in a city apartment. It’s the ultimate meal prep, and once you try it, you’ll wonder how you ever lived without it.
Ingredients: The Holy Trinity of Potato Preservation
You don’t need a lot to get started. This is simplicity at its finest.
- Potatoes: About 10-12 pounds for a full canner load of 7 quarts. Waxy potatoes like Red Bliss, Yukon Gold, or other red-skinned varieties are best as they hold their shape. Starchy potatoes like Russets can get mushy.
- Canning Salt (or Kosher Salt): About 1 teaspoon per quart jar. Do not use table salt, as the iodine can discolor your potatoes and make the liquid cloudy.
- Boiling Water: To fill the jars.
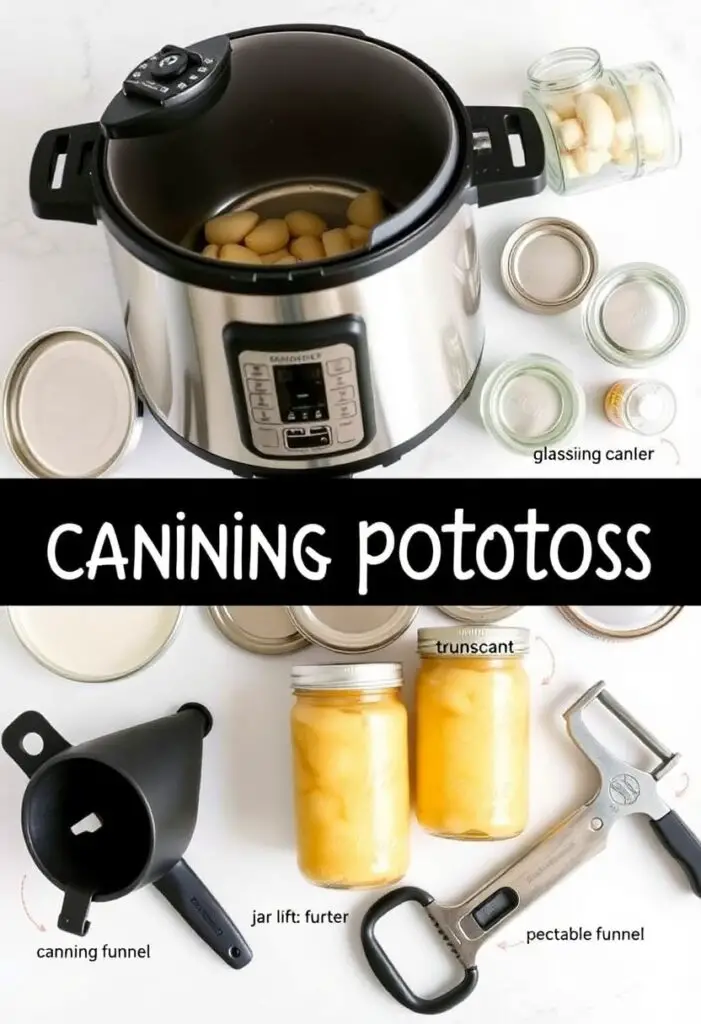
Tools & Kitchen Gadgets Used: Your Canning Command Center
Okay, let’s get serious for a hot second. Canning low-acid foods like potatoes requires specific equipment for safety. This isn’t the time to improvise.
- A Pressure Canner: This is 100% NON-NEGOTIABLE. Potatoes are a low-acid food, and the only safe way to can them at home is with a pressure canner to kill potential botulism spores. You absolutely cannot use a water bath canner for this recipe. Seriously, don’t even think about it.
- Canning Jars: Quart or pint-sized jars with matching lids and rings.
- Jar Lifter: For safely moving hot jars in and out of the canner.
- Canning Funnel: To get the potatoes into the jars without making a huge mess.
- Bubble Popper / Headspace Tool: To remove air bubbles and measure headspace. A simple chopstick works too.
- Large Stockpot: For par-boiling the potatoes.
- Vegetable Peeler and Knife
- Cutting Board
- Clean Cloths or Paper Towels
Step-by-Step Instructions: The Path to Pantry Gold

This process has a few key stages. Read through everything before you start. Remember, we’re being safe now so we can be lazy later.
Act 1: Preparing the Spuds
- Prep Your Canner and Jars: Read your pressure canner’s manual (yes, really!). Wash your jars, lids, and rings in hot, soapy water. Keep the jars warm (in a sink of hot water is fine) to prevent them from breaking when you add hot potatoes.
- Wash and Peel: Wash your potatoes thoroughly. Now for the fun part: peel every single one. For safety reasons, the skins must be removed.
- Chop ‘Em Up: Cut the peeled potatoes into uniform ½-inch to 1-inch cubes. If you’re using small new potatoes, you can leave them whole (as long as they are 1-2 inches in diameter).
- Par-Boil (The Hot Pack Method): Place the potato cubes in a large stockpot and cover them with hot water. Bring to a boil and cook for 10 minutes (or just 2 minutes for whole baby potatoes). This is called a “hot pack,” and it helps ensure better quality and safety.
Act 2: Packing the Jars
- Fill ‘Er Up: While the potatoes are boiling, have your hot jars ready. Once the potatoes have boiled for the required time, use a slotted spoon to transfer them into the hot jars. Pack them in, but do not mash them down. You want them to be relatively loose.
- Add Salt: Add 1 teaspoon of canning salt to each quart jar (or ½ teaspoon to each pint jar).
- Add Liquid: Ladle the hot cooking water from the potato pot over the potatoes in the jars, leaving 1 inch of headspace (the space between the top of the liquid and the rim of the jar). This is critical for a proper seal.
- Remove Air Bubbles: Slide your bubble popper tool or a clean chopstick around the inside of the jar to release any trapped air bubbles.
- Wipe and Seal: Wipe the rims of the jars with a clean, damp cloth to ensure there’s no starchy residue. Place the lids on and screw on the rings until they are “fingertip tight.” This means you tighten them just until you feel resistance, then stop. Do not crank them down like you’re changing a tire.
Act 3: The Pressure Canning Process
- Load the Canner: Place the filled jars onto the rack in your pressure canner, which should have a few inches of simmering water in it (check your canner’s manual for the exact amount).
- Lock and Vent: Lock the canner lid in place. Turn the heat up to high and wait for a steady stream of steam to start escaping from the vent pipe. Let this steam vent for a full 10 minutes. This step is crucial to force all the air out.
- Pressurize: After venting, place the weight or close the petcock on the vent pipe. Watch the pressure gauge. You are aiming for 10 pounds of pressure (PSI) for a dial gauge canner, or 15 pounds for a weighted gauge canner, if you live at or below 1,000 feet elevation. (Adjust for your altitude! Consult your manual.)
- Process: Once the correct pressure is reached, start your timer. You must process quart jars for 40 minutes and pint jars for 35 minutes. Adjust the heat as needed to keep the pressure steady.
- Cool Down Naturally: When the time is up, turn off the heat. Do not try to rush the cool-down process. Let the canner cool down on its own until the pressure gauge reads zero. This can take 30-60 minutes.
- Unload and Rest: Once the pressure is at zero, wait another 10 minutes before carefully removing the weight and unlocking the lid. Use your jar lifter to remove the jars and place them on a towel-lined counter. Let them sit undisturbed for 12-24 hours. You’ll hear the satisfying “ping” of the lids sealing!
Calories & Nutritional Info (Per 1 Cup Serving)
This is an estimate for plain canned potatoes in water.
- Estimated Calories: ~120-140 calories
- Fat: <1g
- Carbohydrates: ~30g
- Protein: ~3g
- Sodium: Varies based on how much salt you add.
Common Mistakes to Avoid: Don’t Be a Canning Catastrophe!
Read this section twice. Your safety depends on it.
- Attempting to Water Bath Can: I know I sound like a broken record, but it’s that important. Potatoes are a low-acid food and MUST be pressure canned. Water bath canning does not reach a high enough temperature to kill botulism spores, which can be deadly.
- Forgetting to Vent the Canner: If you don’t vent the canner for a full 10 minutes, trapped air can give you a false pressure reading, leading to under-processing and unsafe food.
- Incorrect Headspace: Leaving too much or too little headspace can cause the jars to not seal properly. One inch is the rule for potatoes.
- Siphoning (Losing Liquid): This can happen if you cool the canner down too quickly. Let it cool down naturally. A little liquid loss is okay, but if it’s more than half, the food might discolor (but is still safe if the jar sealed).
Variations & Customizations: Keep It Simple, Get Creative Later
With pressure canning, you can’t safely add things like herbs, garlic, butter, or flour. The recipes are tested for safety with specific ingredients. So, the variation comes after you open the jar!
- Crispy Fried Potatoes: Drain the canned potatoes, pat them dry, and pan-fry them in butter or bacon grease until golden brown and delicious.
- Quick Potato Salad: Drain the potatoes, chop them up, and toss with mayonnaise, mustard, celery, and onions for an instant potato salad.
- Easy Roasted Potatoes: Drain and dry the potatoes, toss with olive oil, rosemary, and garlic powder, then roast at 400°F (200°C) for 15-20 minutes until crispy.
FAQ Section: All Your Pressing Potato Questions
Canning can be intimidating. Let’s clear things up.
- Q: Do I absolutely, positively HAVE to use a pressure canner? A: YES. Yes, you do. For the third time, it’s a safety thing. Don’t risk it.
- Q: What kind of potatoes are best for canning? A: Waxy potatoes like Yukon Golds, red potatoes, and other thin-skinned varieties hold their shape the best. Starchy potatoes like Russets tend to break down and can become mushy.
- Q: Why did the water in my jars turn cloudy? A: This is usually due to the starch from the potatoes. It’s totally normal and safe, especially if you used a starchier potato variety.
- Q: Why did my potatoes turn dark or gray? A: This can happen due to minerals in your water or using iodized table salt. Using canning salt and filtered water can help. It’s usually just an aesthetic issue; the potatoes are still safe to eat if the jar is sealed.
- Q: How long will my home-canned potatoes last? A: When stored in a cool, dark place, they are best if used within one year for optimal quality, but can last for several years.
- Q: Can I can mashed potatoes? A: No, you cannot safely can mashed potatoes or any other puréed vegetable. The density of the product prevents heat from penetrating properly to kill all potential bacteria.
- Q: My jars didn’t seal. What do I do? A: If a jar doesn’t seal within 24 hours, you can either re-process it with a new lid, or just put it in the fridge and use it within a few days.
Final Thoughts: Welcome to a Life of Convenience
You did it! You faced the mighty pressure canner and emerged victorious with a beautiful batch of shelf-stable potatoes. You’ve not only learned a valuable preservation skill but have also given your future self the amazing gift of fast, easy meals. So go ahead, stock that pantry, and the next time someone complains about peeling potatoes, just smile. You know the secret.