How to Make Vanilla Frosting That’ll Make You Lick the Bowl Clean
Picture this: you’ve just baked the most beautiful, golden, fragrant cake. It’s a masterpiece, a triumph of baking science. You reach for the frosting and… it’s a can of that sad, vaguely sweet spackle from the grocery store. The tragedy! You wouldn’t put cheap hubcaps on a sports car, so why would you insult your glorious cake with subpar frosting? It’s a crime against confection.
Today, we right that wrong. We’re going to teach you how to make vanilla frosting—the real deal. A fluffy, cloud-like, perfectly sweet American buttercream that will make you want to frost everything in sight. Your cakes, your cupcakes, a stray cookie… maybe even just a spoon.
Why This Recipe Is Your New Best Friend
Let’s get one thing straight: this isn’t just a frosting recipe. This is the frosting recipe. The one you’ll memorize, the one you’ll scribble on a stained index card, the one that will make people’s eyes widen when they take their first bite.
For starters, it’s insanely easy. We’re talking four main ingredients and a mixer. You don’t need a culinary degree, just the ability to press the “on” button. It’s a classic American buttercream, which means it’s straightforward, quick, and ridiculously forgiving.
Next, the texture is divine. Forget that gritty, heavy stuff. We are whipping this into a light, airy, ethereal cloud of deliciousness. It’s smooth, it’s creamy, and it pipes like an absolute dream, creating those perfect, bakery-style swirls.
And the flavor? It’s pure, unadulterated vanilla bliss. It’s sweet but not cloying, thanks to a secret weapon (spoiler: it’s salt). This frosting complements literally any dessert without overpowering it. It’s the perfect plus-one for any cake or cupcake.
The A-List Ingredients
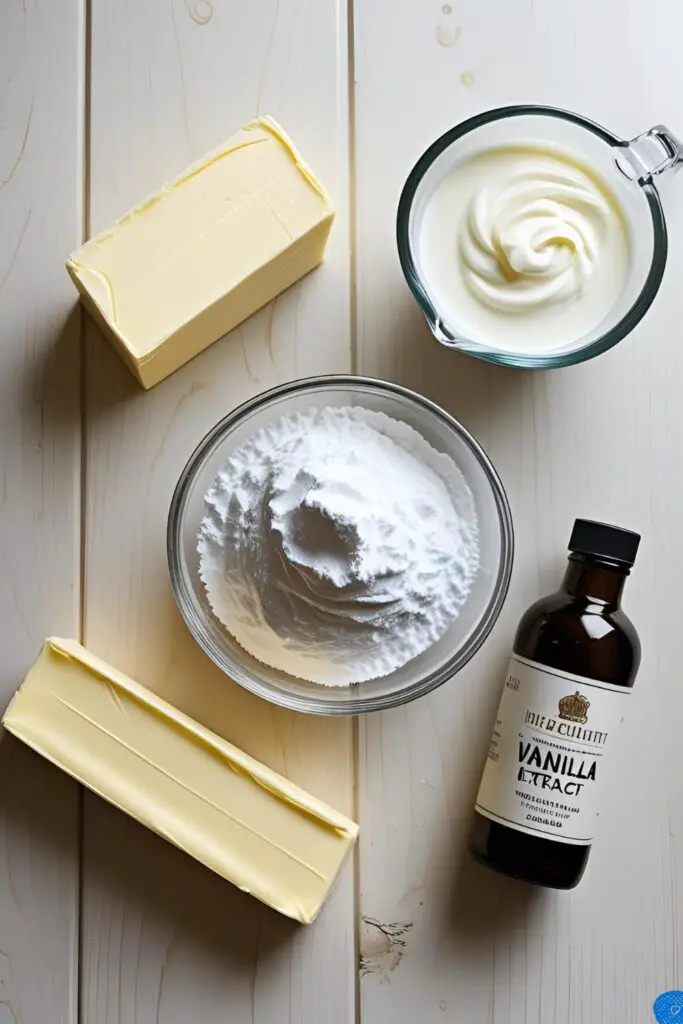

This recipe is all about simplicity and quality. Using good ingredients is the difference between “meh” and “OMG, what is in this?!”
- 1 cup (227g) Unsalted Butter: It must be softened to a perfect, room temperature consistency. Not melted, not cold from the fridge. We’re talking soft enough that your finger leaves an indent easily. This is non-negotiable.
- 4 cups (480g) Powdered Sugar: Also known as confectioners’ sugar. You must sift it. I know, it’s an extra step, but do you want lumpy frosting? I didn’t think so.
- 1/4 cup (60ml) Heavy Cream or Whole Milk: This is for adjusting the consistency. Start with less; you can always add more.
- 2 teaspoons High-Quality Vanilla Extract: Don’t use the imitation stuff. Please. For the love of all that is sweet, use pure vanilla extract.
- 1/4 teaspoon Fine Sea Salt: This is the secret ingredient! It cuts the sweetness and makes the vanilla and butter flavors pop. Don’t skip it.
The Tools of the Frosting Trade
You don’t need a professional kitchen, but a few gadgets will make your life significantly easier and your frosting significantly better.
- Stand Mixer or a good Hand Mixer: A stand mixer (like a trusty KitchenAid) is your best friend here. It does all the hard work of whipping, creating that light-as-air texture. A powerful hand mixer will also get the job done.
- Silicone Spatula: Essential for scraping down the sides and bottom of the bowl. We leave no buttery goodness behind.
- Sifter or Fine-Mesh Sieve: For lump-free, silky-smooth frosting. Again, this is not a suggestion; it’s a command.
- Measuring Cups and Spoons: Baking is a science, after all.
- Piping Bags and Tips: Optional, but highly recommended if you want to make your cupcakes look like they came from a fancy bakery.
Step-by-Step to Fluffy Frosting Glory
Ready to whip it good? Let’s do this. The whole process is faster than deciding what to watch on Netflix.
Step 1: Cream That Butter
Place your perfectly softened butter in the bowl of your stand mixer fitted with the paddle attachment (or use a large bowl with your hand mixer). Beat the butter on medium-high speed for a good 3-5 minutes. You want it to become very pale, light, and fluffy. This step is the foundation of a great frosting, so don’t rush it!
Step 2: The Sugar Situation
Turn the mixer down to its lowest speed. Gradually add your sifted powdered sugar, about one cup at a time. Wait for each addition to be mostly incorporated before adding the next. If you dump it all in at once, you will be cleaning a fine layer of sugar off every surface in your kitchen for the next week. You’ve been warned.
Step 3: Mix and Scrape
Once all the sugar is in, the mixture will look dry and crumbly. This is normal! Stop the mixer and use your spatula to scrape down the sides and bottom of the bowl thoroughly. Get all those stubborn butter and sugar bits mixed in.
Step 4: Add the Magic Elixirs

With the mixer still on low, pour in the vanilla extract and sprinkle in the salt. Mix until they are just combined.
Step 5: Get the Consistency Just Right
Now, let’s make it creamy. With the mixer still running on low, add the heavy cream or milk one tablespoon at a time. Let each tablespoon fully incorporate before deciding if you need more. For a stiffer frosting for piping details, use less liquid. For a softer, spreadable frosting, use a bit more. You are the captain of this frosting ship!
Step 6: The Final Whip
This is where the magic happens. Once you’re happy with the consistency, turn the mixer up to medium-high and beat for another 3-5 minutes. The frosting will transform, becoming incredibly light, fluffy, and smooth. Don’t skimp on this final whip!
The Damage Report (aka Nutritional Info)

Let’s be adults here. This is butter and sugar. It’s a treat. But if you must know, here are the estimated stats per serving (about 2 tablespoons). FYI, I’m not a nutritionist, so don’t quote me.
- Calories: ~130 kcal
- Fat: ~8g (The good, buttery kind)
- Carbohydrates: ~15g
- Sugar: ~15g (Yep, it’s mostly sugar)
- Note: This is pure, unadulterated joy in frosting form. Enjoy every decadent spoonful.
Common Frosting Fails (and How to Be a Hero)
Avoid these common pitfalls to ensure your frosting is flawless every single time.
- Disaster #1: A Greasy, Soupy Mess. Your butter was melted, wasn’t it? The Fix: There’s no great fix here, which is why starting with properly softened butter is key. You can try chilling the mixture and re-whipping, but the texture will never be quite right.
- Disaster #2: Lumpy, Gritty Frosting. You didn’t sift the sugar. I told you so! The Fix: You can’t really fix it once it’s mixed. Just call it “rustic” and promise to sift next time.
- Disaster #3: It’s Too Sweet! This is American buttercream; it’s inherently sweet. The Fix: Make sure you added that pinch of salt! It makes a huge difference. Using high-quality butter also helps. If it’s still too sweet for you, next time you might want to try a less-sweet Swiss or Italian meringue buttercream.
- Disaster #4: My Frosting “Broke” or Curdled. This happens when your ingredients are at different temperatures. Usually, the butter was too cold or the liquid was. The Fix: Keep mixing! Sometimes just letting the mixer run for a few more minutes will bring it all back together.
Jazz It Up: Frosting Variations
Vanilla is classic, but sometimes you want to walk on the wild side. This recipe is a perfect base for experimentation.
- Dreamy Cream Cheese Frosting: This is a game-changer. Replace half the butter (1/2 cup) with 8 ounces of full-fat, block-style cream cheese, also softened. Beat the butter and cream cheese together in the first step until fluffy, then proceed with the recipe. It’s tangy, rich, and perfect for red velvet or carrot cake.
- Chocolate Swirl Buttercream: Make the vanilla frosting recipe as written. Scoop half of it into a separate bowl. Sift 1/4 cup of unsweetened cocoa powder into one half and mix until combined. Place the vanilla and chocolate frostings side-by-side in a piping bag to create a beautiful swirl effect.
- Zesty Lemon (or Almond) Frosting: Simply swap the vanilla extract for the same amount of a different extract. Use lemon extract for a bright, zesty frosting that’s amazing on vanilla or blueberry cupcakes. Or, use almond extract for a nutty, sweet flavor perfect for sugar cookies.
Your Burning Questions, Answered

Here are the answers to the questions I know are rattling around in your head.
Why is my vanilla frosting grainy?
Two culprits are usually to blame: you didn’t sift your powdered sugar, or you didn’t beat the frosting long enough. Sifting removes lumps, and the final 3-5 minute whip dissolves the sugar into the fat, creating that silky-smooth texture.
How can I make my frosting thicker?
Easy! Just add more sifted powdered sugar, a couple of tablespoons at a time, until it reaches your desired thickness. If it gets too thick, you can add a tiny splash of milk or cream to thin it back out.
How do I make my frosting less sweet?
American buttercream is famously sweet. Ensure you’ve added the salt, as that helps balance the flavor. Using high-quality, European-style butter can also add a richer flavor that stands up to the sugar. If you truly want less sweet, a meringue-based buttercream is your best bet.
Can I make this frosting ahead of time?
Yes! It stores beautifully. Keep it in an airtight container in the fridge for up to a week or in the freezer for up to 3 months. Before using, let it come to room temperature completely, then re-whip it with your mixer for a few minutes to bring back its original light and fluffy texture.
Why did my buttercream split or look curdled?
This is almost always a temperature issue. If your butter is too cold, it won’t combine properly with the sugar. If it’s too warm, it can turn into a greasy mess. Ensure everything is at a nice, cool room temperature before you start.
What’s the best butter to use for frosting?
Unsalted butter is a must, as it allows you to control the saltiness of the final product. For a richer flavor and creamier texture, look for a European-style butter, which has a higher fat content.
How do I get my frosting super white?
Butter is yellow, so your frosting will naturally have an ivory tint. To get a whiter color for wedding cakes or special occasions, you can add a tiny, minuscule drop of violet gel food coloring. The violet counteracts the yellow tones, tricking the eye into seeing white. Seriously, use a toothpick to add it—it’s that potent!
Final Thoughts
Congratulations! You are now a frosting connoisseur. Your cakes will stand taller, your cupcakes will look prouder, and your friends will beg you for the recipe. Go forth and frost with wild abandon. You’ve earned it. Now if you’ll excuse me, I have a bowl and a spoon calling my name.