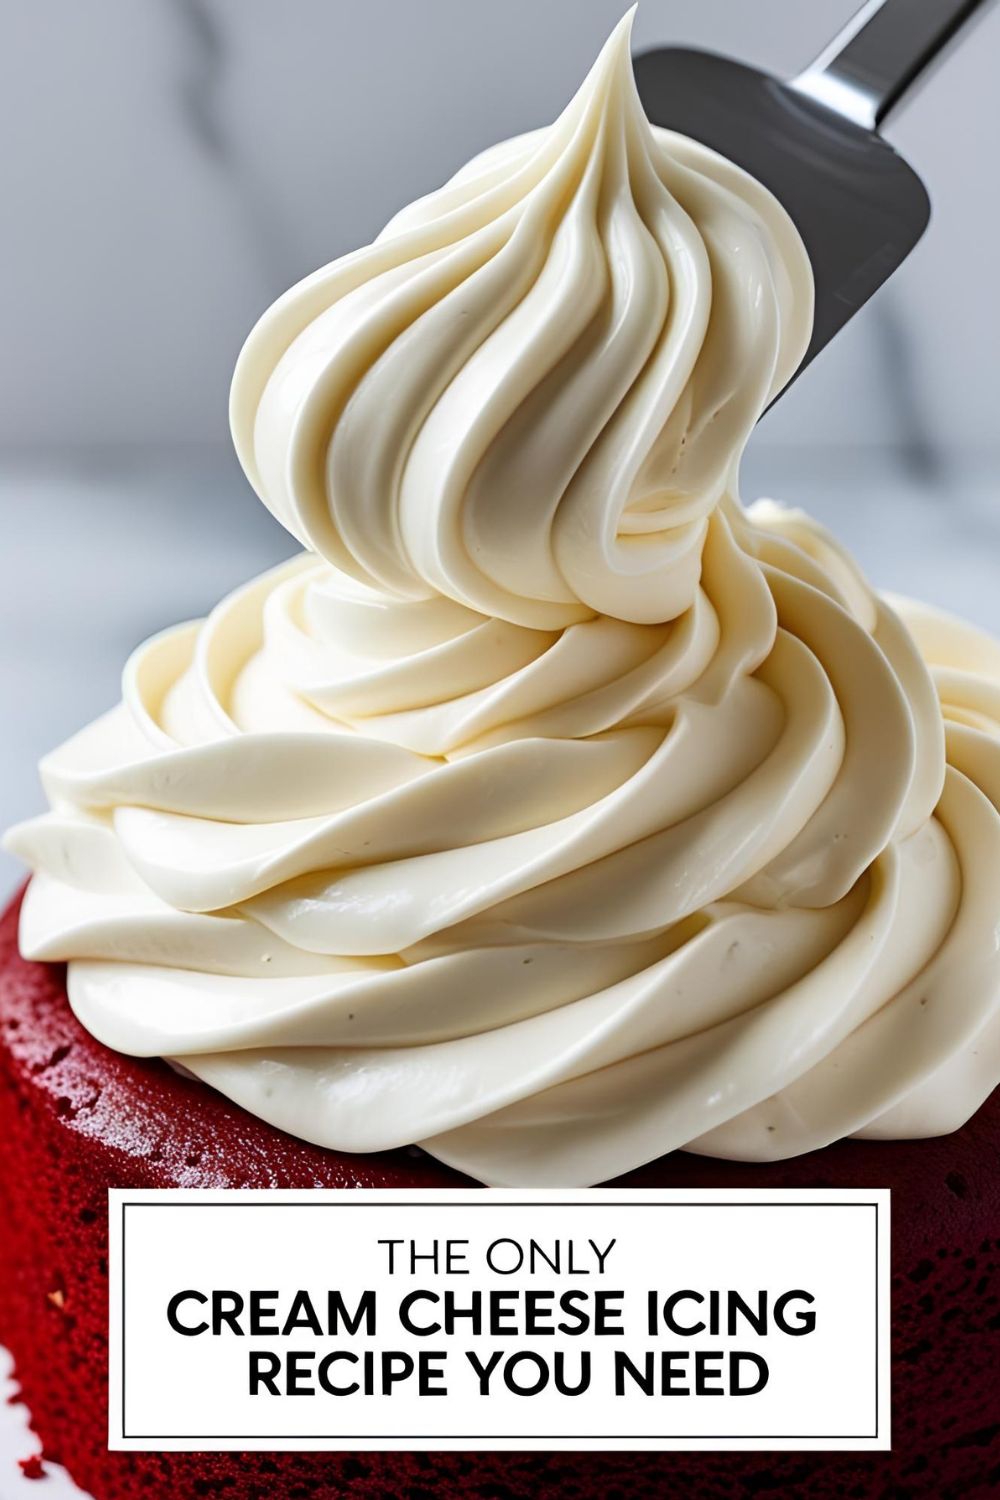
How to Make the Best Cream Cheese Icing (Easy & Foolproof!)
The Only Cream Cheese Icing Recipe You’ll Ever Need
Let’s be real. Standard buttercream is often just a grainy, tooth-achingly sweet vehicle for butter. Royal icing could be used to grout your bathroom tiles. But cream cheese icing? Cream cheese icing is the hero we deserve. It’s the perfect balance of sweet and tangy, with a luscious, creamy texture that makes you want to eat it straight from the bowl with a spoon. It’s Friday afternoon here in Khulna, the perfect time to plan our weekend baking, and I’m here to tell you that whatever cake you’re dreaming up, it will be a thousand times better with this frosting. This is your official, foolproof guide on how to make cream cheese icing that is smooth, tangy, and perfect every single time.
Why This Recipe Is the Undisputed Champion
Why is this the one and only cream cheese frosting recipe you’ll ever need? Because it’s a master of balance. It’s not just a pile of sugar; that glorious tang from the cream cheese cuts through the sweetness, creating a complex, crave-able flavor that complements everything it touches. It’s the iconic partner to red velvet and carrot cake for a reason! This recipe is also incredibly creamy and smooth, with a melt-in-your-mouth texture that is pure luxury.
Best of all, it’s ridiculously easy to make. We’re talking four main ingredients and about 10 minutes of your time. It’s the kind of high-impact, low-effort recipe that will make everyone think you’re a professional pastry chef. You’ll never even look at that sad can of store-bought frosting again.
The Fab Four (aka The Ingredients)

The beauty of this recipe is its simplicity. But for it to work perfectly, you must respect the ingredients.
- Full-Fat Block Cream Cheese (8 oz / 1 block): This is the most important rule. It MUST be full-fat, block-style cream cheese, not the whipped stuff in a tub. The tub kind has more water and will give you a soupy, tragic frosting. It also MUST be properly softened to room temperature.
- Unsalted Butter (½ cup / 1 stick): The butter adds stability and a rich, creamy flavor. This also MUST be softened to room temperature. Are you sensing a theme here?
- Powdered Sugar (4 cups): Also known as confectioners’ or icing sugar. You must sift it if you want a perfectly smooth, non-gritty frosting.
- Pure Vanilla Extract (1 teaspoon): Use the real stuff, not the imitation kind. It makes a difference.
- A Pinch of Salt (⅛ teaspoon): Just a tiny bit to balance all that sweetness and enhance the tangy flavor.
Your Icing Arsenal (Tools & Kitchen Gadgets)
You don’t need much to whip up this bowl of creamy gold, but these tools will ensure a perfect, lump-free result.
- An Electric Mixer (Hand or Stand): This is non-negotiable. You need the power of a mixer to beat the cream cheese and butter into submission and create that light, fluffy, perfectly smooth texture.
- A Sturdy Silicone Spatula: For the all-important task of scraping down the sides and bottom of the bowl. Don’t skip this!
- A Sifter or Fine-Mesh Sieve: The secret weapon against lumpy frosting. Sifting your powdered sugar is a small step with a huge payoff.
- Measuring Cups and Spoons.
- An Offset Spatula: The best tool for applying your finished frosting to cakes and cupcakes with those beautiful, swoopy swirls.
Step-by-Step to Creamy, Tangy Perfection
Follow these simple steps, and you’ll be rewarded with the best cream cheese icing of your life.
Step 1: The Foundation of Smoothness
In a large bowl, place your softened block of cream cheese and your softened stick of butter. Using your electric mixer, beat them together on medium speed for about 2-3 minutes, until the mixture is completely smooth, creamy, and free of any lumps. Scrape down the sides and bottom of the bowl at least once to ensure everything is incorporated. This is the most important step for avoiding lumps!
Step 2: Add the Flavor
Add the vanilla extract and the pinch of salt to the creamed mixture and beat on low speed until just combined.
Step 3: The Gradual Sweetening

With your mixer on its lowest speed, gradually add the sifted powdered sugar, about one cup at a time. Wait until each addition is mostly incorporated before adding the next. This prevents a “sugar explosion” that will cover you and your entire kitchen in a fine white dust.
Step 4: Whip It Good!
Once all the powdered sugar is incorporated, increase the mixer speed to medium-high. Whip the frosting for another 2-3 minutes. It will transform from a dense paste into a light, fluffy, and gloriously spreadable frosting.
Step 5: The Chill (If Needed)
Cream cheese frosting is naturally softer than buttercream. If it feels too soft to spread or pipe, especially if your kitchen is warm like mine here in Khulna, just cover the bowl and pop it in the refrigerator for 20-30 minutes to firm up slightly.
Calories & Nutritional Info (The Sweet, Creamy Truth)

We’re whipping together cream cheese, butter, and a mountain of sugar. Let’s not pretend this is a health food. This is a treat for the soul.
- Serving Size: A generous 2 tablespoons (enough for one cupcake).
- Calories: Approximately 150-180 kcal.
- Main Ingredients: Joy, happiness, and a complete disregard for your diet for one glorious moment.
- FYI: It’s so delicious, every single calorie is 100% worth it.
Common Mistakes to Avoid (Cream Cheese Catastrophes)
Don’t let these simple errors lead to a lumpy, runny mess.
- Using Cold Ingredients: This is the #1 cause of lumpy frosting. Your cream cheese and butter must be properly softened to room temperature. No excuses.
- Using Tub-Style Cream Cheese: The stuff in a tub is softer and has a higher water content. It will result in a runny, soupy frosting that will never hold its shape. Use full-fat, block-style cream cheese only.
- Forgetting to Sift the Sugar: If you don’t sift, you’re almost guaranteed to have little lumps of powdered sugar in your final product, giving it a gritty texture.
- Over-mixing After Adding Sugar: Once the frosting is light and fluffy, stop mixing. Over-beating it, especially in a warm kitchen, can break down the structure and cause it to become runny.
Variations & Customizations (Pimp Your Frosting)
The classic is perfect, but sometimes you want to shake things up.
- Zesty Citrus Cream Cheese Icing: Add 1-2 tablespoons of fresh lemon, lime, or orange zest to the frosting along with the vanilla. This is absolutely incredible on lemon pound cake, vanilla cupcakes, or spice cake.
- Brown Butter Cream Cheese Icing: Before you start, melt the butter in a saucepan and cook it until it foams and brown, nutty-smelling bits form at the bottom. Let it cool and solidify back to a soft, paste-like consistency at room temperature before using it in the recipe. This adds an insane depth of nutty, caramelized flavor.
- Cozy Cinnamon Spice Icing: Add 1 teaspoon of ground cinnamon and ¼ teaspoon of nutmeg to the frosting. This is the ultimate topping for carrot cake, pumpkin bars, or a giant batch of cinnamon rolls.
FAQ: Your Cream Cheese Conundrums, Conquered
Let’s clear up some of the most common frosting frustrations.
1. Help! My cream cheese icing is too runny! How do I fix it?
The first line of defense is chilling it. Pop it in the fridge for 30 minutes to an hour. This will usually firm it up significantly. If it’s still too soft, you can try beating in a little more sifted powdered sugar, a few tablespoons at a time.
2. How do I fix lumpy frosting?
Honestly, it’s very difficult to fix once it’s lumpy. Prevention is key (use room temperature ingredients!). You can try letting the frosting sit out to warm up slightly and then re-beating it on high speed, which might break down some of the lumps.
3. Does a cake with cream cheese icing have to be refrigerated?
Yes, absolutely. This is a dairy-based frosting and should not be left at room temperature for more than two hours. Store your frosted cake in the refrigerator.
4. Can I pipe pretty decorations with this frosting?
Yes, but it’s softer than a traditional buttercream. For the best results, make sure your frosting is well-chilled. If your hands are warm, you may need to pop your piping bag back in the fridge periodically to keep it firm. It’s best for simple swirls and rosettes rather than intricate detail work.
5. Can I make this frosting ahead of time?
Yes! It stores beautifully. You can keep it in an airtight container in the refrigerator for up to a week. Just let it sit at room temperature for about 20-30 minutes and give it a quick whip with your mixer to restore its fluffy texture before using.
6. What cakes and desserts are best with cream cheese icing?
The classics are carrot cake, red velvet cake, and hummingbird cake. It’s also fantastic on pumpkin spice cake, banana bread, cinnamon rolls, and even a rich chocolate cake!
7. Can I use low-fat cream cheese?
You can, but the frosting will be noticeably softer and may have a slightly grainier texture. For the best, richest, and most stable results, full-fat is the only way to go.
Final Thoughts
You are now a master of what is, in my humble opinion, the greatest frosting to ever grace a cake. You have the secret to a perfectly smooth, tangy, and creamy topping that will elevate everything you bake. You are a dessert champion.
So go forth and frost! Slather it on a carrot cake, pipe it onto red velvet cupcakes, spread it on a warm cinnamon roll. Just be prepared for the inevitable question: “Oh my gosh, this frosting is amazing! What’s your secret?” You can just smile and say, “It’s easy when you know how.”