Noot Noot! You’re Seriously Going to Make a Pingu Cake? Let’s Do This.
Alright, let’s be real. Somewhere deep in the nostalgic corners of your mind, you can still hear it: that iconic, slightly unhinged “Noot Noot!” Today, we’re not just reminiscing about our favorite claymation penguin; we’re bringing him to life in glorious, edible form. You’re here because you want to know how to make a Pingu cake, and frankly, I admire your chaotic good energy. This isn’t just a cake; it’s a statement. It says, “I appreciate surrealist children’s television from the ’90s, and I’m not afraid to express it with sugar.”
Forget your elegant drip cakes and your minimalist floral designs. We’re diving headfirst into the world of edible art that’s equal parts adorable and absurd. Is this going to be a simple sheet cake? Absolutely not. Will it be the most memorable dessert you’ve ever made? You bet your icy, Antarctic backside it will. So grab your apron and prepare to channel your inner artist, because things are about to get very, very “noot.”
Why This Cake is an Absolute Legend
So, why go to all the trouble of sculpting a penguin out of cake and fondant? Are you questioning your life choices yet? Don’t. Here’s why this is a certified awesome idea.
First, the sheer, unadulterated joy. Imagine placing this cake on a table. The silence, the confusion, and then the eruption of laughter and delight. A Pingu cake isn’t just a dessert; it’s an experience. It’s a guaranteed hit for birthday parties (for kids or nostalgic adults), or just for a random Wednesday when you need to smile.
Second, it’s a super fun creative project. This is more than just baking; it’s edible sculpting. You get to play with shapes, colors, and textures to bring a beloved character to life. It might look intimidating, but I’m going to break it down into manageable steps that will make you feel like a cake decorating superstar.
Finally, it’s surprisingly delicious. Underneath all that adorable fondant is a rich, moist chocolate cake layered with yummy buttercream. It looks incredible, and it tastes just as good. It’s the ultimate win-win.
Your Antarctic Pantry: Ingredients

Here’s the shopping list for your Pingu expedition. We’re keeping the cake part simple so we can focus our energy on the decorating masterpiece.
For the Chocolate Cake (The Penguin Body):
- Your favorite chocolate cake recipe or 1 box of devil’s food cake mix. (No judgment here. We’re focusing on the art, remember?)
- Ingredients as called for on the box (usually eggs, oil, and water).
For the Buttercream (The Delicious Glue):
- 1 cup (2 sticks) unsalted butter, softened.
- 4 cups powdered sugar.
- 1/4 cup milk or heavy cream.
- 1 teaspoon vanilla extract.
- Pinch of salt.
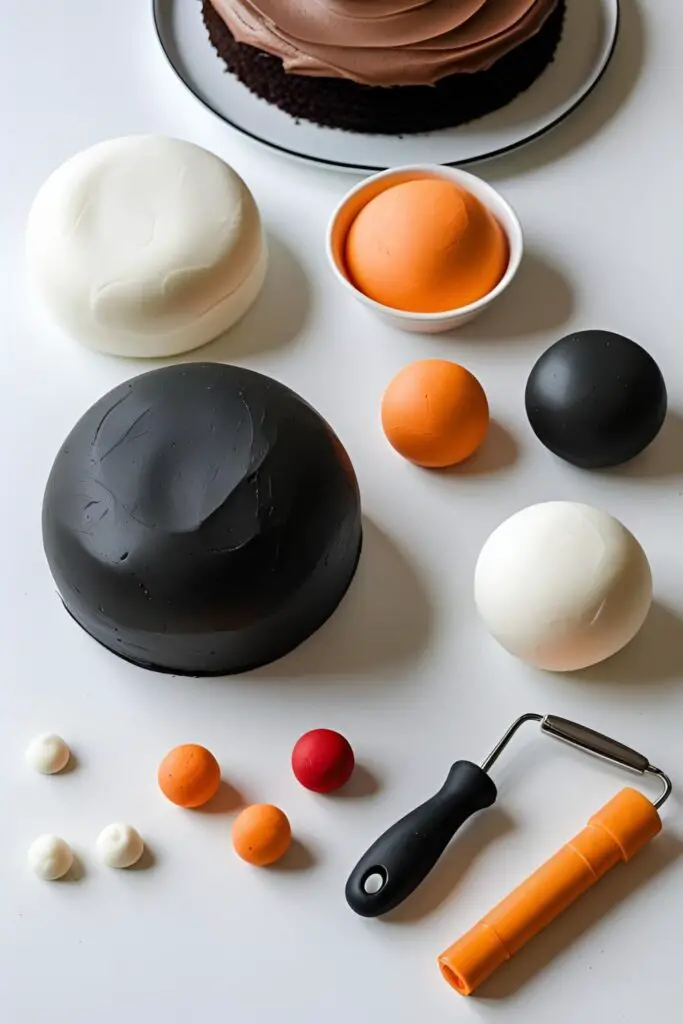
For the Fondant Decoration (Pingu’s Tuxedo):
- 24 oz black fondant. This will be for his main body.
- 12 oz white fondant. For his belly and eyes.
- 2 oz orange or yellow fondant. For his iconic beak and feet.
- A tiny bit of red fondant for his mouth (optional, but cute).
- A little cornstarch or powdered sugar for dusting.
- Shortening to prevent sticking.
Your Sculpting Studio: Tools & Gadgets
Having the right equipment will make you feel less like a stressed-out baker and more like a serene claymation artist.
- Two 6-inch round cake pans & one oven-safe glass bowl (like a Pyrex bowl, about 1.5-quart): This combo is the secret to getting Pingu’s classic pear shape.
- Electric Mixer (stand or handheld): For whipping up that cake batter and buttercream without getting a bicep workout.
- Mixing Bowls & Spatulas: The essentials of any baking quest.
- Serrated Knife: For carving your cake into a penguin masterpiece.
- Cake Board or Serving Platter: To build your penguin upon.
- Offset Spatula: For applying that smooth buttercream crumb coat.
- Fondant Rolling Pin (non-stick): Crucial for getting smooth, even sheets of fondant.
- Fondant Smoother: To get that sleek, professional finish.
- Pizza Cutter or a sharp knife: For cutting clean fondant shapes.
- Small amount of water and a small paintbrush: This is your edible glue for sticking fondant pieces together.
Let’s Get “Nooting”: Step-by-Step Instructions
Ready to bring Pingu to life? Deep breath. You’ve got this. We’ll do it one step at a time.

Step 1: Bake the Cake Components Prepare your chocolate cake batter according to the recipe or box instructions. Grease and flour your two 6-inch round pans and your oven-safe bowl. Divide the batter: fill each 6-inch pan about halfway and pour the rest into the glass bowl. Bake until a toothpick inserted into the center of each comes out clean. The bowl cake will take longer to bake than the round cakes, so keep an eye on it! Let them all cool completely.
Step 2: Assemble Pingu’s Body Once your cakes are totally cool (don’t you dare touch them while they’re warm!), level the two 6-inch round cakes. Place one round cake on your cake board. Add a layer of buttercream. Place the second round cake on top. Now, carefully turn the bowl-shaped cake upside down and place it on top of the stacked round cakes. Ta-da! You have a basic penguin-ish shape.
Step 3: Carve Your Penguin Now for the fun part. Using your serrated knife, begin to carve the stacked cake into a more refined Pingu shape. Think of a smooth, rounded pear or bowling pin. Shave off a little at a time. It’s better to take off too little than too much. You can use the cake scraps to build up areas if needed, “gluing” them on with buttercream. Don’t stress about perfection; the buttercream and fondant will hide a multitude of sins.
Step 4: The All-Important Crumb Coat Once you’re happy with your penguin sculpture, cover the entire thing in a thin, smooth layer of buttercream. This is your crumb coat, and it traps all the loose crumbs so they don’t ruin your beautiful fondant finish. Chill the crumb-coated cake in the fridge for at least 30 minutes until the buttercream is firm to the touch. This is non-negotiable!
Step 5: Suit Up in Black Fondant Lightly dust your work surface with cornstarch or powdered sugar. Knead your black fondant until it’s pliable. Roll it out into a large circle, big enough to drape over the entire cake. Carefully lift the fondant and drape it over your chilled cake. Gently smooth it down the sides with your hands, then use a fondant smoother to get a sleek finish. Trim the excess at the bottom with a pizza cutter.
Step 6: Add the White Belly Roll out your white fondant into an oval shape for Pingu’s belly. Brush the back of it very lightly with a bit of water and press it onto the front of the cake. Use your fondant smoother to make sure it’s adhered well.

Step 7: It’s All in the Details
- Eyes: Roll two small ovals of white fondant for the eyes and two tiny balls of black fondant for the pupils. “Glue” them on with a dab of water.
- Beak: Shape your orange/yellow fondant into Pingu’s iconic wide, flat beak. You can make it slightly open. Attach it to the face just below the eyes.
- Feet: Roll out the orange/yellow fondant and cut out two flat, webbed feet. Tuck them under the base of the cake.
- Wings: You can make two simple flipper shapes from the leftover black fondant and attach them to his sides.
Step 8: Stand Back and Admire Your Creation You did it. You made a Pingu cake. It’s probably a little quirky, maybe a bit lopsided, but it’s yours. Give yourself a pat on the back and make a triumphant “Noot Noot!”
Nutritional Info (An Educated Guess)

This is a cake made of cake, sugar, and more sugar. Let’s not kid ourselves. But if you must know, here’s a rough idea per serving:
- Calories: ~450-600 kcal
- Sugar: A glorious amount.
- Fat: Definitely present, thanks to butter and oil.
- Nostalgia: 1000% of your daily recommended value.
- Note: This is a celebratory cake. Enjoy a slice and don’t think about the calories until tomorrow.
Avoiding an Antarctic Meltdown: Common Mistakes
Steer clear of these pitfalls to ensure your Pingu doesn’t end up looking like he’s had a rough day.
- Decorating a Warm Cake: I’ve said it before, and I’ll say it again. If you try to frost, carve, or cover a warm cake with fondant, you will have a soupy, catastrophic mess. Patience and a fully cooled cake are your best friends.
- Skipping the Crumb Coat: If you skip this step, crumbs will tear your fondant, and you’ll be able to see every lump and bump. The crumb coat is the foundation of a smooth finish.
- Using Too Much Water as Glue: When sticking fondant pieces, you only need a tiny bit of water. Too much will make the fondant slimy and cause colors to bleed. Less is more.
- Forgetting to Knead the Fondant: Cold, stiff fondant will crack when you roll it. Knead it with a little shortening on your hands until it’s smooth and pliable before you start rolling.
Creative Customizations (Pingu’s Universe)
Want to take your Pingu cake to the next level? Of course you do.
- Pingu and Friends: Feeling ambitious? Make a smaller cake for his little sister, Pinga, or his best friend, Robby the Seal. Create a whole Antarctic scene!
- Flavor Variations: Who says Pingu has to be chocolate? Make a red velvet cake for a surprising interior, or a funfetti cake for a party on the inside.
- Icy Landscape: Serve your Pingu cake on a “bed of ice.” You can do this by covering the cake board in white and light blue marbled fondant or by using crushed blue rock candy.
Your Burning Pingu Questions (FAQ)
1. Do I have to use fondant? Can I just use buttercream? You can use buttercream, but it’s much harder to get that super smooth, cartoon-like finish. Fondant gives you the clean lines that make him instantly recognizable. If you hate fondant, try a smooth crusting buttercream.
2. Where do I find all the different colored fondants? Most craft stores with a baking section (like Michaels or Jo-Ann) and cake decorating supply stores sell pre-colored fondant. You can also buy white fondant and color it yourself using gel food coloring.
3. This seems like a lot of cake. Can I make it smaller? Absolutely! Use smaller cake pans and a smaller oven-safe bowl. You could make a cute little cupcake-sized Pingu if you’re feeling extra creative.
4. How do I store a fondant-covered cake? Do not refrigerate a fondant-covered cake for long periods, as the condensation can make the fondant sticky and weepy. Store it in a cool, dry place in a cake box. It should be fine at room temperature for 1-2 days.
5. What’s the best way to cut the cake? Use a long, sharp knife. It can be helpful to run the knife under hot water and wipe it dry between slices to get clean cuts through the fondant and cake.
6. My fondant tore while I was covering the cake! What do I do? Don’t panic! You can often patch small tears by gently rubbing the area with your finger and a tiny bit of shortening. For bigger tears, you can try to smooth a small “patch” of fondant over the top and blend the edges.
7. Can I make the cake components ahead of time? Yes! You can bake the cakes a day or two in advance and wrap them tightly in plastic wrap. You can also make the buttercream ahead and store it in the fridge. Let it come to room temperature and re-whip it before using.
Final Thoughts
You did it. You stared into the claymation void and pulled out a masterpiece. You’ve created a dessert that is guaranteed to spark joy, laughter, and a flood of childhood memories. Whether it’s for a birthday or just because, your Pingu cake is a testament to the fact that baking doesn’t always have to be so serious.
Now, go on and present your creation. Watch as everyone’s face lights up. And when you take that first delicious, chocolatey bite, just let out a quiet, satisfied “Noot Noot.” You’ve earned it. 🙂