How to Make Caramel Apples That Don’t End in a Puddle of Sadness
There’s a certain magic to a perfect caramel apple. It’s the quintessential taste of fall, a nostalgic treat that promises a crisp apple crunch followed by sweet, buttery caramel. But let’s be real, you’ve probably experienced the great caramel apple tragedy: the dreaded “caramel slide,” where all that beautiful homemade caramel slowly slumps off your apple and forms a sad, sticky puddle on the plate. Today, we end this madness. You’re about to learn how to make caramel apples with a foolproof, from-scratch caramel that actually sticks. Prepare to become a legend of the autumn kitchen.
Why This Recipe Is Your Ticket to Fall Glory
So, why go to the trouble of making your own caramel apples when you can buy them? Oh, my friend, let me count the ways. First, the flavor of homemade caramel is leagues beyond that waxy, bland stuff you find in stores. We’re talking deep, rich, buttery caramel with a hint of vanilla that perfectly complements a tart, crisp apple.
Second, making them is actually a blast! It’s a fun, slightly messy activity that’s perfect for a weekend afternoon. And let’s be honest, showing up to a party with a tray of gorgeous, gourmet-looking caramel apples you made yourself? That’s a power move. People will think you’re a confectionary wizard, and who are we to correct them? It’s our little secret.
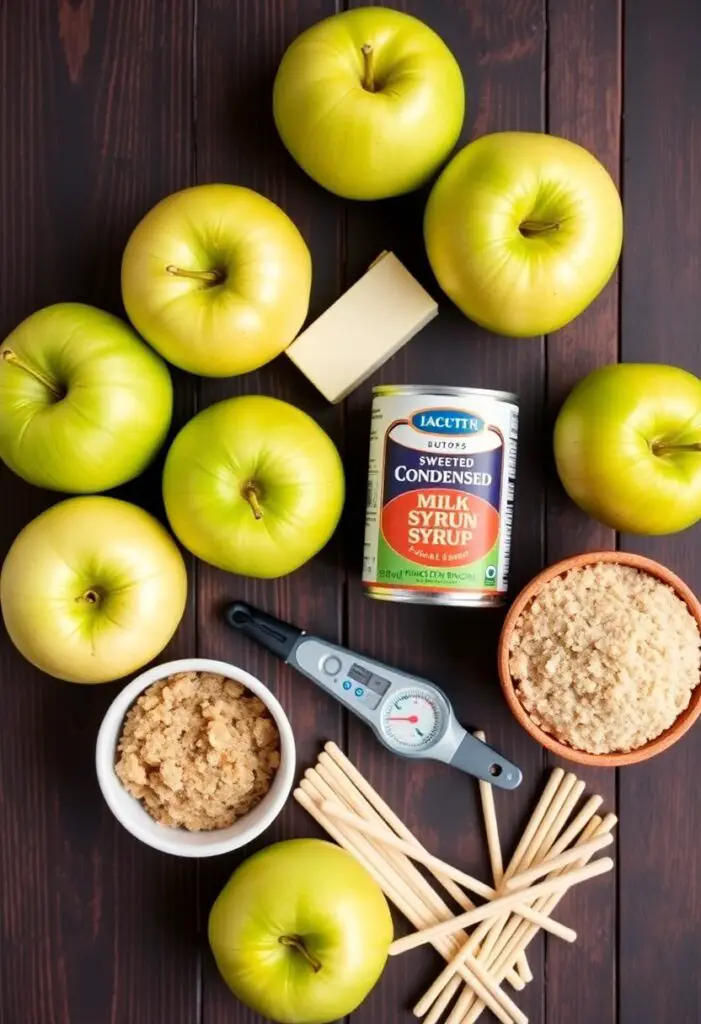
Ingredients: The A-Team of Stickiness
The key to perfect caramel is using the right ingredients. No weird stuff, just pure, simple goodness.
- 6-8 medium apples (Granny Smith are the best, more on that later)
- 1 cup (2 sticks) unsalted butter
- 2 cups packed light brown sugar
- 1 cup light corn syrup
- 1 can (14 ounces) sweetened condensed milk
- 1 teaspoon pure vanilla extract
- 1/2 teaspoon salt
- Sturdy sticks for the apples (craft sticks, lollipop sticks, or even clean twigs from the yard if you’re feeling rustic)
- Optional Toppings: Chopped nuts, sprinkles, mini chocolate chips, flaky sea salt, melted chocolate for drizzling
Key Substitutions:
- Apples: Honeycrisp or Gala are good alternatives if you prefer a sweeter apple.
- Light Corn Syrup: Golden syrup can be used in a pinch, though the flavor will be slightly different. Do not omit this ingredient, as it’s crucial for preventing sugar crystallization.
Tools & Kitchen Gadgets Used: Your Candy-Making Arsenal
Making candy isn’t scary, but having the right tools makes it a heck of a lot easier.
- Candy Thermometer (This is non-negotiable for a perfect result!)
- Heavy-bottomed saucepan (at least 3-4 quarts)
- Parchment paper or a silicone baking mat
- Baking sheet
- Whisk and a heat-resistant spatula
Step-by-Step Instructions: Let’s Get This Sticky Show on the Road

Ready to create some fall magic? Let’s break it down into three crucial stages.
Part 1: Prepping Your Apples (The Most Important Step!)
- Wash and De-Wax: This is the secret to making your caramel stick. Store-bought apples are coated in a food-grade wax that makes them shiny but causes caramel to slide right off. To remove it, bring a pot of water to a boil. Dip each apple in the boiling water for just 5-10 seconds, then immediately wipe it dry with a clean kitchen towel. You’ll see and feel the waxy residue come off.
- Chill Out: Place your clean, dry apples on a parchment-lined baking sheet and pop them in the refrigerator for at least 30 minutes. A cold apple helps the hot caramel set up faster.
- Get to the Core: Remove the stems from your apples. Firmly press a sturdy stick into the top of each apple, going about halfway through.
Part 2: Making the Foolproof Caramel
- Melt It Down: In your heavy-bottomed saucepan, combine the butter, brown sugar, corn syrup, and sweetened condensed milk.
- Bring to a Boil: Cook over medium heat, stirring constantly with a whisk until the butter is melted and the sugar is dissolved.
- Time for the Thermometer: Clip your candy thermometer to the side of the pan, making sure the tip is submerged in the mixture but not touching the bottom of the pan.
- Cook to Perfection: Continue to cook, stirring occasionally, until the caramel reaches 245°F (118°C) on the candy thermometer. This is the “firm-ball” stage and will take about 15-20 minutes. This precise temperature is what ensures your caramel will set perfectly on the apple—not too runny, not too hard.
- Finish with Flavor: Once it reaches 245°F, immediately remove the pan from the heat. Carefully stir in the vanilla extract and salt. Be cautious, as it will bubble up.
Part 3: Dipping and Decorating
- Cool It Down (Slightly): Let the caramel cool and thicken for about 5-10 minutes. This is another key step! If the caramel is too hot, it will be too thin and will slide off. You want it to be thick but still fluid.
- Dip and Twirl: Take your cold apples from the fridge. Holding the stick, dip one apple into the caramel, tilting the pan to help coat it completely. Twirl the apple as you lift it out, letting the excess caramel drip back into the pan.
- Scrape the Bottom: Gently scrape the bottom of the apple against the lip of the pan to remove any extra caramel that might cause a “foot” to form.
- Add Your Toppings: If you’re using toppings, now is the time! Immediately roll the bottom half of the caramel-coated apple in your bowl of chopped nuts, sprinkles, or whatever your heart desires.
- Let Them Set: Place the finished apples on your prepared parchment-lined baking sheet to cool and set completely, which can take about 30-60 minutes.
Calories & Nutritional Info (It’s an Apple, So It’s Healthy, Right?)

Let’s just call this a “balanced” treat. It’s got fruit!
- Serving Size: 1 caramel apple
- Estimated Calories: Around 450-600 (depending on size and toppings)
- Fat: Approximately 20g
- Carbohydrates: Roughly 70g
- Sugar: A glorious, unapologetic amount.
Nutritional Note: You’re getting some fiber and vitamins from the apple! The rest is pure, delicious, buttery, sugary joy. Enjoy it.
Common Mistakes to Avoid: A Guide to Caramel Apple Victory
- The Infamous Caramel Slide: The culprit is almost always wax on the apples. You absolutely must de-wax your apples for the caramel to have any chance of sticking. A cold apple also helps significantly.
- Grainy Caramel: This happens when sugar crystals form. The corn syrup is your best friend in preventing this. Also, avoid scraping the sides of the pan too much while the caramel is cooking.
- Caramel That’s Too Hard or Too Soft: This is a temperature problem. You must use a candy thermometer and cook the caramel to exactly 245°F. Any lower, and it will be runny; any higher, and it will be too hard to bite.
- Dipping in Scalding Hot Caramel: If you dip your apples the second the caramel comes off the stove, it will be too thin and will all run off. Letting it cool for 5-10 minutes to thicken is a crucial step.
Variations & Customizations: Pimp Your Apple
The classic is great, but why not get a little creative?
- The Gourmet Toppings Bar: Set up bowls of different toppings and let everyone customize their own. Think crushed Oreos, toasted coconut, mini M&Ms, flaky sea salt, or even crushed potato chips for a sweet and salty vibe.
- Boozy Salted Bourbon Caramel: For an adults-only version, stir in 2 tablespoons of your favorite bourbon along with the vanilla extract at the end. Sprinkle with flaky sea salt after dipping.
- The “I Don’t Have Time for This” Cheater’s Version: Don’t want to make caramel from scratch? Unwrap about two 11-ounce bags of store-bought caramels. Melt them in a saucepan with 2-3 tablespoons of heavy cream over low heat, stirring until smooth. Proceed with dipping as directed.
FAQ Section: All Your Sticky Questions, Answered
- What are the best apples to use for caramel apples? You want a firm, crisp, and tart apple to balance the sweetness of the caramel. Granny Smith is the undisputed champion. Honeycrisp, Fuji, and Gala are also good choices.
- Why did my caramel slide off my apples? 99% of the time, it’s because you didn’t remove the wax coating from the apples. See the prep steps above—it’s the most important part of the whole recipe!
- Can I make these without a candy thermometer? I highly advise against it. The temperature is extremely important for the final texture of the caramel. A candy thermometer is an inexpensive tool that guarantees success.
- How do I store homemade caramel apples? Store them loosely covered in the refrigerator. They are best eaten within 3-4 days. Let them sit at room temperature for about 15 minutes before eating to allow the caramel to soften slightly.
- Can I make the caramel sauce ahead of time? Yes. You can make the caramel and store it in an airtight container in the fridge for up to a week. To use it, gently reheat it in a saucepan over low heat, stirring until it’s smooth and dippable.
- My caramel is too thick to dip! What do I do? Your caramel has likely cooled down too much. Gently warm it over low heat, stirring, until it reaches a good dipping consistency again. If it’s still too thick, you can stir in a teaspoon or two of heavy cream.
- What can I do with leftover caramel? Drizzle it over ice cream, brownies, or cheesecake. Use it as a dip for pretzels or fruit. Or, just eat it with a spoon. No one is watching.
Final Thoughts
Congratulations! You are now a caramel apple master, armed with the knowledge to create a perfect, sticky, delicious fall treat that won’t end in disappointment. Say goodbye to the dreaded caramel slide and hello to a world of gourmet, homemade goodness. Go on, get dipping, and prepare for the oohs and aahs.