Ditch the Store-Bought: Your Ultimate Guide to How to Make Paneer at Home (Seriously, It’s Easy!)
Ever stare at that sad block of store-bought paneer, wondering if you could do better? Spoiler alert: You absolutely can. And honestly, it’s not nearly as intimidating as you think. Forget those Pinterest-perfect images of complicated cheese-making; we’re about to tackle how to make paneer from scratch, and trust me, your taste buds will thank you. IMO, there’s nothing quite like the fresh, squeaky goodness of homemade paneer. You’re about to unlock a whole new level of culinary street cred. Ready to become a paneer pro? Let’s do this!
Why This Homemade Paneer Recipe Is Your New Kitchen BFF
Okay, so why bother making your own paneer when you can just grab it from the dairy aisle? Because, my friend, flavor, texture, and pure bragging rights! Store-bought paneer often feels like a rubbery, flavorless sponge. Our homemade version? It’s soft, it’s tender, and it actually tastes like something. Plus, you control the ingredients, so no weird additives or preservatives. Think about it – you can literally tell your dinner guests, “Oh, this paneer? I made it myself.” Mic drop! It’s also incredibly cost-effective, which means more money for… well, more cheese, I guess? Winning!
What You’ll Need: The Goods

Making paneer is surprisingly minimalist. No fancy ingredients, just a few kitchen staples.
- Whole Milk: This is your star player. Go for full-fat milk, ideally pasteurized but not ultra-pasteurized (UHT) if you can avoid it. UHT milk sometimes struggles to curdle properly. You need about 1 gallon (3.78 liters).
- Acid Agent: This is what makes the milk separate into curds and whey. Choose one of the following:
- Lemon Juice: About 1/4 to 1/2 cup (60-120 ml), freshly squeezed is best.
- White Vinegar: About 1/4 to 1/2 cup (60-120 ml).
- Plain Yogurt (optional, for extra tang): A couple of tablespoons can enhance flavor, especially if you’re using vinegar.
- Salt (optional): Just a pinch or two if you like a slightly seasoned paneer.
See? Told you it was simple. No exotic spices or hard-to-find ingredients here.
Your Arsenal of Awesome Kitchen Gadgets
You don’t need a Michelin-star kitchen, but a few key tools make the process smooth sailing. Here’s what you’ll be reaching for:
- Large Heavy-Bottomed Pot: We’re talking at least 6-8 quart capacity. This prevents scorching your precious milk.
- Fine-Mesh Sieve or Colander: Essential for straining.
- Cheesecloth or Muslin Cloth: A good quality, tightly woven cloth is crucial. Don’t skimp here; paper towels won’t cut it, trust me.
- Large Bowl: To collect the whey (don’t toss it!).
- Spatula or Large Spoon: For stirring the milk.
- Measuring Cups and Spoons: For precision, even if we’re being laid-back about it.
- Heavy Weight (optional but recommended): A stack of cookbooks, a cast-iron pan, or even a water-filled pot will work. This helps press your paneer into a firm block.
- Cutting Board: For shaping and slicing your glorious paneer.
Let’s Get Curd-Happy: Step-by-Step Instructions
Alright, buckle up buttercup, it’s paneer time! Follow these steps, and you’ll be a dairy wizard in no time.
H3: Step 1: Heat the Milk (Gently, My Friend)

Pour your gallon of whole milk into that big, heavy-bottomed pot. Place it over medium-high heat. Now, here’s the important part: stir it frequently to prevent it from sticking to the bottom and scorching. We want warm, happy milk, not a burnt mess.
H3: Step 2: Bring it to a Boil (But Don’t Walk Away!)
Keep stirring until the milk comes to a full rolling boil. You’ll see those bubbles forming and rising vigorously. As soon as it hits that boiling point, immediately reduce the heat to low or take it off the heat entirely. Don’t let it boil over – trust me, cleaning burnt milk off your stovetop is a special kind of hell.
H3: Step 3: Add Your Acid (The Magic Moment!)
Now for the fun part! Gradually add your chosen acid (lemon juice or vinegar), a tablespoon at a time, gently stirring after each addition. You’ll notice the milk starting to curdle right before your eyes. Little white clumps (the curds) will separate from a yellowish-greenish liquid (the whey). Keep adding the acid until the whey is mostly clear. If it’s still milky, add a little more acid. Don’t go crazy, though; too much acid can make your paneer tough. This usually takes about 1/4 to 1/2 cup.
H3: Step 4: Let it Sit (Patience, Young Padawan)
Once the curds and whey have clearly separated, stop stirring. Let the mixture sit undisturbed for about 5-10 minutes. This gives the curds a chance to fully form and settle. You’ll see a distinct separation, almost like a cloudy lake with white islands floating in it.
H3: Step 5: Strain Your Curds (The Great Divide)
Place your fine-mesh sieve or colander over a large bowl (remember, we’re saving that whey!). Line the sieve with your cheesecloth or muslin cloth, making sure it hangs over the edges. Carefully pour the curdled milk mixture into the cloth-lined sieve. The whey will drain into the bowl below, leaving the glorious white curds behind in the cloth.
H3: Step 6: Rinse the Paneer (Optional, But Recommended)
Once most of the whey has drained, gather the corners of the cheesecloth to form a bundle. Gently rinse the paneer under cold running water for a minute or two. This step is crucial if you used lemon juice or vinegar, as it helps wash away any lingering acidic taste. It also helps cool down the curds, making them easier to handle.
H3: Step 7: Press the Paneer (For That Perfect Firmness)

Twist the cheesecloth tightly to squeeze out as much excess water as possible. You want it pretty dry, but not bone dry. Now, form the paneer into a disc or square shape within the cloth. Place this little bundle on a clean plate or cutting board.
Here’s where the weight comes in: Place a flat surface (like another plate) on top of the paneer bundle, and then put your heavy weight on top of that. This presses out the remaining moisture and helps the paneer solidify into a firm block.
Let it press for at least 1-2 hours for soft paneer, or up to 3-4 hours (or even overnight in the fridge) for a firmer block that’s easier to fry or grill. The longer you press, the firmer it gets.
H3: Step 8: Unleash Your Inner Chef!
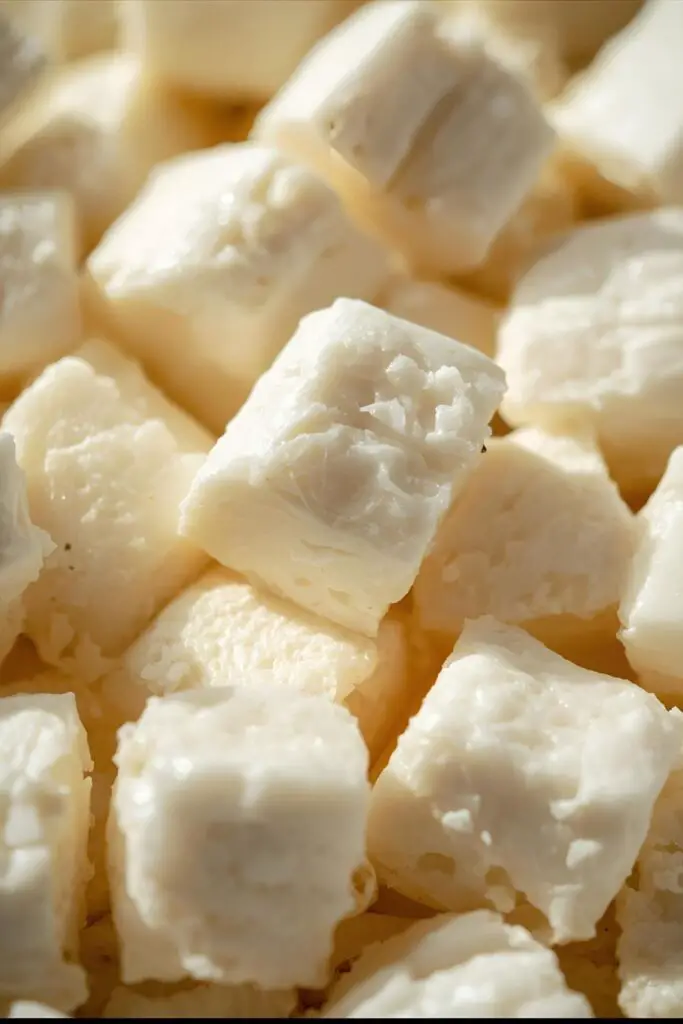
Once pressed, unwrap your beautiful homemade paneer. You should have a firm, creamy white block. Now, you can slice it, dice it, cube it, or crumble it – whatever your recipe calls for! Store any unused paneer in an airtight container in the fridge, submerged in fresh cold water, for up to 3-4 days. Change the water daily.
Calories & Nutritional Info: The Nitty-Gritty
Homemade paneer is a fantastic source of protein and healthy fats. Here’s a quick breakdown for a typical serving (about 1 oz or 28g), though these are estimates and can vary based on milk fat content and how much moisture you press out.
- Calories: Approximately 80-100 kcal
- Protein: Around 6-7 grams
- Fat: Roughly 6-8 grams (mostly saturated, FYI)
- Carbohydrates: Minimal, usually less than 1 gram
- Calcium: A good source, contributing to bone health.
- Vitamins: Contains some B vitamins and Vitamin A.
So, not exactly a diet food, but it’s wholesome, protein-packed, and much better than a greasy fast-food burger, right?
Common Mistakes to Avoid: Don’t Be That Guy!

We all make mistakes, especially in the kitchen. Here’s how to sidestep the most common paneer pitfalls:
- Using UHT Milk: Ultra-pasteurized milk sometimes struggles to curdle. Stick to regularly pasteurized whole milk for best results. Check the label, people!
- Not Enough Acid (or Too Much): If your milk isn’t curdling, you probably need a little more acid. If your paneer tastes sour or is too tough, you might have overdone it. It’s a delicate balance, TBH.
- Not Stirring the Milk: Burned milk at the bottom of the pot? Been there, done that, bought the T-shirt. Stir, stir, stir!
- Over-Boiling After Adding Acid: Once those curds start forming, get that pot off the heat or turn it way down. Continuing to boil will make your paneer hard and chewy. Nobody wants rubbery paneer.
- Not Pressing Long Enough: You’ll end up with crumbly paneer that falls apart when you try to cook with it. Patience is a virtue here.
- Forgetting to Rinse: If you used lemon juice or vinegar, skipping the rinse can leave your paneer with an unwelcome tangy aftertaste. Don’t be shy with the cold water!
Variations & Customizations: Get Creative!
Now that you’re a paneer-making maestro, let’s explore some ways to jazz it up.
- Spicy Paneer: Add a pinch of red chili flakes or finely chopped green chilies to the milk before it boils. This infuses the paneer with a subtle kick. Imagine chili paneer with your own spicy base!
- Herbed Paneer: Stir in some freshly chopped herbs like cilantro, mint, or even a little dried oregano into the curds before pressing. This adds an aromatic twist perfect for grilling.
- Garlic & Ginger Infused Paneer: Lightly sauté some minced garlic and grated ginger in a tiny bit of oil, then add it to the milk before it boils. This gives your paneer a flavorful foundation for Indian curries.
- Keto-Friendly Paneer: Good news! Paneer is inherently keto-friendly due to its high fat and protein, and low carb content. No major changes needed here, just enjoy!
FAQ Section: Your Burning Paneer Questions Answered
Got questions? I’ve got answers. Let’s tackle some common queries about making paneer at home.
Q1: Can I use low-fat milk to make paneer?
A: While you can technically make paneer with low-fat milk, I wouldn’t recommend it. You’ll get a much smaller yield, and the paneer will be drier and less flavorful. Whole milk is king for a reason!
Q2: What can I do with the leftover whey?
A: Don’t toss it! Whey is packed with nutrients. Use it as a base for soups, curries, or even to knead dough for roti or bread. You can also drink it as a protein-rich beverage (though the taste might be an acquired one!).
Q3: How do I make my paneer softer?
A: For softer paneer, reduce the pressing time. Instead of 3-4 hours, try just 1-2 hours with a lighter weight. Also, avoid over-boiling the milk after adding the acid, as this can toughen the curds.
Q4: My paneer isn’t forming a solid block. What went wrong?
A: This usually means you didn’t press it long enough, or you didn’t press it with enough weight. It could also mean you didn’t squeeze enough moisture out initially. More pressing, more firmness!
Q5: Can I freeze homemade paneer?
A: Yes, you can! Wrap the paneer tightly in plastic wrap, then place it in an airtight container or freezer bag. It will last in the freezer for up to 2-3 months. Thaw it in the refrigerator overnight before use. Keep in mind, the texture might change slightly after freezing.
Q6: How can I tell if my milk has curdled enough?
A: You’ll see a clear separation between the solid white curds and the translucent, yellowish-green liquid (whey). If the liquid still looks milky or cloudy, add a little more acid and wait a few more minutes.
Q7: Is there a vegan alternative to paneer?
A: Absolutely! While not paneer in the traditional sense, you can make a similar block from firm tofu by pressing it very well and then baking or frying it. You can also find vegan paneer alternatives made from soy or nut milks in some specialty stores.
Final Thoughts: You’re Officially a Paneer Boss!
So there you have it! You’ve just mastered how to make paneer at home, and I bet it was way easier than you thought. No more rubbery, sad blocks from the store for you, my friend. You’re officially in the big leagues now. Go forth and impress your family, your friends, and most importantly, yourself! Now, what curry are you going to make first? Don’t forget to share your paneer triumphs with me! 😉