How to Make Muffin Liners in 5 Minutes (And Never Panic-Buy Them Again)
Picture this: It’s a Tuesday night. A sudden, intense craving for warm, fluffy blueberry muffins has taken over your entire being. You’ve pulled out the flour, the sugar is measured, the oven is preheating to a perfect 375°F. You reach into the pantry for the muffin liners and your hand meets…nothing. Just the cold, empty bottom of the box. The horror. The betrayal.
Do you abandon the mission? Do you risk a greased-pan situation that will inevitably leave half your muffin welded to the tin? Before you surrender to a muffin-less existence, let me tell you a secret. I have a guide on how to make muffin liners using one simple thing you absolutely have in your kitchen right now.
This isn’t just a recipe; it’s a life skill. It’s a baker’s emergency plan. It’s your ticket to never letting an empty box stand between you and deliciousness ever again.
Why This “Recipe” is a Game-Changer
First, let’s talk about the sheer convenience. This is the ultimate baking hack for when you’re in a pinch. It literally takes five minutes and saves you a frantic, last-minute trip to the store wearing one sock and a whole lot of desperation.
Second, it’s basically free. A single roll of parchment paper, which costs a few bucks, can produce hundreds of muffin liners. Compare that to the fancy, boutique cupcake liners that cost a fortune and get thrown away anyway. It’s just smart baking economics.

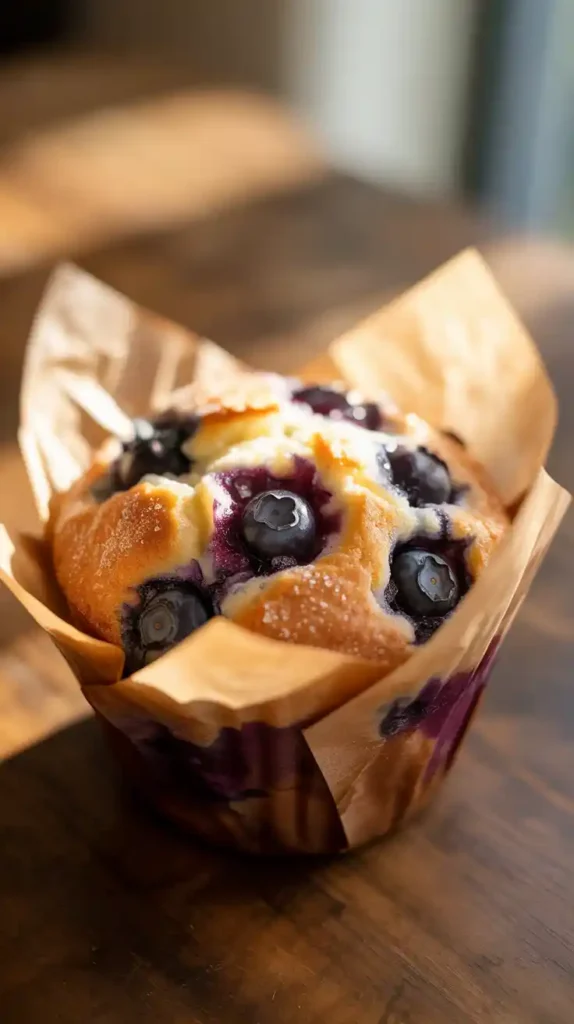
Finally, they look incredible. Seriously. These DIY liners give your muffins and cupcakes a rustic, chic, straight-from-a-fancy-bakery vibe. The tall, crinkly parchment walls look effortlessly elegant. You’ll look like a professional pastry chef, even if your muffins are from a box mix (I won’t tell).
Materials You’ll Need (It’s a Short List)
Forget a long, complicated ingredient list. For this “recipe,” you only need one star player.
- Parchment Paper: This is it. This is the whole list. You can use bleached (white) or unbleached (brown) parchment paper. Do not, under any circumstances, use wax paper.
Tools & Kitchen Gadgets Used
This is where the magic happens. You’ll need a few common household items to become a liner-making machine.
- A Standard Muffin/Cupcake Tin: You need this to form the liners, and presumably, to bake in.
- A Can or Small Glass: Find one that fits snugly into the bottom of your muffin tin cups. A can of tomato paste, a spice jar, or a small juice glass are all perfect candidates.
- A Ruler or Measuring Tape: For a brief moment of precision.
- Scissors or a Rotary Cutter: For clean, straight cuts.
Step-by-Step Instructions: Let’s Get Folding!
Ready to unlock your new superpower? The process is so simple, you’ll wonder why you ever bought liners in the first place.
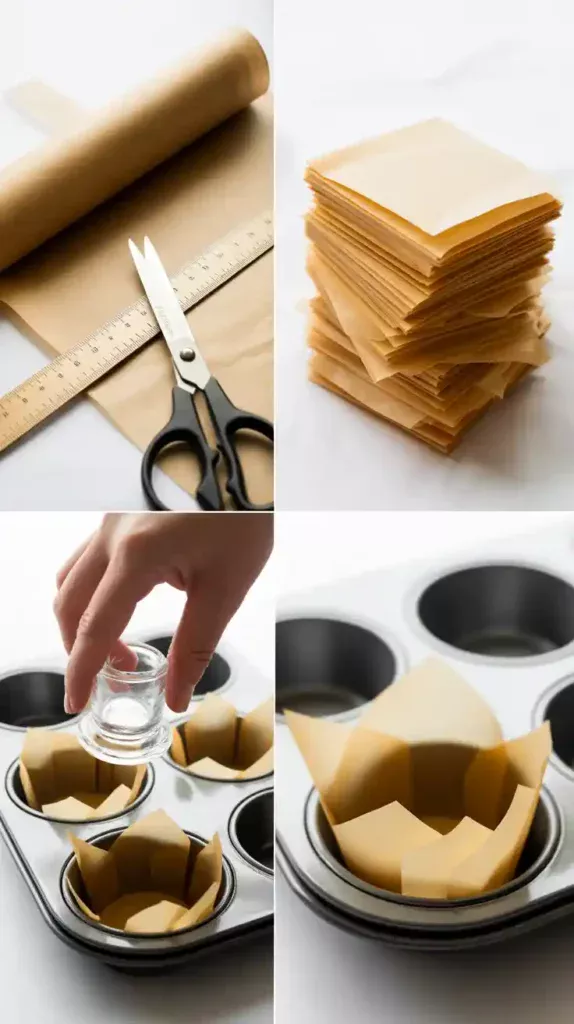
H3: Part 1: The Prep – Measure and Cut
- Determine Your Size: For a standard muffin tin, a 5-inch by 5-inch square is the perfect size. This gives you enough paper to form the base and have those lovely rustic walls come up the side.
- Measure and Mark: Unroll a sheet of your parchment paper. Use your ruler to measure out 5-inch increments along the length and width. You can make little marks with a pencil if you like, or just live on the edge and eyeball it.
- Cut Your Squares: Use your scissors or rotary cutter to cut out your 5×5 inch squares. Don’t stress if they aren’t geometrically perfect down to the last millimeter. The rustic charm is part of the appeal! Cut out as many squares as you need liners.
H3: Part 2: The Fold – Shaping Your Liners
- Center Your Square: Take one of your parchment squares and center it over one of the cups in your muffin tin.
- The Magic Press: Take your can or glass and place it directly in the center of the parchment square. Press down firmly, pushing the parchment paper down into the muffin cup. The paper will fold and crinkle up around the sides of the glass.
- Crease with Conviction: This is the most important part. While holding the glass down, use your other hand to firmly press and crease the folds of the paper against the sides of the glass. You need to be assertive here. You’re telling the paper, “This is your shape now. Deal with it.”
- The Reveal: Gently remove the glass, and voilà! You have a beautifully formed, crinkly, bakery-style muffin liner. Remove it from the tin and repeat the process with the remaining squares.
H3: Part 3: Ready for Batter
- Place and Fill: Arrange your newly minted muffin liners back in the tin. They are now ready and waiting to be filled with your delicious batter.
- A Quick Tip: The DIY liners are lighter than store-bought ones. I find it easiest to use a cookie scoop or a piping bag to fill them, which prevents the batter from splattering and messing up the tall paper walls.
When to Use Your DIY Liners (And When Not To)
While these liners are amazing, there’s a time and a place for everything.
- Perfect For:
- Hearty Muffins: Blueberry, bran, or morning glory muffins look stunning in these rustic cups.
- Bakery-Style Cupcakes: When you want an elegant, understated look that lets the frosting be the star.
- Savory Bakes: Mini quiches, egg cups, or savory muffins are a perfect match.
- When you’re out of store-bought liners. Duh.
- Maybe Stick to Store-Bought When:
- You need a specific color or printed design for a themed party.
- You’re making very delicate, light-colored cupcakes and want perfectly uniform, fluted sides.
- You’re baking for a massive bake sale and just want the speed and convenience of pre-made.
Common Mistakes to Avoid (The DIY Don’ts)
I’ve made the mistakes so you don’t have to. Avoid these common pitfalls.
- The Wax Paper Fiasco: I know I said it before, but it bears repeating. Do not use wax paper. It is coated in wax, which will melt in the oven, creating smoke, a horrible smell, and infusing your beautiful muffins with a waxy residue. Just don’t.
- Cutting Puny Squares: If your paper squares are too small, they won’t come up high enough on the sides of the muffin tin. You’ll end up with a sad little paper disc at the bottom and batter stuck all over the sides of the pan. A 5×5 inch square is your golden ticket for standard tins.
- The Timid Crease: If you just gently press the paper into the tin, it will pop right back up and won’t hold its shape. You need to create sharp, firm creases around the base. Show that parchment who’s boss.
Variations & Customizations

Once you master the basic fold, you can get creative.
- The Tulip Liner: This is that super elegant, pointy-topped liner you see in fancy coffee shops. To make these, you cut a slightly larger square (around 6×6 inches), and instead of pressing it in, you fold it in half, then in half again to find the center, and then drape it over your glass before pressing it into the tin. This creates four distinct “petals.”
- A Splash of Color: While white parchment is classic, the unbleached brown parchment paper gives an even more rustic, earthy feel. You can also find oven-safe colored parchment paper online if you want to get really fancy.
- Get Edgy: Use a pair of decorative craft scissors (the ones with the zigzag or wave pattern) to cut your 5×5 squares. This will give the top edge of your muffin liners a fun, decorative border. It’s a small detail that makes a big impact.
FAQ: Your Burning Questions About Folding Paper
- Is it safe to bake with parchment paper? Yes, absolutely! Parchment paper is designed for baking. It’s coated with silicone, making it non-stick and heat-resistant up to a certain temperature, typically 425°F to 450°F (220°C to 230°C). Always check the packaging on your specific brand.
- Can I use regular printer paper or aluminum foil instead? Hard no on the printer paper—it’s a fire hazard and not food-safe. Aluminum foil can be used in a pinch, but you must grease it thoroughly, or your muffins will stick horribly. Parchment is infinitely better.
- Do I need to grease these DIY parchment liners? Nope! That’s the beauty of parchment paper. Its silicone coating makes it naturally non-stick. Your muffins should pop right out.
- Can I make a big batch of these ahead of time? Of course! You can spend ten minutes making a huge stack of them. I recommend storing them pressed inside your muffin tin or stacked with a rubber band around them to help them keep their shape.
- Will they really hold their shape when I pour in the batter? Yes, for the most part. The weight of the batter helps hold them in place. They might unfold slightly, but that adds to the rustic, homemade charm.
- What’s the best kind of parchment paper to use? Any brand will work just fine. Some people find that a slightly thicker, heavy-duty parchment paper is a little easier to crease and holds its shape more rigidly, but it’s not a requirement.
- Is this actually cheaper than buying liners? By a long shot. A standard 75-foot roll of parchment paper can make well over 150 liners, making the per-liner cost mere pennies.
Final Thoughts
And there you have it. You are now a master of a secret baking art. You possess the power to conjure muffin liners from a simple roll of paper. No longer will you be held hostage by your pantry’s inventory. You are free. You are powerful. You are a self-sufficient baking champion.
Now go forth and fold. Make those muffins, bake those cupcakes, and when someone asks where you got your adorable, rustic liners, just smile knowingly and say, “Oh, these? I just whipped them up.”