30-Minute Homemade Mozzarella: Your Guide to Becoming a Cheese God
Let’s have a real talk about mozzarella. You’ve probably bought that sad, plastic-wrapped ball of cheese from the grocery store. It’s fine. It’s… serviceable. It melts on a pizza. But have you ever had fresh, warm mozzarella, mere moments after it was born? The kind that’s so milky, so tender, with that signature squeak and glorious stretch? It’s a completely different universe of deliciousness. And you’re probably thinking, “Yeah, that sounds great, but I’m not a 19th-century Italian nonna.”
Well, what if I told you that you are less than 30 minutes away from that exact life-changing cheese experience, using just a few simple ingredients and your own two hands? It’s true. Today, I’m going to show you how to make mozzarella that will ruin you for the store-bought stuff forever. You’re about to become a cheese-making wizard.
Why This Recipe Is Basically a Superpower
Okay, “superpower” might be a strong word, but hear me out. Why should you embark on this dairy-fueled adventure?
First, the sheer speed. This isn’t a month-long cheddar-aging situation. This is practically instant gratification in the world of cheesemaking. You can literally decide you want fresh mozzarella for dinner and have it ready before the pasta water even boils.
Second, the flavor and texture are unbeatable. Warm, fresh, homemade mozzarella is a culinary revelation. It’s creamy, milky, and has a delicate sweetness you just can’t find in a package. The stretch is legendary.

And finally, the bragging rights. Oh, the bragging rights. Casually dropping “I just made a fresh ball of mozzarella” at a dinner party will earn you more respect than climbing a mountain. People will think you’re some kind of kitchen deity. And who are we to correct them?
Your Alchemical Ingredient List
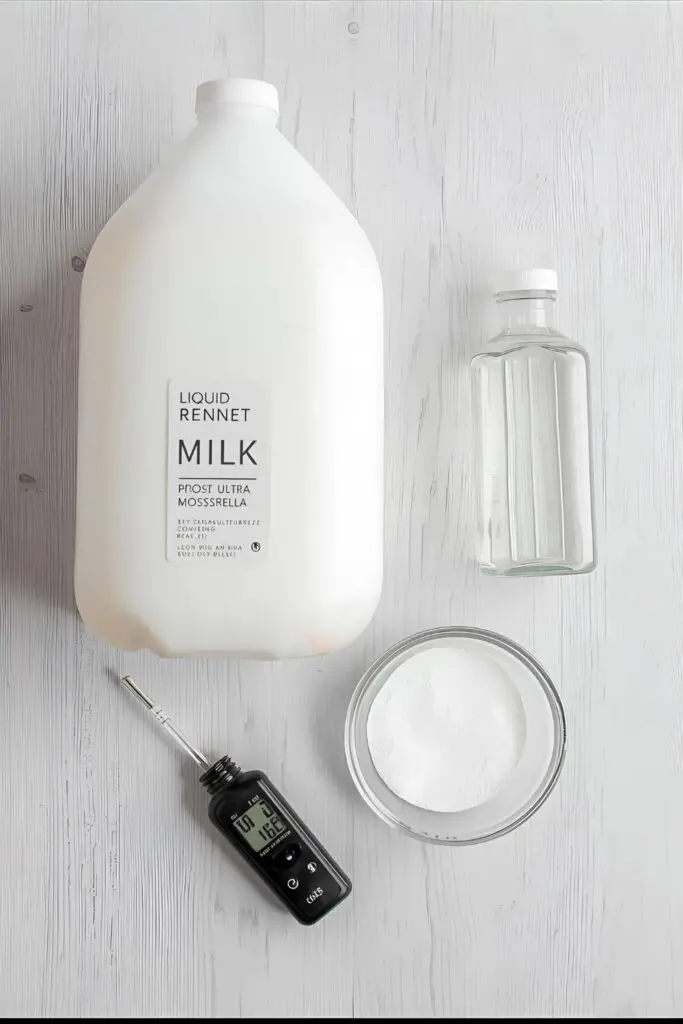
This is where science meets magic. The ingredients are simple, but they are specific. Pay attention, future cheesemonger.
- 1 gallon (4 liters) Whole Milk: This is the most important part. You MUST use non-ultra-pasteurized milk. Check the carton. If it says “UHT” or “ultra-pasteurized,” put it back. That milk has been heated so high its proteins won’t curdle properly, and you’ll end up with a pot of disappointment. Regular pasteurized milk is perfect.
- 1 1/2 tsp Citric Acid: This provides the acidity needed to start separating the curds from the whey. You can find it in the canning aisle of most grocery stores or online.
- 1/4 tsp Liquid Rennet: This is the enzyme that does the heavy lifting, turning your milk into a solid curd. Make sure you get liquid rennet (animal or vegetable is fine), not junket tablets, which aren’t as strong. Dilute it in 1/4 cup of cool, non-chlorinated water before you start.
- 1-2 tsp Cheese Salt or Kosher Salt: To season your glorious creation. Iodized table salt can interfere with the process, so stick to the non-iodized stuff.
The Tools of a Cheese Wizard
You don’t need a secret underground cheese cave, just a few key items.
- Large Stainless Steel Pot: At least 6-8 quarts. Do not use aluminum or cast iron, as they can react with the acid.
- Instant-Read Kitchen Thermometer: This is 100% non-negotiable. Cheesemaking is a science of specific temperatures. Guessing is not an option.
- Long Knife or Offset Spatula: To cut the curds.
- Slotted Spoon: For scooping and stirring your curds.
- Colander and a large bowl to catch the whey.
- Microwave-Safe Bowl: This is our secret weapon for easy stretching.
- Food-Safe Gloves: For handling the hot cheese. Trust me, you want these.
Let’s Turn Milk into Magic: Step-by-Step
Deep breaths. You are about to witness a miracle. Follow these steps, trust your thermometer, and prepare for glory.
Step 1: Prep Your Magic Potions
In a small bowl, dissolve the 1 1/2 tsp of citric acid in 1 cup of cool, non-chlorinated water. In a separate small bowl, dilute the 1/4 tsp of liquid rennet in 1/4 cup of cool, non-chlorinated water. Set them both next to your stove. Your potions are ready.
Step 2: The Initial Heat-Up
Pour the entire gallon of milk into your large, non-reactive pot. Pour in the citric acid solution and stir gently. Now, turn the heat to medium and slowly heat the milk to 90°F (32°C), stirring gently to prevent scorching. Use your thermometer constantly!
Step 3: Add the Rennet and Wait for Magic

Once you hit exactly 90°F, turn off the heat. Gently stir in your diluted rennet solution with an up-and-down motion for exactly 30 seconds. No more, no less. Stop the motion of the milk with your spoon, put the lid on the pot, and walk away for 5 minutes. Do not touch it, poke it, or look at it funny. Let the rennet do its work.
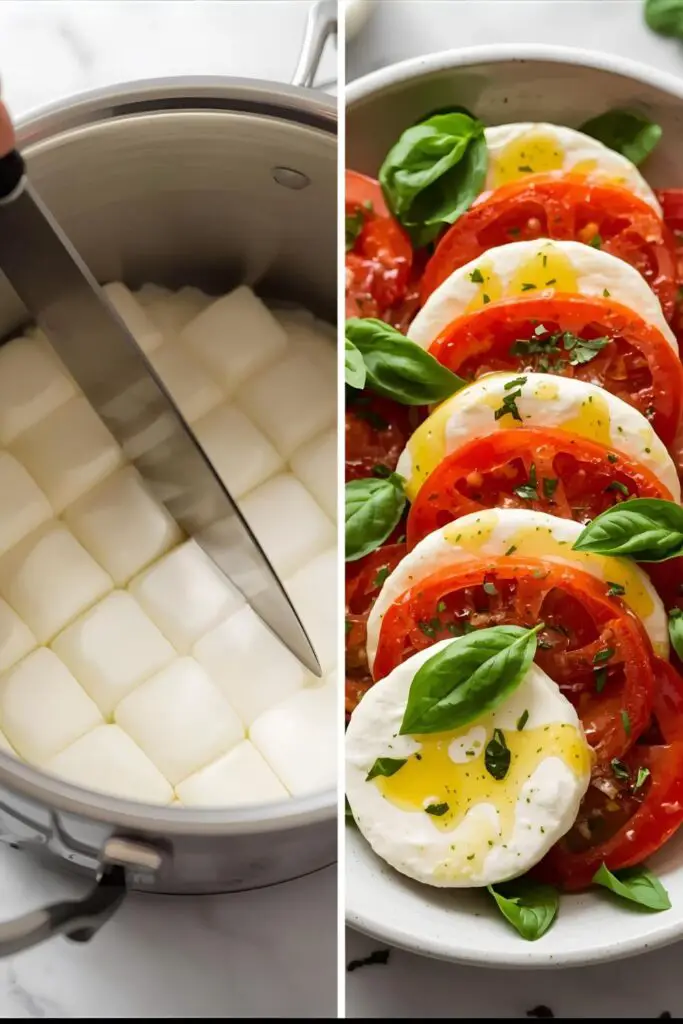
Step 4: Cut the Curds
After 5 minutes, lift the lid. You should see that the milk has set into a solid mass, like a giant, wobbly panna cotta. If it’s still liquidy, wait another 5 minutes. Now, take your long knife and cut the curd. First, cut straight lines about 1-inch apart, then turn the pot 90 degrees and cut another set of lines to create a checkerboard pattern.
Step 5: Cook the Curds
Place the pot back on the stove over medium-low heat. Heat the curds very slowly and gently up to 105°F (41°C). This should take about 5-8 minutes. Stir gently a few times as it heats. You’ll see the curds start to clump together and separate even more from the greenish-yellow whey.
Step 6: Drain and Separate
Turn off the heat. Use your slotted spoon to transfer the beautiful, lumpy curds into a colander set over a large bowl. Let them drain for a minute or two, gently pressing to release more whey. Don’t throw out the whey! You can use it later.
Step 7: The Microwave Stretch
This is the fun part! Transfer the curds to your microwave-safe bowl. Microwave on high for 1 minute. The curds will release more whey; carefully drain it off. Put on your food-safe gloves because things are about to get hot.
Knead the cheese a bit, then microwave it for another 30 seconds. Your cheese needs to reach an internal temperature of 135°F (57°C) to stretch properly. Check it with your thermometer. If it’s not hot enough, give it another 15-30 seconds.
Step 8: Salt, Stretch, and Shine!

Once the cheese is hot enough, sprinkle your salt over it. Now, like you’re pulling taffy, begin to stretch and fold the cheese. It will be hot, but this is what creates that classic mozzarella texture. Stretch it until it’s smooth, shiny, and no longer lumpy. Don’t overwork it, or it can get tough!
Step 9: Shape and Chill
Once it’s beautifully smooth, shape it into one large ball or several smaller balls (bocconcini). Plunge the finished balls immediately into a bowl of ice water for a few minutes to help them firm up and keep their shape. And that’s it. You just made cheese. You’re amazing.
Calories & Nutritional Info
For those of you keeping score, here’s a rough estimate for a 1 oz (28g) serving of your glorious homemade mozzarella:
- Calories: Approximately 70-80 kcal
- Fat: Around 6g
- Protein: About 6g
- Carbohydrates: Less than 1g
- Note: It’s a fantastic source of protein and calcium. Plus, because you made it, you know exactly what’s in it—no weird preservatives or anti-caking agents.
Common Mistakes to Avoid (Or, How Not to Cry Over Spilled Milk)
- Using Ultra-Pasteurized Milk: I’m begging you. If you use UHT milk, it simply will not form a proper curd. You will have wasted a gallon of milk. Read the label.
- Playing Fast and Loose with Temperatures: This is chemistry, not interpretive dance. Use your thermometer for every single temperature check. 90°F, 105°F, and 135°F are your magic numbers. Don’t disrespect them.
- My Curds Won’t Stretch!: They’re not hot enough. That’s it. 99% of the time, this is the problem. The cheese must be 135°F (57°C) to get that beautiful, elastic stretch. Pop it back in the microwave for a few seconds.
- Stirring After Adding Rennet: Once the rennet is in, your job is to be a statue. Stirring will break up the fragile bonds that are forming, and you’ll get weak, mushy curds.
Variations & Customizations
You’ve mastered the art. Now, make it your own.
- Herb-Infused Mozzarella: During the stretching phase, knead in some finely chopped fresh basil, oregano, or a pinch of red pepper flakes for a kick.
- Smoked Mozzarella: Once your mozzarella ball is formed and cooled, you can give it a quick 20-30 minute session in a smoker over very low, indirect heat for an incredible smoky flavor.
- Make it Burrata! (Advanced Move): Feeling bold? Save some of the curds before the final stretching. Shred them and mix with a little heavy cream to make stracciatella. Then, form the stretched cheese into a pouch, fill it with the stracciatella, and pinch it shut. (See my burrata recipe for more details!)
Frequently Asked Questions (The Mozzarella Mailbag)
1. Help! My milk didn’t curdle after adding the rennet! This is usually one of three things: 1) You used ultra-pasteurized milk. 2) Your rennet is old or expired. 3) You didn’t heat the milk to the correct temperature before adding the rennet.
2. Why isn’t my mozzarella stretching? It’s just breaking apart. It is not hot enough. I cannot say this enough. It needs to reach that magical 135°F (57°C). Pop it back in the microwave. If it’s hot enough and still not stretching, the pH might be off, which can happen, but heat is the first thing to check.
3. Can I use raw milk? Yes, and it makes phenomenal mozzarella! For safety, it’s recommended to pasteurize it yourself by heating it to 145°F (63°C) for 30 minutes and then cooling it back down to 90°F before starting the recipe.
4. What can I do with all this leftover whey? Don’t throw it out! Whey is packed with protein. You can use it in place of water when baking bread, add it to smoothies, or even use it as the liquid for cooking grains like oatmeal or rice.
5. How long will my beautiful homemade mozzarella last? This is a fresh cheese with no preservatives. It’s at its absolute peak the day it’s made. It will last for a few days stored in a container with a little bit of the salted whey or a light brine, but its texture will change. Eat it fresh!
6. Do I have to use a microwave? No, you can use the traditional method. Heat a pot of the reserved whey (or water) to about 175°F (80°C). Place your drained curds in a strainer and dip them into the hot whey for a few seconds at a time until they reach that crucial 135°F, then stretch. The microwave is just faster and easier, IMO.
7. Can I use goat’s milk? Yes, you can make a goat milk version! The curds will be much softer and more delicate, so handle them with extra care.
Final Thoughts
You did it. You took a basic liquid and, through the power of science and a little bit of heat, turned it into a solid, delicious, stretchy ball of cheese. You are not just a cook; you are an alchemist. A dairy wizard. A true kitchen badass.
Now go, enjoy the fruits of your labor. Slice it up, put it on a pizza, make a Caprese salad that will make angels weep, or—my personal favorite—just stand over the sink and eat it warm with a sprinkle of salt. You’ve earned it.