How to Make Khichdi (The Ultimate Comfort Food, No Judgment!)
Let’s talk about food that hugs your soul. Not the fancy, Michelin-star stuff that leaves you wondering if you just ate a foam cloud, but the real, down-to-earth, “everything’s gonna be alright” kind of meal. I’m talking about khichdi. You know, that humble, unassuming dish that your mom probably made when you were sick, or when she just wanted something quick and wholesome. It might not be the most glamorous meal on the planet, but it’s undeniably the OG comfort food. Today, you are going to learn how to make khichdi – a simple, nourishing, and surprisingly flavorful one-pot wonder that will make you question why you ever bothered with anything else when you just needed a hug in a bowl.
Why This Recipe Is Awesome (It’s Basically a Hug in a Bowl)
So, why should you embrace the humble khichdi? Because this isn’t just a meal; it’s a mood, a memory, and a super-easy weeknight savior. This recipe is awesome because it’s:
- The Ultimate Comfort Food: Seriously, when you’re feeling under the weather, stressed, or just craving something wholesome and warm, khichdi delivers. It’s like a warm blanket for your insides.
- One-Pot Wonder: Who loves doing dishes? Nobody! This recipe minimizes cleanup, making it perfect for busy weeknights or when you’re feeling lazy (no judgment here, we’ve all been there).
- Nutritious & Wholesome: A glorious blend of rice and lentils, it’s packed with protein and fiber. You’re basically eating something healthy and delicious. Win-win!
- Customizable AF: Think of it as a blank canvas. You can keep it simple or load it up with veggies and spices. Your khichdi, your rules!
Forget those complicated recipes. This is the kind of dish you make when you want maximum flavor with minimum fuss. Your grandma in Khulna would approve, IMO.
Ingredients: Your Cozy Crew
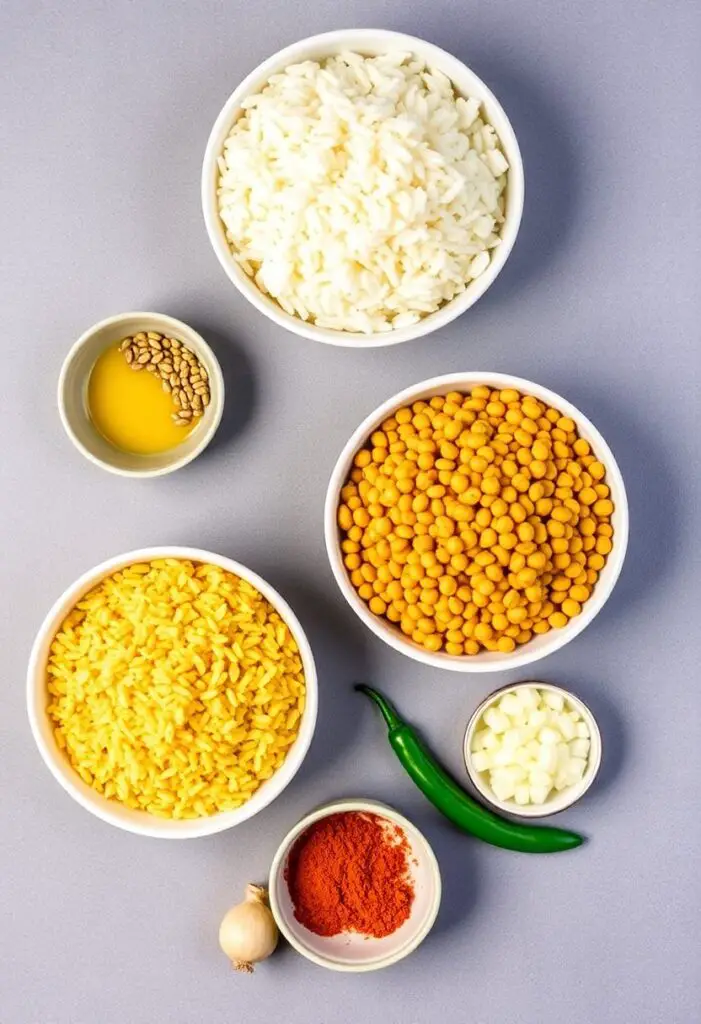
Khichdi keeps it simple. You probably have most of these in your pantry already.
- ½ cup basmati rice (or any medium-grain white rice)
- ¼ cup moong dal (split yellow lentils) – skinned and split.
- ¼ cup masoor dal (red lentils) – split, no skin.
- 1 tablespoon ghee or cooking oil
- ½ teaspoon cumin seeds (jeera)
- Pinch of asafoetida (hing) – optional, but really good for digestion!
- 1 medium onion, finely chopped
- 1 inch ginger, grated or finely minced
- 2-3 cloves garlic, minced
- 1 green chili, slit lengthwise (adjust to your spice preference, or omit)
- ¼ teaspoon turmeric powder (haldi)
- ½ teaspoon red chili powder (optional, adjust to taste)
- ½ teaspoon garam masala
- 4-5 cups hot water (adjust for desired consistency)
- Salt to taste
- Fresh cilantro (coriander leaves), chopped, for garnish
- Extra ghee, for serving (because, duh!)
Key Ingredient Notes (Don’t Skimp Here!):
- Rice & Dal Ratio: This recipe uses a 2:1:1 ratio of rice to moong dal to masoor dal. You can adjust the types of dal, but sticking to this ratio generally yields a good consistency.
- Washing is Crucial: Always wash your rice and dal thoroughly until the water runs clear. This removes excess starch and impurities.
- Ghee vs. Oil: Ghee gives a much richer, more authentic flavor. If you use oil, a neutral-flavored one is best.
Tools & Kitchen Gadgets Used: Your Khichdi Command Center

You don’t need fancy gadgets, just your basic kitchen essentials.
- Large Pot or Pressure Cooker: A pressure cooker makes this unbelievably fast. If using a pot, ensure it’s heavy-bottomed to prevent sticking.
- Fine-Mesh Sieve: For rinsing your rice and dal.
- Measuring Cups and Spoons
- Chopping Board
- Chef’s Knife
- Wooden Spoon or Spatula
Step-by-Step Instructions: Mastering the Khichdi Mystique
Prepare for ultimate ease. Seriously, this is pretty foolproof.
Act 1: The Prep Work (The Boring, But Necessary, Part)
- Wash Your Grains: In your fine-mesh sieve, combine the rice, moong dal, and masoor dal. Rinse them under cold running water, rubbing gently, until the water runs completely clear. This might take a few rinses. Trust me, it makes a difference.
- Soak (Optional, But Recommended): If you have time (and patience!), soak the washed rice and dal in fresh water for 15-20 minutes. This helps them cook faster and more evenly. Drain thoroughly before cooking.
- Chop & Mince: Get all your chopping done! Finely chop the onion, mince the ginger and garlic, and slit that green chili. Prep is half the battle, right?
Act 2: The Cooking (Where the Magic Happens)
- Heat the Pot: Place your large pot or pressure cooker over medium heat. Add the ghee or cooking oil. Once hot, add the cumin seeds. Let them splutter and turn fragrant (about 30 seconds).
- Aromatics First: Add the pinch of asafoetida (hing) if using. Then immediately toss in the chopped onion. Sauté until the onion turns soft and translucent (about 5-7 minutes). Don’t rush this!
- Ginger, Garlic, Chili Time: Add the minced ginger, minced garlic, and slit green chili. Sauté for another 1-2 minutes until fragrant, being careful not to burn the garlic.
- Spice It Up: Stir in the turmeric powder, red chili powder (if using), and garam masala. Cook for just 30 seconds, stirring constantly. The spices will become aromatic.
- Add Rice & Dal: Add the drained rice and dal mixture to the pot. Stir well to coat the grains with the spices and aromatics. Sauté for 1-2 minutes, allowing the rice and dal to lightly toast. This deepens the flavor.
- Pour in Water & Season: Pour in the hot water (start with 4 cups, you can add more later if needed). Add salt to taste. Stir everything well, ensuring nothing sticks to the bottom.
- Cook It Down (Pot Method):
- Bring the mixture to a boil.
- Once boiling, reduce the heat to low, cover the pot, and let it simmer for 20-25 minutes, or until the rice and dal are tender and the khichdi has reached your desired consistency. Stir occasionally to prevent sticking.
- If it gets too thick, add more hot water (¼ cup at a time) until it’s just right.
- Cook It Down (Pressure Cooker Method):
- Close the lid of your pressure cooker.
- Cook on high heat until it reaches 2-3 whistles.
- Turn off the heat and let the pressure release naturally for 10-15 minutes before opening the lid.
- Stir well. If it’s too thick, add a little hot water and stir.
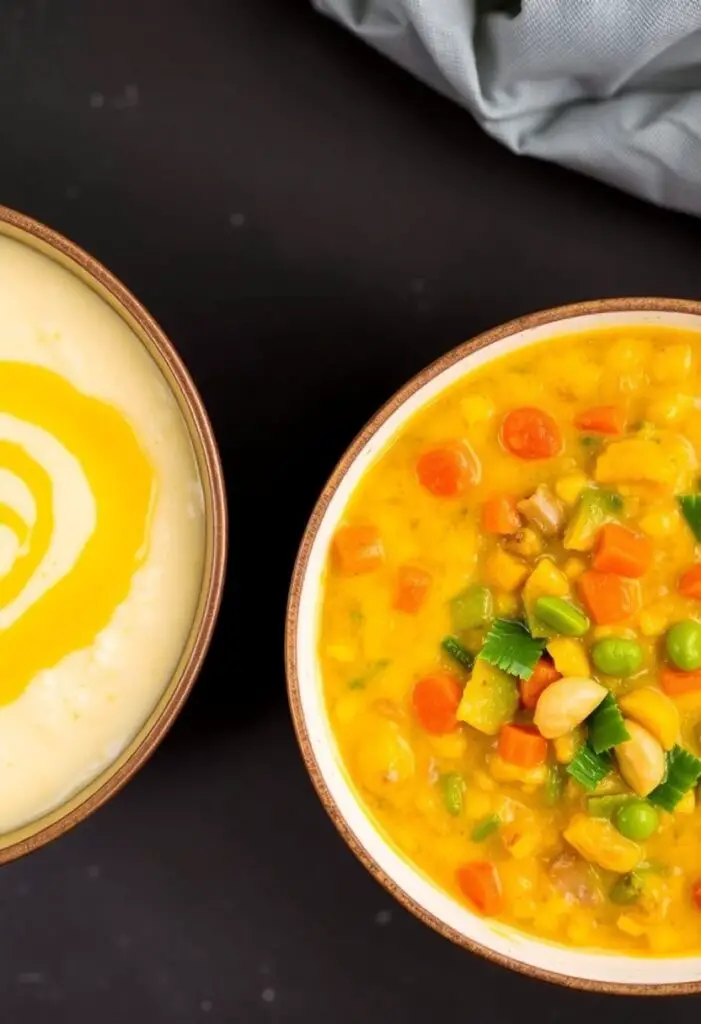
Act 3: The Grand Finale
- Garnish & Serve: Stir in the freshly chopped cilantro. Ladle your glorious khichdi into bowls.
- The Ghee Drizzle: Don’t forget the best part! Drizzle a generous spoonful of extra ghee over each serving. This adds an incredible richness and flavor. Seriously, do it. You deserve it.
- Pair It Up: Serve your khichdi hot with a dollop of yogurt, a side of pickle, or some crispy papad. Pure bliss!
Calories & Nutritional Info (Per Serving, Estimated)
This is wholesome goodness. (This is for one serving, assuming 4 servings for the recipe.)
- Estimated Calories per serving: ~300-400 calories
- Protein: ~12-15g (thanks, dal!)
- Carbohydrates: ~50-60g
- Fiber: ~8-10g
- Fat: ~10-15g (with that glorious ghee!)
Common Mistakes to Avoid: Don’t Let Your Khichdi Be Blah!
Even simple dishes have their nuances. Steer clear of these missteps.
- Not Washing Rice/Dal: This leads to a starchy, sometimes gummy texture. Rinse, rinse, rinse!
- Not Toasting Spices/Aromatics: Skipping this step means you miss out on a huge flavor boost. Let those cumin seeds splutter and the onions caramelize a bit.
- Too Little Water: Khichdi should be soft and almost soupy, not a dry pilaf. Adjust water as needed for that perfect, comforting consistency.
- Not Stirring Occasionally (Pot Method): If using a pot, give it a stir every now and then to prevent the bottom from sticking and burning. No one wants burnt khichdi.
- Skimping on Ghee: Ghee is essential for both flavor and texture. It’s what gives khichdi that rich, satisfying mouthfeel. Don’t be shy with the extra drizzle at the end!
Variations & Customizations: Your Khichdi, Your Rules
Khichdi is the ultimate chameleon. Make it your own!
- Vegetable Khichdi: Sauté diced vegetables like carrots, peas, potatoes, or spinach along with the onions and spices. This adds extra nutrients and flavor.
- Masala Khichdi (Spicier!): Increase the red chili powder and add a pinch of chili flakes. You can also add whole spices like bay leaf, cloves, and cardamom pods to the tempering.
- Lighter & Simpler: For a super light version (perfect when you’re feeling unwell), omit the onion, garlic, and chili. Just temper cumin seeds, add turmeric, salt, rice, dal, and water. A super gentle version!
FAQ Section: All Your Khichdi Questions, Answered
You’ve got khichdi conundrums? I’ve got solutions.
- Q: What kind of dal is best for khichdi? A: Moong dal (split yellow lentils) and masoor dal (red lentils) are most commonly used for their quick cooking time and creamy texture. You can use a mix or just one type.
- Q: Can I make khichdi in an Instant Pot? A: Absolutely! It’s even faster. Follow the same sautéing steps, then add rice, dal, water (usually 3.5-4 cups for this recipe), and spices. Pressure cook on high for 5-7 minutes, then natural release for 5-10 minutes.
- Q: My khichdi is too dry. How do I fix it? A: Don’t panic! Simply add a little more hot water (¼ to ½ cup at a time) and stir it in. Let it simmer gently for a few minutes until it reaches your desired consistency.
- Q: How do I make my khichdi less mushy? A: You might be using too much water, or you’re overcooking it. Start with the lower amount of water in the recipe and check for doneness. If you prefer a more defined grain, reduce the cooking time slightly.
- Q: What does “tadka” mean and is it important? A: Tadka (or tempering) is the process of frying spices and aromatics in hot oil or ghee to release their flavors. It’s incredibly important for building depth of flavor in many Indian dishes, including khichdi. You can add a fresh tadka of ghee and cumin seeds right before serving for extra flavor!
- Q: How do I store and reheat leftover khichdi? A: Store cooled khichdi in an airtight container in the refrigerator for up to 3-4 days. When reheating, add a splash of water or broth to loosen it up, as it will thicken in the fridge. Reheat on the stovetop or in the microwave.
- Q: Is khichdi really good for you when you’re sick? A: Yes! It’s easily digestible, packed with nutrients (protein from dal, carbs from rice), and you can make it mild to soothe an upset stomach. It’s like nature’s chicken noodle soup.
Final Thoughts: Embrace the Khichdi Life!

You’ve officially unlocked the magic of khichdi! You’re now equipped to create a dish that is humble yet heavenly, simple yet satisfying. Go forth, experiment with your spices, toss in some veggies, and make this a regular in your meal rotation. Your taste buds (and your busy schedule) will thank you. Who knew such a simple combination of rice and lentils could bring so much joy? TBH, you might never look at bland broth the same way again.