The Secret to Perfect Dusty Rose Icing (It’s Easier Than You Think!)
Let’s be real. You’ve seen those impossibly chic cakes on Pinterest and Instagram. You know the ones—they’re frosted in a color that’s not just pink, but a sophisticated, muted, grown-up shade that whispers “I have my life together.” That, my friend, is dusty rose. And you’ve probably tried to make it, only to end up with a cupcake that’s either Pepto-Bismol pink or a sad, fleshy beige. Don’t worry, we’ve all been there. But today, that all changes. I’m going to show you exactly how to make dusty rose icing, and you’ll see it’s less about luck and more about a tiny bit of color magic.
Forget those basic, screamingly bright colors from the supermarket dropper bottles. We’re about to elevate your baking game to a whole new level of elegance. Are you ready to become the Michelangelo of buttercream? Of course you are.
Why This Recipe Is a Game-Changer
So, why obsess over a single color? Because this isn’t just any color, and this isn’t just any icing.
First, the sheer sophistication is off the charts. Slather this on a simple vanilla cake, and you’ve instantly got a dessert worthy of a wedding, a fancy baby shower, or at the very least, a Tuesday where you feel like being fabulous. It’s the little black dress of the frosting world.
Second, the buttercream base is foolproof and delicious. We’re using a classic American buttercream recipe that’s sturdy enough for piping, smooth enough for a flawless finish, and sweet enough to satisfy any craving. It’s the perfect canvas for our color masterpiece.
Finally, you’ll learn a skill for life. Understanding how to mute and tone colors is a baker’s superpower. Once you know the secret to making dusty rose, you can make sage green, muted lavender, or terracotta. The world of sophisticated color is your oyster!
Ingredients: Your Palette for Perfection

We’re breaking this down into two parts: the icing itself, and the all-important color components.
For the Buttercream Base:
- 1 cup (2 sticks) unsalted butter: Make sure it’s softened to room temperature. This is non-negotiable for a smooth, non-lumpy result.
- 4 cups powdered sugar: Sift it! I know it’s an extra step, but do you want silky smooth icing or gritty, lumpy sadness? The choice is yours.
- 1-2 teaspoons pure vanilla extract: Use the clear kind if you want to keep your white base as pure as possible, but regular is fine too.
- 2-4 tablespoons heavy cream or milk: This is for adjusting the consistency.
- Pinch of fine sea salt: It cuts the sweetness and makes all the flavors pop.
For the Magical Dusty Rose Color:
- Pink or Red GEL food coloring: Gel is mandatory. Liquid food coloring will ruin your icing’s consistency. A little goes a very long way.
- Brown OR Violet GEL food coloring: This is the secret weapon! A minuscule amount of brown or violet is what “dirties up” the pink, turning it from Barbie’s dream house into the sophisticated shade we’re after.
Tools & Kitchen Gadgets Used
To become a true buttercream artist, you’ll need the right brushes. Or, in this case, mixers and spatulas.
- Stand Mixer with a Paddle Attachment or a Hand Mixer: You need this to whip the butter and sugar into submission and create that light, fluffy texture.
- Flour Sifter or Fine-Mesh Sieve: For that lump-free powdered sugar we talked about.
- Rubber Spatula: For scraping the sides of the bowl and ensuring everything is perfectly combined.
- Small Bowls: For mixing your colors.
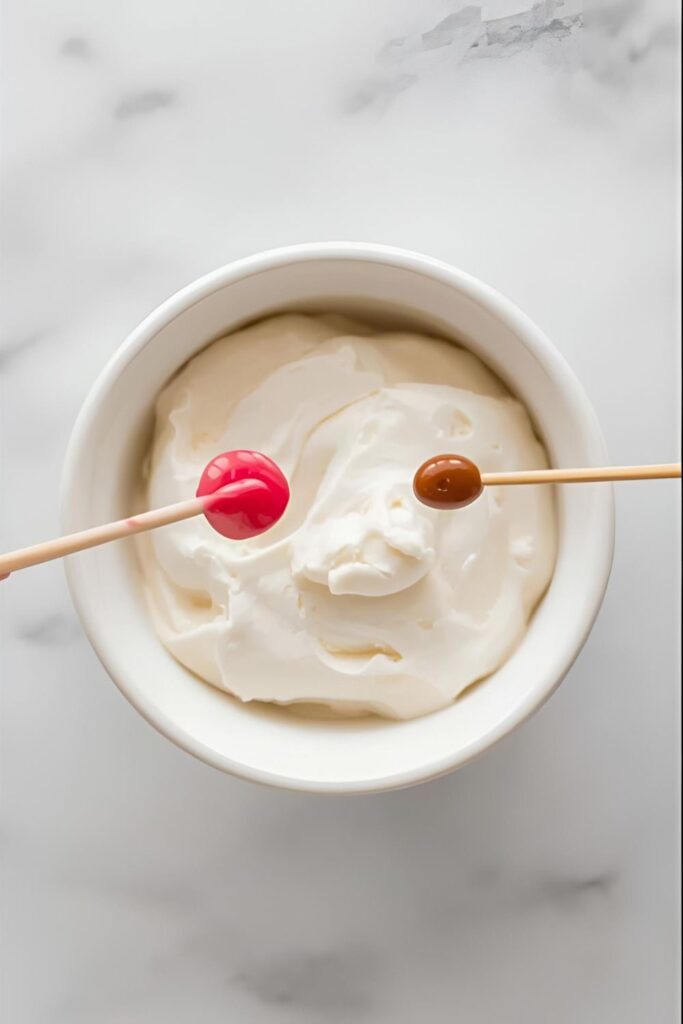
- Toothpicks: The absolute best tool for adding tiny, controllable amounts of gel color. Do NOT squeeze the gel directly into the icing unless you’re aiming for chaos.
- Piping Bags and Tips (Optional): If you plan on doing more than just slathering it on with a knife.
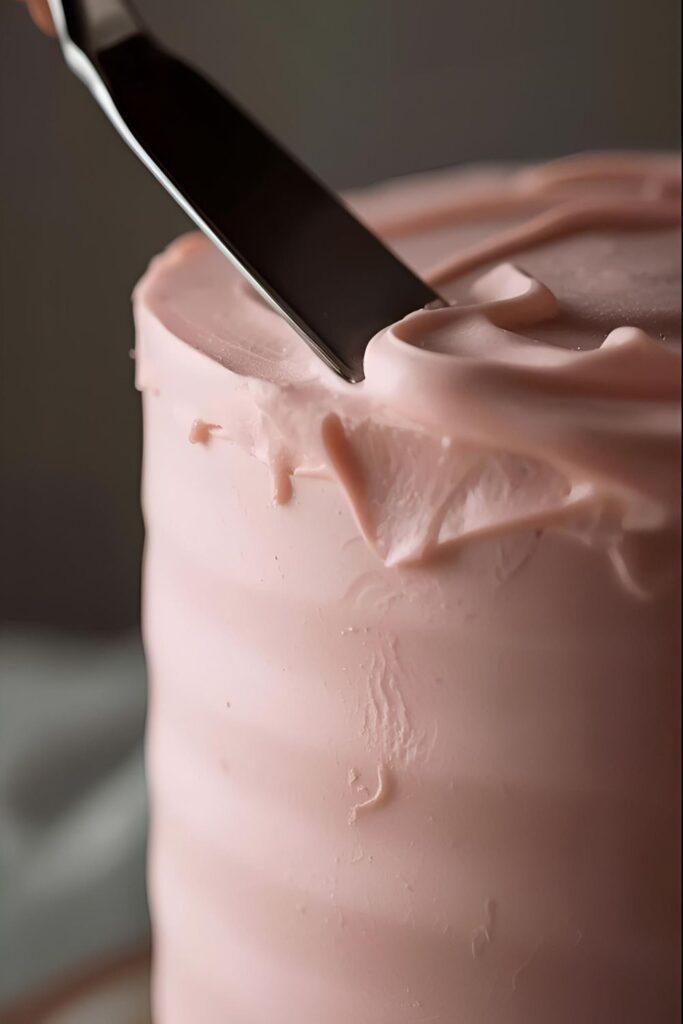
- Offset Spatula: For achieving that perfectly smooth, professional finish on your cakes.
Step-by-Step Instructions: From Butter to Beautiful
Ready to work some magic? Let’s do it. We’ll make the icing first, then transform it.
Part 1: Whipping Up the Perfect Buttercream Canvas
- Cream the Butter: In the bowl of your stand mixer (or a large bowl with a hand mixer), beat the softened butter on medium-high speed for about 2-3 minutes. You want it to be super creamy, pale, and fluffy. Scrape down the sides of the bowl.
- Add the Sugar: Turn the mixer down to low and gradually add the sifted powdered sugar, one cup at a time. Mix until it’s just combined. It will look dry and crumbly at this stage—trust the process.
- Make it Frosting: Add the vanilla extract and 2 tablespoons of heavy cream/milk. Turn the mixer up to medium-high and beat for another 3-5 minutes. This is where the magic happens! The mixture will transform into a light, fluffy, and smooth buttercream. If it’s too stiff, add more cream one teaspoon at a time. If it’s too thin, add a bit more powdered sugar.
- Taste and Season: Add a pinch of salt and give it one last mix. Now you have a perfect, pure white buttercream, ready for its glow-up.
Part 2: The Art of Mixing Dusty Rose
This is the most important part. Read it carefully. Work with a small test batch first if you’re nervous!
- Start Small: Scoop about 1/4 cup of your white buttercream into a separate small bowl. We will perfect the color here before coloring the whole batch.
- Add the Pink: Dip a clean toothpick into your pink or red gel food coloring. You only want a tiny speck of color on the end. Now, swirl that toothpick into your small bowl of icing. Mix thoroughly until the color is even. You’re aiming for a light, baby pink.
- Introduce the “Dust”: Now, take a NEW, clean toothpick and dip it into your brown or violet gel coloring. You want even LESS of this color. We’re talking a nearly invisible amount. Add it to your pink icing and mix, mix, mix.
- Assess and Adjust: Look at your color. Is it dusty enough? Does it have that muted, antique feel? If it’s still too bright, add another minuscule speck of brown/violet. If it’s too dark or muddy, add a spoonful of your reserve white icing to lighten it up.
- Color the Full Batch: Once you’ve achieved the perfect dusty rose in your small bowl, use it as a guide to color the main batch. Add your pink and brown/violet in the same proportions, working slowly and mixing thoroughly after each addition until you reach your desired shade. Remember that the color will deepen slightly as it sits!
Calories & Nutritional Info
Let’s not kid ourselves, we’re eating butter and sugar. But if you must know…
- Serving Size: 2 tablespoons (enough to generously frost one cupcake)
- Estimated Calories per Serving: Approximately 130-150 calories.
- Nutritional Highlights: High in fats and sugar. Deliciousness level: expert. It’s a dessert, designed to make your soul happy. Enjoy it as such. 🙂
Common Mistakes to Avoid (Or, A Guide to Not Making Pink Slime)
I’ve made all these mistakes. Now you don’t have to.
- The “Squeeze-and-Pray” Method: Squeezing gel color directly from the bottle into your icing is a recipe for disaster. You will almost always add too much. Use a toothpick for control. It’s the difference between “ooh, lovely” and “oh, neon.”
- Using Liquid Food Coloring: I know I sound like a broken record, but it’s that important. Liquid coloring is water-based and will break your beautiful, fatty buttercream, turning it into a runny, separated mess. Gels or oil-based colors only.
- Forgetting to Sift: You beat your butter perfectly. You mixed your color like a pro. But if you didn’t sift your sugar, your icing will have little gritty lumps. It’s a texture that no one enjoys. Sift. Your. Sugar.
- Being Impatient: Color needs time to fully incorporate and develop. Mix thoroughly after each addition, and remember that the color will get a little darker after about 20-30 minutes. Don’t rush the process!
Variations & Customizations

Once you’ve mastered the color, why not play with the flavor and application?
- Rosewater-Infused Icing: Add 1/4 to 1/2 teaspoon of rosewater to the buttercream along with the vanilla. It gives the icing a beautiful, floral aroma that perfectly complements the “rose” color.
- Dusty Rose Cream Cheese Frosting: This color works beautifully with cream cheese frosting, too! Just add the color to your favorite recipe. The slight tang of the cream cheese is a wonderful complement to the sweet, romantic vibe.
- Ombre Cake Design: Make your full batch of dusty rose icing. Then, divide it into three bowls. Leave one as is, add a little white icing to the second bowl to lighten it, and add a tiny bit more pink and brown to the third to darken it. Now you have three coordinated shades for a stunning ombre effect on a layer cake.
FAQ: Your Icing Inquiries, Answered
What’s the best brand of gel food coloring to use?
Brands like Americolor, Chefmaster, and Wilton Color Right are all excellent and highly concentrated. Americolor’s “Dusty Rose” is a good starting point if you’re nervous about mixing, but creating your own gives you more control.
My icing color is too dark! How can I fix it?
The only way to lighten a color is to dilute it. Mix in more of your plain white buttercream until you reach a shade you’re happy with. This is why it’s a good idea to only color about 3/4 of your icing at first, leaving some white in reserve for emergencies.
Can I make this color with natural food colorings?
Yes, but it’s trickier. You can get a pinkish base from a tiny bit of beet powder. To get the “dusty” effect, try adding a very, very small amount of unsweetened cocoa powder. The key is to add minuscule amounts and mix thoroughly.
Why does my icing look curdled or separated?
This almost always means your butter was either too cold or too warm. If it’s curdled, the butter was too cold. Try warming the outside of the bowl with your hands and re-whipping. If it’s soupy, the butter was too warm. Pop the whole bowl in the fridge for 15-20 minutes, then whip it again.
How far in advance can I make dusty rose icing?
You can make this buttercream up to a week ahead of time. Store it in an airtight container in the fridge. Before using, let it come back to room temperature completely, then give it a good whip in your mixer to restore its fluffy texture.
What’s the real difference between dusty rose and mauve?
We’re getting into serious color theory here! Generally, mauve has more purple/blue undertones, giving it a cooler feel. Dusty rose leans more towards a warm, muted pink with brown or gray undertones. TBH, they’re very similar, and both are gorgeous.
Why does my frosting color look different now than it did an hour ago?
Colors, especially reds and pinks, tend to “bloom” or deepen as they sit and the dye fully saturates the fat in the icing. It’s a good idea to make your color a shade lighter than you want the final product to be, then let it rest for 30 minutes to see its true color.
Final Thoughts
You did it! You are now the proud creator of a stunning, sophisticated, and absolutely delicious dusty rose icing. You’ve conquered the fear of the food coloring bottle and emerged victorious. Go forth and frost everything in sight!
Now, put that beautiful creation on a cake, pipe it onto some cookies, or just eat it with a spoon (I fully support this). And when your friends ask where you bought such an elegant dessert, you can just smile and say, “Oh, I just whipped it up.” They’ll never know your secret was just a little pink, a little brown, and a whole lot of genius.