How to Make Dango: Those Cute Little Japanese Dumplings You’ve Seen Everywhere
Okay, let’s get real for a sec. You’ve probably seen those adorable little skewered mochi balls drizzled with all sorts of deliciousness floating around the internet, right? Those, my friend, are dango. And you’ve probably thought, “Wow, those look impossibly cute and therefore impossibly difficult to make.” Well, prepare to have your world (and your snack game) turned upside down because today we’re tackling how to make dango. Spoiler alert: it’s way easier than you think. Are you ready to ditch the store-bought snacks and embrace your inner Japanese street food vendor? Let’s do this!
Why This Dango Recipe is Your New Obsession
So, why should you bother making these chewy little dumplings? First off, they’re incredibly versatile. Sweet or savory, grilled or boiled, plain or slathered in sauce – dango can do it all. It’s like the Swiss Army knife of the dessert world. Second, they’re surprisingly easy to make with just a few basic ingredients. No fancy equipment or advanced culinary degrees required. Seriously, if you can stir and boil water, you’re basically a dango master in the making.
And let’s not forget the cool factor. Imagine whipping out a plate of homemade dango at your next gathering. Your friends will be all like, “Ooh, what are these exotic delights?” and you can casually say, “Oh, just some dango I whipped up.” Instant foodie cred, guaranteed. Plus, they’re just plain fun to make. Rolling those little balls is strangely therapeutic, IMO.
Ingredients (The Short and Sweet List)
You won’t need to raid a specialty store for this one.
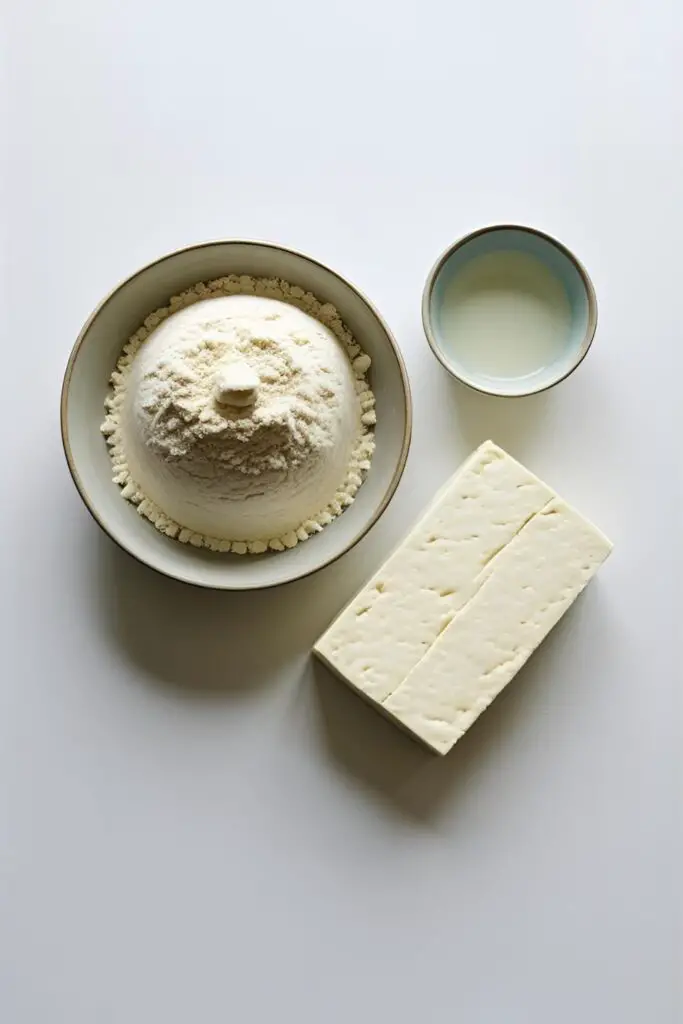
- 1 cup glutinous rice flour (mochiko) (This is the key for that chewy texture. Don’t try to substitute with regular rice flour!)
- ¼ cup silken tofu (Adds moisture and softness. Don’t worry, you won’t taste the tofu!)
- ½ cup lukewarm water, plus more if needed
Key Substitutions:
- Silken Tofu: In a pinch, you can try using plain yogurt or even just a bit more water, but the texture might be slightly different. Silken tofu really does the trick.
Tools & Kitchen Gadgets Used:
Keep it simple, folks. You don’t need a whole arsenal.
- Large Mixing Bowl: For combining the dough ingredients.
- Spatula or Wooden Spoon: For mixing.
- Small Pot: For boiling the dango.
- Slotted Spoon: For removing the cooked dango from the water.
- Ice Water Bath: A bowl filled with ice and water to shock the cooked dango (helps with the chewy texture).
- Skewer (optional): Bamboo skewers for serving.
- Grill Pan or Outdoor Grill (optional): For grilled dango.
Step-by-Step Instructions (Let’s Get Chewy)
Alright, time to roll! Literally.
Part 1: Making the Dango Dough
- Combine the Dry: In your large mixing bowl, whisk together the glutinous rice flour (mochiko). This helps break up any lumps.
- Add the Wet: Add the silken tofu to the bowl. Use your hands or a spatula to mash the tofu into the flour until it starts to come together.
- Water Works: Gradually add the lukewarm water, mixing with your hands or a spatula until a smooth, pliable dough forms. You might need a little more or a little less water depending on the humidity and the exact consistency of your tofu. The dough should be soft and easy to handle but not sticky. It should feel likePlay-Doh.
- Knead Briefly: Gently knead the dough in the bowl for a minute or two until it’s nice and smooth.
Part 2: Shaping the Dango
- Roll ‘Em: Pinch off small pieces of dough (about the size of a marble or slightly larger). Roll each piece between the palms of your hands to form smooth, round balls.
- Get Creative (Optional): You can make them any size you like, TBH. Some people prefer slightly larger, golf-ball-sized dango. It’s your dango universe!
Part 3: Cooking the Dango
- Boil, Boil, Toil (Not Really): Bring a pot of water to a gentle boil.
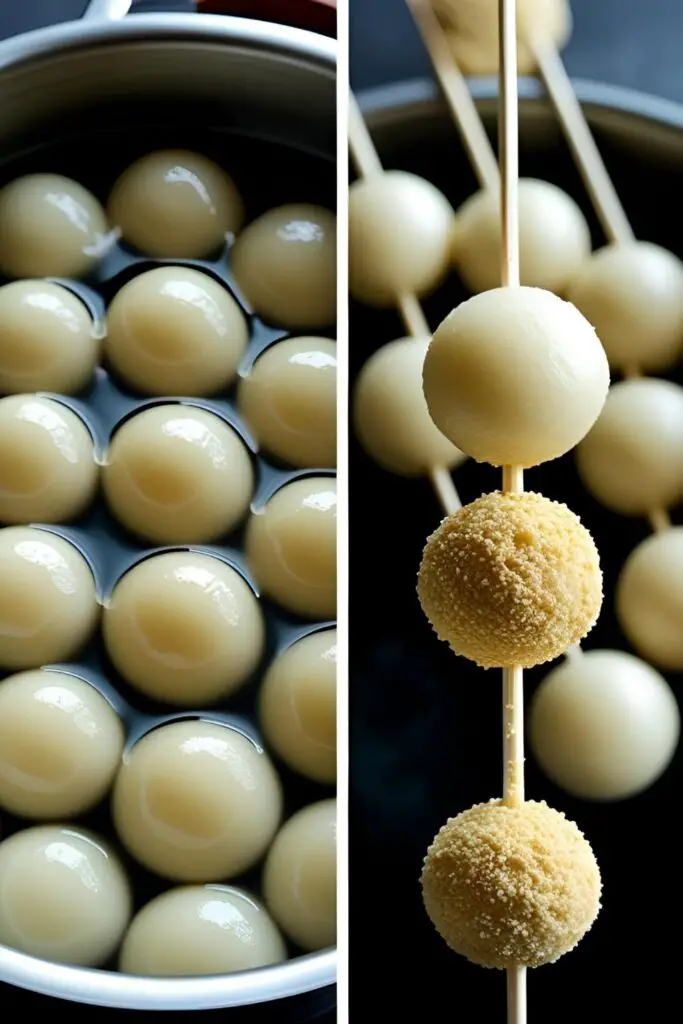
- Drop ‘Em In: Carefully drop the dango balls into the boiling water. Don’t overcrowd the pot; work in batches if necessary.
- Wait for the Float: The dango will initially sink to the bottom. Once they start to float to the surface, let them cook for another 2-3 minutes. This ensures they are cooked through.
- Ice Bath Time: Using a slotted spoon, immediately transfer the cooked dango to your prepared ice water bath. This sudden chill stops the cooking process and gives them that wonderfully chewy texture. Let them sit in the ice water for a few minutes.
- Drain and Serve: Drain the dango from the ice water. Now they’re ready to be enjoyed!
Part 4: Serving Suggestions (The Fun Part!)
- Skewers Ahoy!: Thread a few dango balls onto bamboo skewers for that classic look.
- Sauce It Up: This is where the magic happens. Here are a few popular options:
- Mitarashi Dango Sauce: A sweet and savory glaze made with soy sauce, sugar, and a bit of starch for thickening. (We’ll save this for another adventure, but keep it in mind!)
- Anko (Sweet Red Bean Paste): A classic sweet topping.
- Kinako (Roasted Soybean Flour) and Sugar: A simple and nutty coating.
- Simply Grilled: Grill the boiled dango lightly until they get a bit charred and serve with a light soy sauce glaze.
Calories & Nutritional Info (It’s Mostly Carbs, Let’s Be Honest)

Dango is primarily made of rice flour, so it’s fairly carb-heavy.
- Serving Size: About 3-4 small dango balls (without sauce)
- Estimated Calories: 100-150
- Fat: 1-2g (mostly from the tofu)
- Carbohydrates: 20-30g
- Protein: 2-3g
- Important Note: The calorie and nutritional information will vary greatly depending on the type and amount of sauce or toppings you use.
Common Mistakes to Avoid (Don’t Let Your Dango Dreams Go Sour)
- Using Regular Rice Flour: I can’t stress this enough: you need glutinous rice flour (mochiko) for that signature chewiness. Regular rice flour will result in hard, crumbly balls of sadness.
- Adding Too Much Water: Add the water gradually! You want a soft, pliable dough, not a sticky mess. If it’s too wet, add a little more glutinous rice flour.
- Overcooking: Once the dango float, they only need a couple more minutes. Overcooking can make them too soft and mushy.
- Skipping the Ice Bath: This step is crucial for the chewy texture! Don’t be tempted to skip it.
- Not Serving Immediately (or Storing Properly): Dango is best enjoyed fresh. If you have leftovers, store them in an airtight container in the fridge and reheat them gently (boiling or steaming works best) to restore some of their chewiness. They can get a bit firm when cold.
Variations & Customizations (Dango Your Way)
Let’s get creative with these little guys!
- Colorful Dango: Divide your dough into several portions and use natural food colorings (like matcha powder for green, beetroot powder for pink, or turmeric for yellow) to create a rainbow of dango.
- Savory Dango: Skip any sweet toppings and try grilling your dango. Then brush them with a savory miso glaze or a light soy sauce with a sprinkle of nori (dried seaweed).
- Hanami Dango: This is a classic! Make three colors of dango (pink, white, and green) to represent the colors of cherry blossoms. They’re often enjoyed during cherry blossom viewing season.
FAQ Section (Your Burning Dango Desires Answered)
Let’s tackle those dango dilemmas!
1. What is the difference between mochi and dango? Both are made from glutinous rice, but mochi is typically pounded to create a very smooth and elastic texture, while dango uses glutinous rice flour and has a slightly less elastic and more subtly chewy texture. Think of it as cousins in the delicious rice cake family.
2. Can I bake dango instead of boiling it? While boiling is the traditional and most effective method for achieving the right chewy texture, some recipes suggest baking at a low temperature after boiling for a slightly firmer exterior. However, boiling is generally recommended.
3. My dango is cracking while boiling. What am I doing wrong? This could be due to the dough being too dry. Make sure your dough is soft and pliable. You might need to add a tiny bit more water next time.

4. How do I get my dango to be perfectly round? Take your time when rolling the balls and ensure there are no cracks or unevenness in the surface. Consistent pressure helps. It gets easier with practice!
5. Can I make dango ahead of time? Yes, you can boil the dango ahead of time and store them in an airtight container in the fridge. When you’re ready to serve, you can reheat them briefly in boiling water or by steaming to soften them up.
6. Where can I find glutinous rice flour (mochiko)? You can usually find it in the Asian foods section of most well-stocked grocery stores or definitely at Asian supermarkets. Look for “glutinous rice flour” or “mochiko.”
7. Is dango gluten-free? Yes, dango made with glutinous rice flour and tofu is naturally gluten-free. However, be mindful of any sauces or toppings you use, as some may contain gluten.
Final Thoughts (Go Forth and Dango!)
Well, there you have it! You’re now equipped with the knowledge to conquer the world of dango. Go forth, roll those little balls of chewy goodness, and impress everyone with your newfound Japanese snack skills. Whether you choose sweet or savory, plain or saucy, one thing’s for sure: homemade dango is a delightful treat that’s surprisingly easy to master. Now, if you’ll excuse me, I think I hear a plate of mitarashi dango calling my name. Happy dango-ing! 😉