Why Oven-Baked Crispy Pata Is Seriously Awesome
Still clinging to the deep-fryer dream? Let me convince you why making crispy pata in oven is the way to go for a truly awesome pork experience.
First off, it’s significantly less messy and oily. We’re talking about avoiding a gallon of hot oil and the subsequent splatter zone that turns your kitchen into a grease slick. Your countertops (and your arteries) will thank you.
Second, it’s surprisingly easy, albeit a bit time-consuming. The actual hands-on work is minimal. The oven does most of the heavy lifting (literally, in terms of rendering fat and crisping skin). You can multitask while your pata slowly transforms into golden perfection.
Finally, it still delivers that iconic crispy skin and tender meat. Don’t think for a second that baking compromises on texture or flavor. With the right technique, you’ll achieve skin that snaps like a potato chip and pork that’s juicy and fall-off-the-bone tender. What’s not to love?
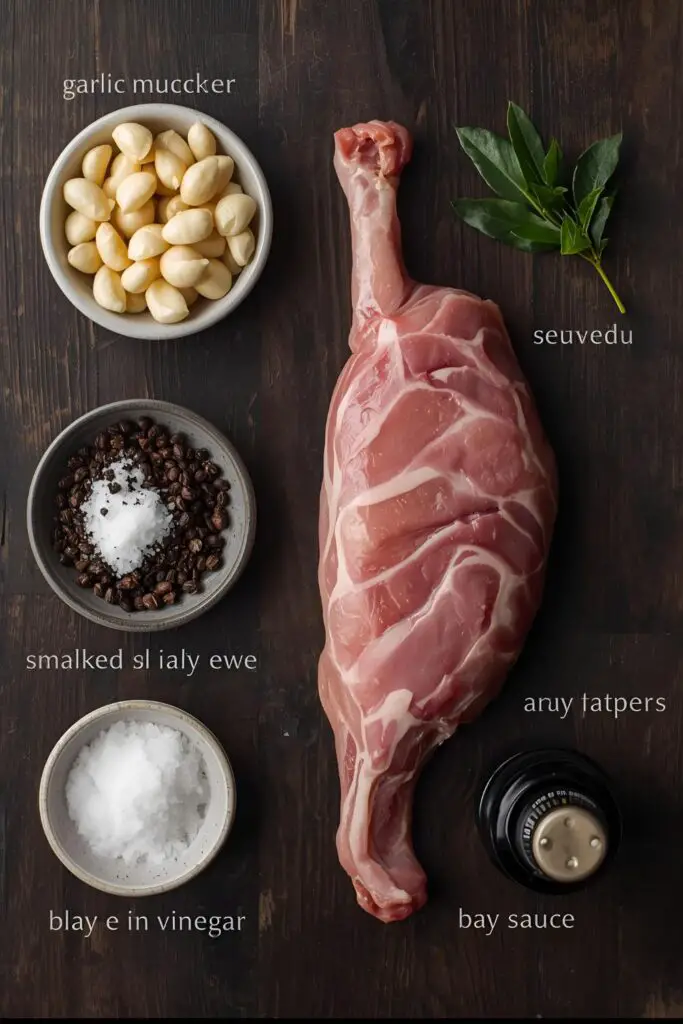
The Star of the Show and Its Supporting Cast
Here’s what you’ll need to create this oven-baked masterpiece.
- Pork Knuckle (Pata): 1 whole (about 2-3 lbs). Make sure it’s been thoroughly cleaned. You can usually find this at Asian supermarkets or your local butcher. Ask them to leave the skin on, obviously!
- Water: Enough to cover the pork knuckle for boiling.
- Salt: 2 tablespoons, plus more for seasoning.
- Whole Peppercorns: 1 tablespoon. Adds a subtle warmth.
- Bay Leaves: 2-3. For that classic savory depth.
- Garlic: 4-5 cloves, smashed. Because garlic makes everything better, IMO.
- Vinegar (White or Apple Cider): ¼ cup. Helps tenderize the pork and contributes to the flavor.
- Soy Sauce: 2 tablespoons. Adds umami and color.
- Cooking Oil: 2-3 tablespoons (high smoke point oil like vegetable or canola). For that final crisp.
Your Crispy Pata Arsenal

Here are the tools you’ll need for this culinary adventure.
- Large Stockpot: Big enough to fully submerge the pork knuckle.
- Tongs: For safely handling the hot pork.
- Large Baking Sheet: For roasting the pata.
- Wire Rack: Place it on the baking sheet so the air can circulate around the pata for maximum crispiness. This is crucial!
- Sharp Knife or Fork: For pricking the skin (more on this later!).
- Aluminum Foil: For tenting the pata.
Step-by-Step: From Boiled to Beautifully Crispy
Ready to embark on this journey to pork perfection? Let’s do it!
Step 1: The Initial Boil (Tenderizing Time)
Place the pork knuckle in your large stockpot and cover it completely with water. Add 2 tablespoons of salt, whole peppercorns, bay leaves, and smashed garlic. Bring the water to a boil over high heat, then reduce the heat to low, cover, and simmer for 1.5 to 2 hours, or until the pork is tender but not falling apart. You should be able to easily pierce the meat with a fork. This step is crucial for juicy meat!
Step 2: The Flavor Infusion (Vinegar and Soy Magic)
Carefully remove the pork knuckle from the pot using tongs and place it on a clean cutting board. Discard the boiling liquid and aromatics. In the same (now empty) pot, combine the vinegar and soy sauce. Bring this mixture to a gentle simmer. Place the cooked pork knuckle back into the pot and let it simmer for another 15-20 minutes, turning occasionally to ensure it’s evenly coated with the vinegar-soy mixture. This adds a lovely tang and color.
Step 3: The Prickly Situation (Secret to Crispy Skin)
Remove the pork knuckle from the vinegar-soy mixture and place it on a wire rack set over a baking sheet. Pat the skin as dry as possible with paper towels. Now comes the slightly tedious but absolutely essential part: using a sharp knife or fork, prick the skin all over. Make sure you pierce through the skin but try not to go too deep into the meat. The more holes, the crispier the skin will be! This allows the fat to render out and the skin to get super crunchy.
Step 4: Chill Out (Skin Drying Time)
Place the baking sheet with the pricked pork knuckle in the refrigerator, uncovered, for at least 2-3 hours, or preferably overnight. This chilling process helps to dry out the skin even further, which is key to achieving ultimate crispiness in the oven. Don’t skip this step!
Step 5: The Oven Transformation (Crisping Power)

Preheat your oven to 375°F (190°C). Remove the pork knuckle from the refrigerator and rub the skin generously with salt. You can also add a little more freshly ground black pepper if you like. Drizzle the pork knuckle with the cooking oil.
Place the baking sheet with the wire rack and pork knuckle in the preheated oven and bake for 30 minutes. After 30 minutes, reduce the oven temperature to 325°F (160°C) and continue baking for another 45-60 minutes, or until the skin is golden brown and incredibly crispy. Keep a close eye on it, and if the skin starts to brown too quickly, you can loosely tent it with aluminum foil.
Step 6: The Grand Finale (Rest and Serve!)
Once the skin is beautifully crispy and golden brown, remove the crispy pata from the oven and let it rest for about 10-15 minutes before carving and serving. This allows the juices to redistribute, resulting in even more tender meat. Serve it with your favorite dipping sauces (like a vinegar-garlic dip) and enjoy the glorious crunch!
Calories & Nutritional Info (Let’s Be Honest, It’s Pork Belly’s Cousin)

Crispy Pata is not exactly a health food, my friends. It’s an indulgence. Let’s just be real about it.
- Serving Size: About 4-6 ounces (mostly meat, some skin)
- Estimated Calories: 400-600 (this can vary greatly depending on the amount of skin consumed)
- Key Nutrients:
- Protein: High, as it’s pork.
- Fat: Also high, especially the crispy skin.
- Sodium: Can be high due to the salt and soy sauce.
- Nutritional Note: Enjoy this in moderation as a special treat. It’s definitely not on the “eat this every day” list.
Common Mistakes to Avoid (Don’t Ruin That Crispy Goodness!)
- Skipping the Thorough Boiling: Undercooked pork is no fun. Make sure it’s tender before moving on.
- Not Drying the Skin Enough: Moisture is the enemy of crispy skin! Pat it dry meticulously after boiling and let it chill uncovered in the fridge. This step is non-negotiable.
- Being Stingy with the Pricking: Those little holes are crucial for rendering fat and achieving that crackling texture. Prick away!
- Forgetting the Wire Rack: If the pata sits directly on the baking sheet, the bottom skin won’t get crispy. The wire rack allows air to circulate.
- Not Salting the Skin Before Baking: Salt helps to draw out moisture and enhances the crispiness.
- Over-Browning Too Quickly: Keep an eye on the skin. If it’s getting too dark, tent it loosely with foil to prevent burning.
Variations & Customizations (Spice It Up!)
Want to put your own spin on this classic? Here are a few ideas:
1. Spicy Crispy Pata
Before the final bake, rub the skin with a mixture of salt, garlic powder, chili powder or cayenne pepper, and a touch of smoked paprika for a spicy kick.
2. Herb-Infused Crispy Pata

Stuff the cavity of the pork knuckle with fresh herbs like rosemary, thyme, and oregano during the boiling process. This will subtly infuse the meat with aromatic flavors.
3. Garlic Butter Basted Crispy Pata
During the last 15-20 minutes of baking, melt some butter with minced garlic and baste the skin of the pata every 5 minutes. This will add a rich, garlicky flavor and promote extra browning.
FAQ: Your Crispy Pata Conundrums, Cracked
Let’s tackle some of those burning pork questions.
1. Can I skip the boiling step? While you technically could try to cook it solely in the oven, the boiling step ensures the meat is tender and helps to render some of the fat, leading to a better overall texture and crispier skin. Skipping it is not recommended.
2. How do I know when the crispy pata is done? The skin should be a deep golden brown color and incredibly crispy to the touch. When you tap it, it should sound hollow. The internal temperature of the meat should reach at least 145°F (63°C), but it will likely be much higher after the long cooking time.
3. What’s the best way to serve crispy pata? Traditionally, crispy pata is served whole or chopped into pieces and accompanied by a vinegar-garlic dipping sauce (toyomansi with calamansi is also popular). It’s often a centerpiece at celebrations and gatherings.
4. Can I make crispy pata ahead of time? You can boil the pork knuckle and even let it chill in the fridge overnight after the vinegar-soy soak. However, the final crisping in the oven is best done just before serving for maximum crunch. If you do bake it ahead, you can try to re-crisp the skin under the broiler for a few minutes, but be very careful not to burn it.
5. Why is my crispy pata skin not crispy? The most common reasons are not drying the skin thoroughly enough, not pricking it adequately, or not using a wire rack during baking. Make sure you follow those steps carefully!
6. Can I use a smaller pork hock instead of a whole knuckle? Yes, you can. Adjust the boiling and baking times accordingly, as smaller pieces will cook faster.
7. Where can I buy a pork knuckle (pata)? Check your local Asian supermarkets or ask your butcher. They may need to order it in advance, so plan accordingly.
Final Thoughts
You’ve done it! You’ve braved the steps and emerged with a magnificent, oven-baked crispy pata that’s ready to wow your taste buds (and your Instagram feed, let’s be honest). Forget those deep-frying nightmares; this method delivers all the glorious crunch with a fraction of the fuss. So gather your friends, prepare your dipping sauces, and get ready for a symphony of crackling goodness. You might just find yourself saying goodbye to store-bought chips forever. Just kidding… maybe. Enjoy your crispy creation!