How to Make Cookie Dough That’s Dangerously Good (For Baking… or Not!)
Let’s be honest with each other for a moment. No one really makes cookie dough just to bake cookies. That’s like buying a new car just to listen to the radio. Baking the cookies is a delightful, often necessary, secondary outcome, but the true purpose of learning how to make cookie dough is to have access to that glorious, forbidden substance: raw, unadulterated, straight-from-the-bowl cookie dough.
We’ve all been there, standing in front of the mixer, spatula in hand, performing complex risk-reward calculations. Is the sheer joy of eating this buttery, sugary, chocolate-dotted ambrosia worth the minuscule risk our mothers warned us about? The answer is, and always will be, a resounding yes.
So today, we’re not just making cookies. We’re creating the ultimate, no-fail, classic chocolate chip cookie dough that’s perfect for baking into chewy, golden perfection and for those moments that require a spoon and an open refrigerator door.
Why This Cookie Dough Recipe Reigns Supreme
In a world full of cookie dough recipes, this one stands tall. Here’s why it will become your one and only.
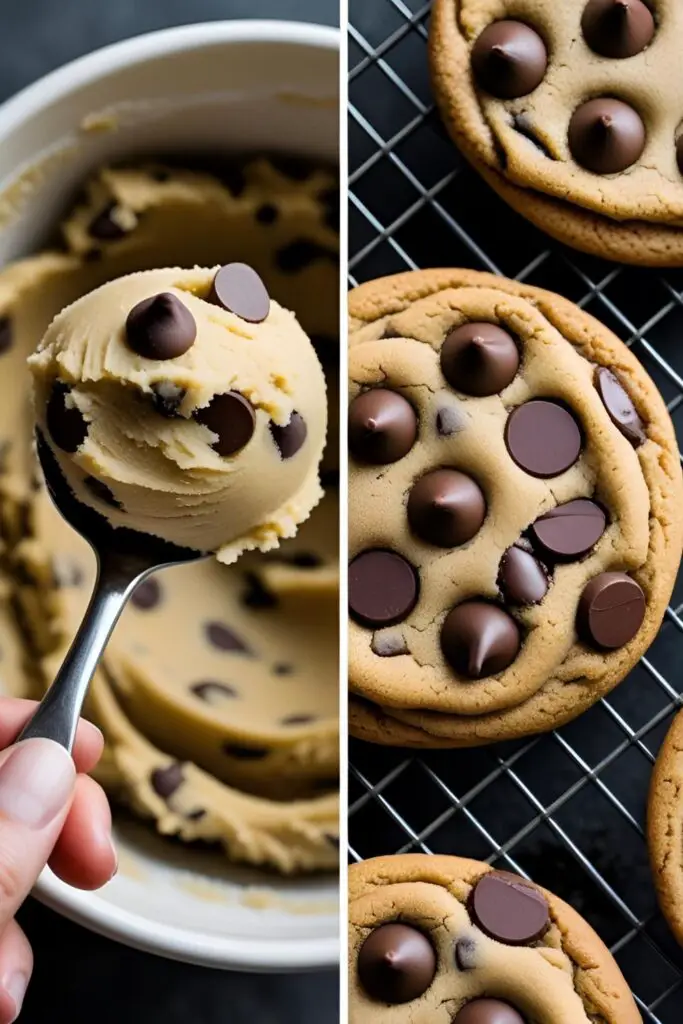
First, it bakes into the perfect cookie. We’re talking about the holy grail of cookie textures: crispy, buttery edges that give way to a soft, chewy, gooey center. It’s a symphony of textures and deep, brown-sugar-and-vanilla flavor that store-bought dough can only dream of.
Second, it’s dangerously versatile. This recipe is your perfect starting point. Not only is it the foundation for the best chocolate chip cookies of your life, but with one or two simple tweaks (which I’ll show you), it becomes 100% safe-to-eat, no-bake, edible cookie dough. It’s a two-for-one deal.

Finally, it’s basically a science lesson in deliciousness. I’m going to break down the why behind each step—from creaming the butter to the dreaded (but essential) chilling process. You’ll not only make amazing cookie dough, but you’ll understand what makes it amazing, turning you into a more confident and, frankly, more powerful baker.
The Lineup: Your Cookie Dough Ingredients
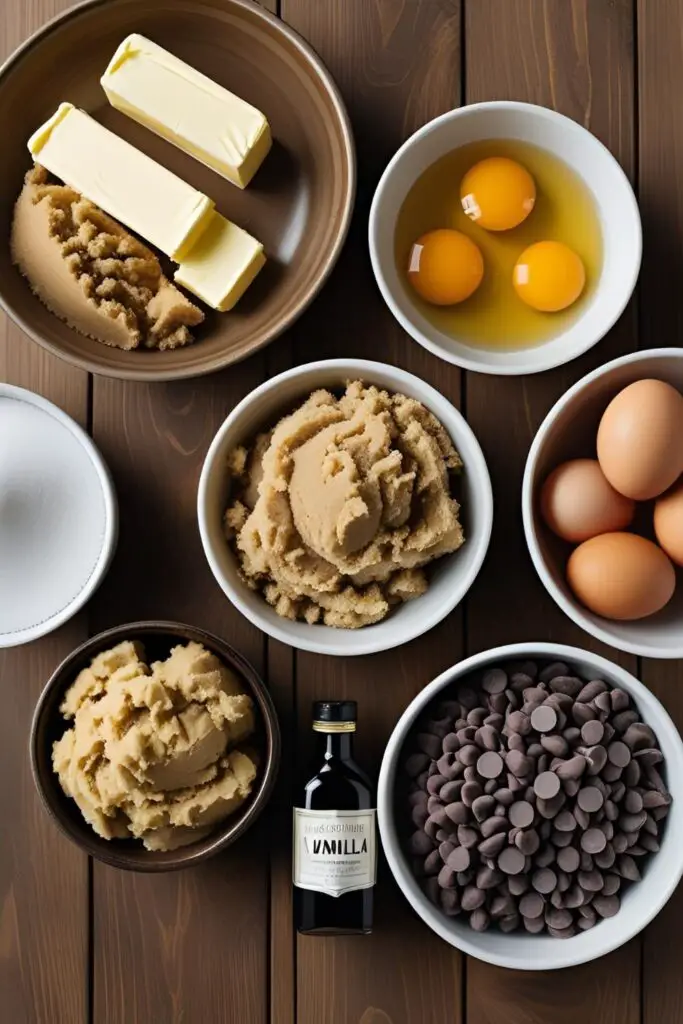
Greatness starts with good ingredients. Here’s your shopping list.
- 1 cup (226g) unsalted butter, softened to cool room temperature (This is critical! Not melted, not cold from the fridge.)
- 43 cup (165g) packed light brown sugar
- 41 cup (50g) granulated sugar
- 2 large eggs, at room temperature
- 2 teaspoons pure vanilla extract (the good stuff, not the imitation)
- 241 cups (270g) all-purpose flour
- 1 teaspoon baking soda
- 1 teaspoon salt
- 121 cups (255g) semi-sweet chocolate chips or chunks
The Cookie-Making Arsenal: Tools & Gadgets
Having the right gear makes you feel powerful. Wield it wisely.
- Stand Mixer or Electric Hand Mixer: This is almost non-negotiable for properly creaming the butter and sugar.
- Mixing Bowls: One large for the dough, one medium for the dry ingredients.
- Silicone Spatula & Whisk: The trusty sidekicks of any baking adventure.
- Measuring Cups and Spoons: For accuracy that leads to perfection.
- Cookie Scoop: The secret weapon for creating perfectly uniform cookies that bake evenly. A 1.5 tablespoon scoop is a great all-purpose size.
- Baking Sheets & Parchment Paper: For the baking portion of our program.
- Plastic Wrap: For the most important step of all: chilling.
Step-by-Step: The Path to Dough-vana
Let’s break this down into the crucial moments that define cookie dough greatness.
H3: Part 1: The Creaming Method (The Foundation of Flavor)
- Combine Butter and Sugars: In the bowl of your stand mixer fitted with the paddle attachment, place your softened butter, the brown sugar, and the granulated sugar.
- Cream Until Fluffy: Beat the butter and sugars together on medium-high speed for a full 3-4 minutes. The mixture should become visibly lighter in color and look pale and fluffy. You are literally whipping air into the fat, which is the secret to a great cookie texture. Don’t skimp on this step!
H3: Part 2: The Emulsification Station
- Add Eggs and Vanilla: Scrape down the sides of the bowl. Add the eggs, one at a time, beating well after each addition until it’s fully incorporated. After the last egg is mixed in, add the vanilla and mix to combine.
H3: Part 3: The Dry Ingredients (Handle with Care)
- Whisk Separately: In your separate, medium-sized bowl, whisk together the all-purpose flour, baking soda, and salt. This ensures the baking soda and salt are evenly distributed, so you don’t get one super salty, puffy cookie and one flat, bland one.
- Combine Gently: Add the dry ingredients to the wet ingredients in the mixer bowl. Mix on the lowest possible speed only until the last streaks of flour have just disappeared. Do not overmix! Overmixing develops gluten and leads to tough, cakey cookies. We are not making bread here.
H3: Part 4: The Best Part
- Fold in the Chocolate: Remove the bowl from the mixer. Pour in your chocolate chips and use a silicone spatula to fold them into the dough until they’re evenly distributed.
- The Taste Test: This is the point where you, the baker, are required by ancient law to take a small (or large) bite of the dough. For quality control purposes, of course.
H3: Part 5: The Hardest Step of All (Patience)
- Chill Your Dough: Cover the bowl with plastic wrap and place it in the refrigerator for at least 30 minutes. For truly transcendent results, chill it for 24 to 72 hours.
- Why, You Ask? Chilling the dough does two magical things. First, it solidifies the butter, which prevents your cookies from spreading into thin, sad, greasy pancakes in the oven. Second, it allows the flour to fully hydrate and the flavors to meld and deepen, resulting in a richer, more complex taste. It is the single most important step for making great cookies.
Nutritional Info (Read At Your Own Peril)
A brief look at the data before you dive in with a spoon.
- Serving Size: 1 baked cookie (if you make ~36 cookies)
- Estimated Calories: Around 150 kcal per cookie
- Serving Size: 1 “I’ve had a bad day” spoonful of raw dough
- Estimated Calories: Deliciously irrelevant.
- Note: Cookie dough is a solution to problems, not a source of them.
Common Mistakes to Avoid (Cookie Crimes)
Don’t let these common felonies ruin your perfect dough.
- Using Melted or Cold Butter: Using melted butter will result in a greasy dough and flat cookies. Cold butter won’t cream properly with the sugar. It must be softened to a cool room temperature—firm enough to hold its shape but soft enough for your finger to leave an indent.
- Under-Creaming the Butter and Sugar: If you only mix for 30 seconds, you haven’t incorporated enough air. Your cookies will be dense and heavy. Give it the full 3-4 minutes.
- Overmixing After Adding Flour: I’m saying it again because it’s that important. As soon as the flour is mixed in, stop. Step away from the mixer. Overmixing is the #1 cause of tough, bready cookies.
- Skipping the Chill: You impatient monster. This is why your cookies look like sad, flat frisbees. Chilling is a non-negotiable step for flavor and texture.
- Ignoring Food Safety (for raw dough): Traditional cookie dough contains raw eggs and uncooked flour, which both carry a small risk of bacteria like Salmonella and E. coli. If your primary goal is to eat it raw, see the variation below.
Variations & Customizations (Choose Your Own Adventure)

This classic dough is your canvas. Now, paint your masterpiece.
- 100% Safe-to-Eat Edible Cookie Dough: This is the big one. To make this recipe completely safe to eat raw, you need to do two things. First, heat-treat the flour: spread your flour on a baking sheet and bake it at 350°F (175°C) for 5 minutes to kill any potential bacteria. Let it cool completely. Second, omit the eggs entirely. You can add 2-3 tablespoons of milk to get the right consistency. The baking soda is also unnecessary if you aren’t baking it.
- The “Kitchen Sink” Masterpiece: Keep the base dough the same, but go wild with the mix-ins. Swap out the chocolate chips for butterscotch chips, chopped nuts, toffee bits, M&Ms, crushed pretzels, or even potato chips. The possibilities are endless.
- Brown Butter Magic: For a truly next-level flavor, brown your butter before you start. Melt the butter in a light-colored saucepan and continue to cook it, swirling occasionally, until it foams and little brown bits form at the bottom, and it smells nutty and amazing. Let it cool and solidify back to a soft, paste-like consistency before creaming it with the sugar.
Frequently Asked Questions (Your Dough Dilemmas, Solved)
Why is chilling cookie dough so important?
It does two things: 1) It solidifies the fat (butter), which means the cookies spread less in the oven. 2) It allows the flour to hydrate and the flavors to deepen, resulting in a chewier, more flavorful cookie.
Can I make this cookie dough without an electric mixer?
You can, but it will be a serious arm workout. You’ll need to cream the butter and sugar by hand with a wooden spoon or spatula for a solid 10 minutes to get enough air into it. It’s possible, but a mixer makes it much, much easier.
How can I make my cookies chewier? Or cakier?
For chewier cookies, use more brown sugar than white sugar (which this recipe does!) and slightly underbake them. For cakier cookies, you can add a little more flour or an extra egg yolk.
Is it really that unsafe to eat raw cookie dough?
The risk is low, but it’s real. The two culprits are raw eggs (potential for Salmonella) and raw flour (potential for E. coli). Following the steps in the edible variation above eliminates these risks.
How long can I store cookie dough?
You can store it in an airtight container in the refrigerator for up to a week. You can also scoop it into balls, freeze them on a baking sheet, and then transfer them to a freezer bag. They’ll last for up to 3 months in the freezer—you can bake them straight from frozen (just add a couple of minutes to the baking time).
Why did my cookies spread out so much?
The most common reason is that you didn’t chill the dough. Other culprits include using melted butter instead of softened, or your oven not being hot enough when you put the cookies in.
Can I use salted butter?
Yes, you can. Just reduce the amount of added salt in the recipe from 1 teaspoon to 21 teaspoon.
Final Thoughts
You are now the proud owner of a recipe for what might just be the most perfect, versatile, and dangerously delicious substance on Earth. You have the power to create warm, gooey cookies at a moment’s notice or to whip up a bowl of edible comfort to be eaten directly with a spoon.
Use this power wisely. Or, you know, don’t. Make a batch, stand in front of the open fridge, and see how long it lasts. No judgment here.