From Powder to Paradise: Seriously Easy Homemade Chocolate (You Won’t Believe It)
Ever stare longingly at a chocolate bar, only to remember you’re fresh out and the thought of putting on pants feels like climbing Mount Everest? Yeah, me too. But what if I told you that you could whip up a surprisingly legit version of your favorite treat using that dusty container of cocoa powder hiding in your pantry? Sounds too good to be true, right? Well, buckle up, buttercup, because I’m about to spill the beans (or should I say, cocoa nibs?) on how to make chocolate with cocoa powder, and prepare to have your mind (and taste buds) blown.
Why This Recipe is Awesome (And Will Save You From Chocolate Emergencies)
Let’s face it, sometimes that emergency chocolate craving hits hard and fast. And running to the store feels like a monumental effort. This recipe is your superhero cape in those moments. It’s ridiculously easy, requires minimal ingredients (you probably have them already!), and delivers a satisfyingly rich chocolate experience. Forget those waxy, questionable “chocolate-flavored” things. This is the real deal, made by you.
Plus, think of the possibilities! You can customize it to your heart’s content – darker, sweeter, with nuts, without nuts. You’re basically a chocolatier in your own kitchen. And when your friends are all, “OMG, this chocolate is amazing!”, you can casually say, “Oh, it’s just something I whipped up.” Instant domestic god/goddess status achieved. What’s not to love?
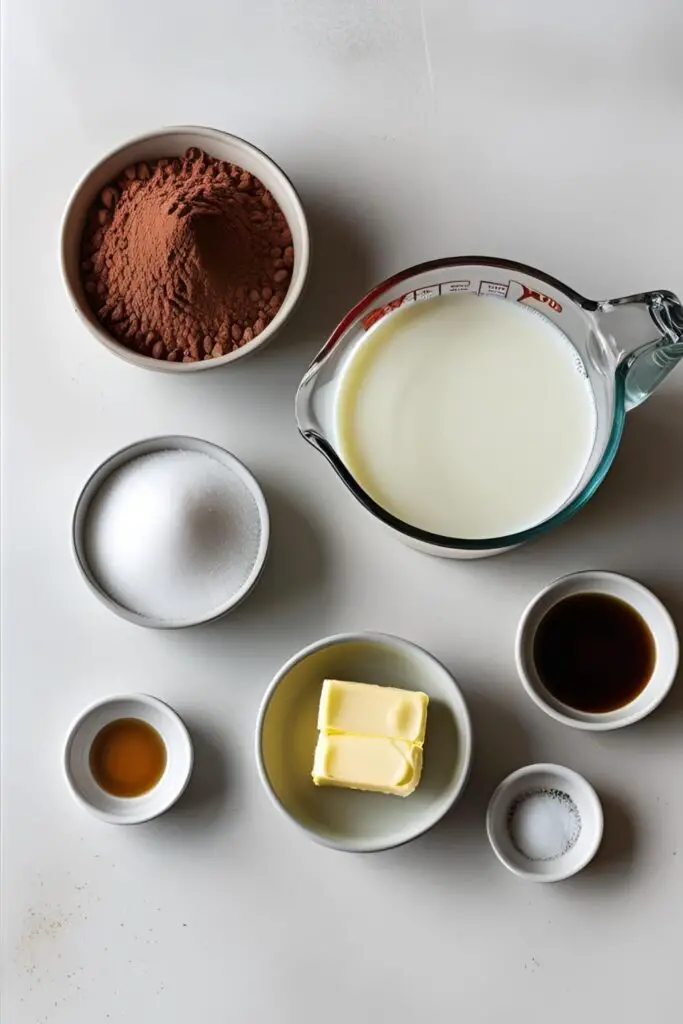
Ingredients
Alright, gather ’round, ingredient enthusiasts. You won’t believe how simple this is.
- ½ cup unsweetened cocoa powder. Good quality makes a difference, FYI.
- ½ cup granulated sugar (or more, to taste). Feel free to experiment with brown sugar for a slightly different flavor profile.
- ¼ cup unsalted butter (or coconut oil for a vegan version). Make sure it’s melted and slightly cooled.
- 2-4 tablespoons milk (dairy or non-dairy). This helps bring everything together and creates a smooth texture. Start with less, you can always add more.
- ½ teaspoon vanilla extract (optional, but highly recommended). Adds a touch of that classic chocolatey goodness.
- Pinch of salt. Seriously, don’t skip the salt. It enhances the chocolate flavor.
Tools & Kitchen Gadgets Used
You won’t need a fancy chocolate tempering machine for this, promise.
- Medium-sized saucepan.
- Whisk. Your trusty sidekick for smooth mixing.
- Measuring cups and spoons. Because precision matters (sort of).
- Small bowl or plate lined with parchment paper. For setting your homemade chocolate.
- Spatula (optional). For scraping every last bit of chocolatey goodness.
Step-by-Step Instructions
Get ready for some serious kitchen alchemy. It’s easier than you think, promise!
- Dry Ingredients Unite!: In your saucepan, whisk together the cocoa powder, sugar, and salt. Make sure there are no lumps of cocoa powder trying to stage a rebellion.
- Melt the Fat: In a separate small bowl, melt the butter (or coconut oil). You can do this gently in the microwave or over low heat on the stove. Let it cool slightly before moving on. Hot butter + cocoa powder = sad, grainy mess.
- Wet Meets Dry (Carefully!): Pour the melted butter (or oil) into the saucepan with the dry ingredients. Stir everything together with your whisk until it forms a thick, fudgy paste. Don’t panic, it’s supposed to look like this.
- Milk It Up: Now, gradually add the milk, one tablespoon at a time, whisking continuously until the mixture becomes smooth and glossy. You’re looking for a consistency that’s thick but pourable. You might not need all the milk, so go slow.
- Vanilla Magic (If You’re Feeling Fancy): Stir in the vanilla extract (if using). Give it one last good whisk to make sure everything is perfectly combined.
- Set It and Forget It (Almost): Pour the chocolate mixture onto your parchment-lined bowl or plate. Spread it out to your desired thickness. Thicker for chunks, thinner for more brittle pieces.
- Chill Out: Place the bowl or plate in the refrigerator and let the chocolate set for at least 30 minutes to an hour, or until it’s firm to the touch. Patience, young Padawan. Good things come to those who chill.
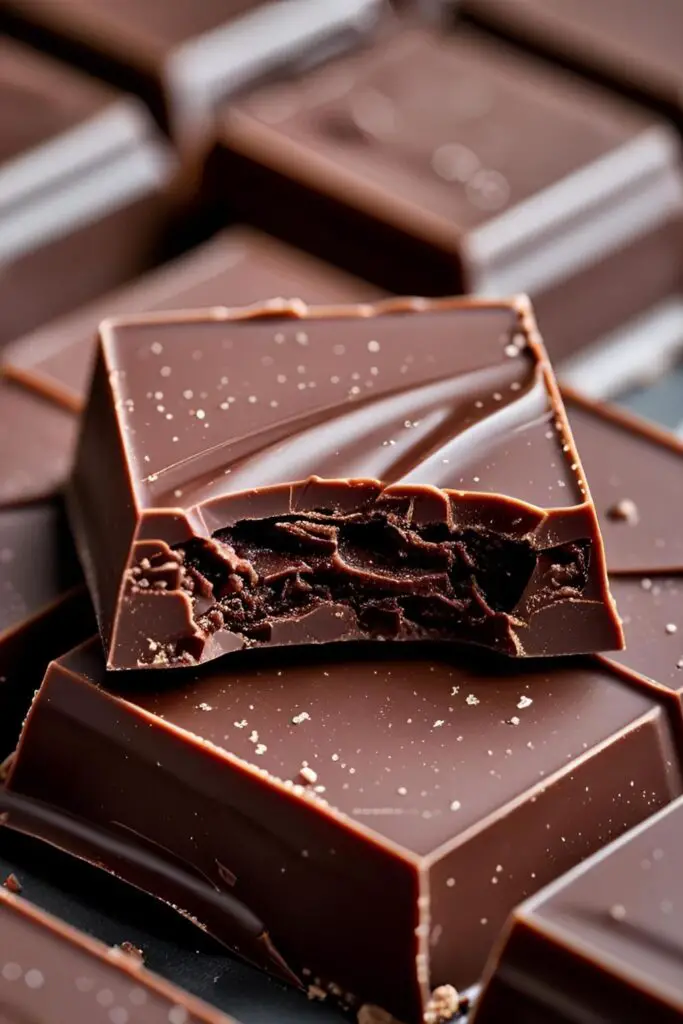
- Break It Down: Once the chocolate is firm, remove it from the fridge and break it into pieces. Now comes the best part… ENJOY!
Calories & Nutritional Info (The Part Where We Slightly Lie to Ourselves)

This is a very rough estimate for about 1 ounce (28 grams) of your homemade chocolate. It will vary depending on the amount of sugar and fat you use.
- Calories: Approximately 180-220
- Fat: ~12-15g (depending on butter/oil)
- Carbohydrates: ~15-20g (mostly from sugar)
- Sugar: ~15-20g (Hey, it’s chocolate!)
- Protein: ~2-3g
Let’s just agree that it’s a delicious treat that brings joy to your life, okay? Nutritional information is overrated when chocolate cravings are involved. 😉
Common Mistakes to Avoid (Or, How Not to Make Chocolate Soup)
Making chocolate from cocoa powder is pretty foolproof, but here are a few potential pitfalls to watch out for:
- Using Cold Butter (or Oil): You want the butter (or oil) to be melted and slightly cooled. Cold fat won’t mix properly with the cocoa powder and can result in a lumpy, sad mess.
- Adding All the Milk at Once: Go slow with the milk! Adding too much liquid too quickly can make your chocolate too thin and it won’t set properly. Add it gradually until you reach the desired consistency.
- Overheating: Don’t try to cook the chocolate mixture on the stove for too long. You just want to melt everything together until it’s smooth. Overheating can make it seize up and become grainy.
- Not Using Good Quality Cocoa Powder: The quality of your cocoa powder will directly impact the flavor of your chocolate. Opt for a good quality, unsweetened cocoa powder for the best results.
- Impatience: Don’t try to rush the setting process! Your chocolate needs time in the fridge to firm up properly. Otherwise, you’ll just have a gooey, chocolatey puddle. Still delicious, but not quite chocolate bar material.
Variations & Customizations (Let Your Inner Chocolatier Shine!)
Now for the fun part! Once you’ve nailed the basic recipe, the possibilities are endless.
- Dark Chocolate Delight: Reduce the amount of sugar slightly for a richer, less sweet dark chocolate. You can also use a darker cocoa powder.
- Milky Goodness: Increase the amount of milk slightly for a creamier, milk chocolate-style treat.
- Nutty Professor Chocolate: Stir in your favorite chopped nuts (almonds, peanuts, walnuts, etc.) after the chocolate mixture is smooth.
- Mint Chocolate Magic: Add a few drops of peppermint extract along with the vanilla for a refreshing minty twist.
- Spicy Chili Chocolate: For the adventurous souls, add a pinch of chili powder or cayenne pepper for a subtle heat.
- Vegan Dream: As mentioned, using coconut oil instead of butter makes this recipe completely vegan.
FAQ Section (Your Burning Chocolate Questions Answered)
Let’s dive into some of those chocolatey queries.
Q: Can I use Dutch-processed cocoa powder? A: Yes, you can! Dutch-processed cocoa powder has a smoother, less acidic flavor than natural cocoa powder. Either will work in this recipe.

Q: My chocolate is grainy. What did I do wrong? A: This could be due to a few things: not whisking thoroughly enough, overheating the mixture, or using cold butter/oil. Make sure you whisk until smooth over low heat and use melted, slightly cooled fat.
Q: Can I temper this chocolate? A: This recipe creates what’s known as “untempered” chocolate. It will still be delicious and set firm in the fridge, but it won’t have the same glossy shine and snap as properly tempered chocolate. Tempering requires more specific temperatures and techniques.
Q: How should I store my homemade chocolate? A: Store it in an airtight container in the refrigerator for up to a week, or even longer in the freezer. Let it come to room temperature for a few minutes before enjoying for the best texture.
Q: Can I use this for dipping or coating? A: This chocolate will work for dipping, but because it’s not tempered, it will melt more easily at room temperature. You’ll likely want to keep whatever you’re dipping chilled.
Q: What if I don’t have milk? Can I use water? A: While milk adds richness and creaminess, you can use water in a pinch. However, the final chocolate might be a bit less flavorful.
Q: Can I make white chocolate with cocoa powder? A: Nope! White chocolate gets its creamy sweetness from cocoa butter, not cocoa powder. Cocoa powder is what gives milk and dark chocolate their color and characteristic chocolate flavor.
Final Thoughts (Go Forth and Conquer Your Chocolate Cravings!)

There you have it, folks! Proof that you don’t need a fancy chocolate factory to satisfy that deep, dark craving. With just a few simple ingredients and a little bit of stirring, you can create your very own homemade chocolate. So go ahead, embrace your inner chocolatier, experiment with flavors, and never again be held hostage by an empty chocolate stash. Now, if you’ll excuse me, I hear a batch of homemade spicy chili chocolate calling my name. You should probably go make some too. You deserve it. 😉