How to Make Fondant for Beginners (The Easy Way That Actually Tastes Good!)
Let’s be brutally honest for a moment: fondant has a terrible reputation. It’s that thick, chewy, often completely flavorless blanket on wedding cakes that people dutifully peel off and leave on the side of their plate like a sugary shame-puddle. It looks stunning, sure, creating those impossibly smooth surfaces and perfect shapes. But the taste? Not so much. It’s the edible equivalent of a beautiful but uncomfortable pair of shoes.
But what if I told you that it doesn’t have to be this way? What if I told you there’s a way to make fondant at home that is ridiculously easy, costs a fraction of the store-bought stuff, and actually tastes… good? Like, “vanilla-marshmallow-cloud” good? Today, my friend, I’m showing you how to make fondant for beginners using a magical, game-changing ingredient: marshmallows. Prepare to have your cake-decorating world rocked.
Why This Recipe Is a Baking Game-Changer
So, why should you, a perfectly sane person, willingly invite a potentially sticky situation into your kitchen? Oh, the reasons are sweet and plentiful.
First and foremost, it actually tastes delicious. This is the number one advantage. Unlike traditional fondant, which can have a bland, pasty flavor, marshmallow fondant tastes exactly like what it is: a soft, sweet, vanilla-flavored marshmallow confection. It’s a pleasant addition to a slice of cake, not something to be discarded. People will be shocked when they discover they like the fondant.
Second, it is unbelievably easy to make. If you can melt marshmallows in a microwave and operate a mixer, you have all the prerequisite skills. There’s no cooking sugar to specific, terrifying temperatures. There are no weird, hard-to-find ingredients like glycerin or glucose. It’s the most accessible entry point into the world of fondant.

Finally, it’s so much cheaper. A single tub of pre-made fondant can be surprisingly pricey. A bag of marshmallows and a bag of powdered sugar? That’s just a few bucks. You can make a huge batch of high-quality, delicious fondant for a fraction of the cost. Your wallet will thank you.
The A-List Ingredients
This magical, edible clay comes together with just a few pantry staples. It’s beautiful in its simplicity.
- Miniature Marshmallows: 1 bag (16 ounces). Minis melt more evenly and quickly than the big campfire ones.
- Powdered Sugar (Confectioners’ Sugar): About 2 pounds (or 7-8 cups), sifted. You will be using a LOT of this.
- Water: 2-3 tablespoons.
- Shortening: About ½ cup. This is not an ingredient for flavor; it is your secret weapon against stickiness. Do not skip this.
- Vanilla Extract: 1 teaspoon. Use a clear vanilla extract if you want to keep your fondant a pure, bright white.
The Fondant-Wrangler’s Toolkit
Having the right gear will be the difference between a fun project and a sticky, kitchen-wide disaster.
- A Large Microwave-Safe Bowl: The bigger, the better. Marshmallows puff up to an alarming size when melted.
- A Stand Mixer with a Dough Hook: This is highly, highly recommended. Kneading this sticky dough by hand is possible, but it is a serious arm workout and a test of your sanity. The dough hook will do all the hard work for you.
- A Sturdy, Greased Spatula: For the initial mixing.
- Measuring Cups and Spoons: For your water and vanilla.
- A Large, Clean Work Surface: You’ll need plenty of space for kneading.
- Plenty of Plastic Wrap: For storing your finished fondant.
- Gel Food Coloring (Optional): If you plan on coloring your fondant.
Step-by-Step: From Marshmallow Goop to Silky Smooth Fondant
Ready to create some edible Play-Doh for adults? Let’s do this. The key to this whole process is to embrace the grease.
Step 1: The Great Greasing Ritual This is the most important step of the entire process. Take a generous scoop of shortening and grease EVERYTHING. Grease the inside of your large microwave-safe bowl. Grease your spatula. Grease the dough hook of your stand mixer. Grease a large patch of your countertop. When you think you’ve used enough, add a little more. If it’s going to touch the fondant, it needs to be greased.
Step 2: The Marshmallow Meltdown Pour the entire bag of mini marshmallows into your greased bowl. Add the 2-3 tablespoons of water. Microwave on high for 30-second intervals, stirring with your greased spatula in between, until the marshmallows are completely melted and have puffed up into a glorious, gooey blob. This usually takes about 2 minutes total.

Step 3: The Initial Mix Once the marshmallows are melted and smooth, stir in your vanilla extract. Now, add about 4-5 cups of the sifted powdered sugar to the bowl. Stir with your greased spatula until it starts to come together into a ridiculously sticky, thick paste. It will look like a disaster. This is normal.
Step 4: Let the Mixer Do the Work (The Smart Way) Scrape the sticky blob from your bowl into the greased bowl of your stand mixer fitted with the greased dough hook. Turn the mixer on low speed and begin gradually adding the remaining powdered sugar, about a cup at a time. The mixer will knead the sugar into the marshmallow goo. Keep adding sugar until the dough starts to pull away from the sides of the bowl and forms a soft, pliable ball. It might not use all of the powdered sugar, so add it slowly.
Step 5: The Hand-Kneading Finale Scoop a generous amount of shortening onto your hands. Turn the fondant out onto your greased work surface and knead it by hand for just a minute or two, until it’s smooth and no longer sticky to the touch. It should feel like a soft, pliable dough.
Step 6: The Mandatory Rest This is a crucial step for the texture. Coat the entire ball of fondant with a thin layer of shortening, then wrap it tightly in two layers of plastic wrap. Place it in an airtight container or a Ziploc bag and let it rest at room temperature for at least 8 hours, or preferably overnight. This allows the fondant to firm up and develop the perfect texture for rolling and decorating.
Fondant Facts & Figures (The “Nutrition”)
Let’s be very clear about what we just made.
- It’s Sugar: Fondant is, at its core, a sugar dough. It’s made of marshmallows (which are sugar, corn syrup, and gelatin) and a whole lot of powdered sugar. It is a confection, meant for decoration.
- A Little Goes a Long Way: You typically only eat a small amount of fondant along with your slice of cake.
- Allergen Information: This recipe is naturally nut-free. Most commercial marshmallows are also gluten-free, but be sure to check the packaging on your specific brand if you have a gluten sensitivity.
Common Fondant Fails (And How to Avoid Them)
Making fondant is easy, but it can be a sticky situation. Here’s how to avoid the most common disasters.
- The Sticky Apocalypse. This is the number one issue for beginners. The cause? You didn’t use enough shortening. I know it feels weird to grease everything so aggressively, but marshmallow goo is one of the stickiest substances known to humankind. Shortening is your non-stick force field. Grease your hands, your tools, your counter. You cannot over-grease.
- Adding All the Powdered Sugar at Once. If you dump all two pounds of sugar into the melted marshmallows, you will create a stiff, unmixable brick. The mixture will seize up, and your mixer will cry for help. You must add the sugar gradually, allowing it to be incorporated slowly.
- Using Granulated Sugar. Do not, under any circumstances, try to use regular granulated sugar for this. You will end up with a grainy, crunchy, weeping, terrible mess. You must use powdered sugar (also called confectioners’ sugar or icing sugar).
- Skipping the Overnight Rest. I know you’re excited to use your beautiful, homemade fondant. But if you try to roll it out right after you make it, it will be too soft, sticky, and prone to tearing. The overnight rest is non-negotiable. It allows the fondant to set, firm up, and develop the perfect stretchy, pliable consistency for covering a cake.
Variations & Customizations (Playing with Your Food)

Now that you have this amazing, edible clay, you can do all sorts of fun things with it!
- How to Color Your Fondant: The best way to color fondant is with gel food coloring. Liquid food coloring will make your fondant too wet and sticky. Just dip a toothpick into the gel, swipe it onto your fondant, and knead until the color is uniform. Wear gloves if you don’t want to have rainbow hands for three days.
- How to Flavor Your Fondant: The sky’s the limit! Instead of vanilla extract, try using other oil-free extracts like almond, lemon, peppermint, or even cake batter flavoring. Just add it in Step 3.
- Making Simple Decorations: You don’t have to cover a whole cake! Roll your fondant out and use small cookie cutters to create beautiful, simple shapes to decorate cupcakes or cookies. You can also use it like Play-Doh to sculpt simple figures, flowers, and bows.
Your Burning Fondant Questions, Answered
Let’s demystify this magical marshmallow dough.
What’s the real difference between marshmallow fondant and traditional fondant?
Traditional fondant is made by cooking sugar, water, and glucose to a specific temperature, then adding gelatin and glycerin. It has a stiffer texture and a more neutral (some would say bland) flavor. Marshmallow fondant uses melted marshmallows as its base, making it much easier to make at home and giving it a sweeter, more pleasant vanilla-marshmallow flavor.
How do I store my homemade fondant, and how long does it last?
Keep it tightly wrapped in plastic wrap and stored in an airtight container or Ziploc bag at room temperature. Do not refrigerate it, as this can cause it to become hard and create condensation. It will last for several weeks.
My fondant is tearing when I try to cover a cake. What’s wrong?
It’s likely either rolled too thin, or it didn’t rest long enough to develop its strength. Also, make sure your cake has a smooth, even layer of buttercream underneath for the fondant to grip onto.
Can I really make this without a stand mixer?
You can, but prepare for an epic arm workout. You will have to do all the kneading by hand on a very well-greased surface. It’s a great way to earn your slice of cake!
How do I actually get the fondant to stick to the cake?
You need a “glue.” A thin, smooth layer of buttercream frosting is the perfect adhesive. Frost your cake with a thin layer, let it crust slightly, then apply your fondant.
My fondant is too dry and cracking / too soft and sticky. How do I fix it?
If it’s too dry and cracking, knead in a tiny bit of shortening until it becomes pliable again. If it’s too soft and sticky (often due to humidity), knead in a little more powdered sugar until it reaches the right consistency.
Can I make chocolate marshmallow fondant?
Yes! When you add your first batch of powdered sugar, also sift in about ½ cup of unsweetened cocoa powder. You’ll have a rich, delicious chocolate fondant.
Final Thoughts
You’ve done it. You have officially conquered the final boss of cake decorating. You’ve created beautiful, edible, and—most importantly—delicious Play-Doh for adults. You have stared into the face of a sticky, intimidating project and emerged victorious with a perfect, smooth ball of marshmallowy goodness.
The world of cake decorating is now your oyster. Go forth and cover things in a smooth, sweet, marshmallowy blanket of victory. You’ll never look at that sad, peeling layer on a wedding cake the same way again.
SEO and Pinterest Elements
SEO Optimized Blog Title: How to Make Fondant for Beginners (The Easy Way That Actually Tastes Good!)
Meta Description: Learn how to make fondant for beginners with this easy, 3-ingredient marshmallow fondant recipe! It’s cheap, delicious, and perfect for cake decorating.
Pinterest Title (70 characters): How to Make Easy Marshmallow Fondant for Beginners (That Tastes Great!)
Pinterest Description (490–500 characters): Learn how to make fondant for beginners with our easy marshmallow fondant recipe! This is the best homemade fondant that actually tastes good, using simple ingredients you already have. Our step-by-step guide is perfect for first-timers wanting to cover a cake or make decorations. We’ll show you how to color it, store it, and avoid common mistakes like stickiness and tearing. Ditch the expensive, flavorless store-bought stuff and start making your own delicious, pliable fondant at home today!
Image Generation Prompts:
- Text Overlay Image:
- Prompt: A bright, cheerful shot of hands kneading a perfectly smooth, white ball of marshmallow fondant on a clean, lightly greased countertop. The background is a clean, modern kitchen. Text overlay in a fun, encouraging font reads: “Easy Homemade Fondant”.
- Image File Name: easy-homemade-marshmallow-fondant.jpg
- Alt Text: Hands kneading a smooth ball of white marshmallow fondant on a countertop, showing how to make fondant for beginners.
- Ingredients Collage Image:
- Prompt: A simple, minimalist flat lay photo collage on a pastel-colored background. It shows the three core ingredients: a bowl of white mini marshmallows, a bowl of sifted powdered sugar, and a small container of shortening. The composition is clean and highlights the recipe’s simplicity.
- Image File Name: marshmallow-fondant-ingredients.jpg
- Alt Text: A flat lay of the three main ingredients for marshmallow fondant: mini marshmallows, powdered sugar, and shortening.
- Finished Recipe (Application) Variants Image:
- Prompt: A diptych-style image. The left side shows the gooey, melted marshmallow mixture in a large glass bowl right after coming out of the microwave. The right side shows a beautifully smooth, fondant-covered cake in a solid pastel color, showcasing the perfect, professional-looking result.
- Image File Name: making-and-using-marshmallow-fondant.jpg
- Alt Text: Two images showing the process of making fondant: one of the melted marshmallow mixture, and one of a finished cake covered in smooth fondant.
Canva Text Overlay Prompt (160 characters): Hands rolling out a perfectly smooth sheet of white fondant on a clean surface. Text: ‘The Ultimate Guide to Homemade Fondant’. Bright, clean, DIY foodie style.
Pinterest Tag Topics:
- Fondant Recipe
- Cake Decorating
- Baking for Beginners
- DIY Recipes
- Marshmallow Fondant
- Baking Hacks
- Cake Decorating Tips
- Dessert Recipes
You stopped this response
RECIPE:How to make chicken nuggets
Write a fun, engaging, and slightly sarcastic recipe article that feels like a friendly chat with a foodie friend. Use a conversational tone with short, punchy paragraphs, occasional humor, and rhetorical questions to keep the reader hooked. Avoid passive voice and long, boring blocks of text. Come up with a seo-optimized title.
The article should be around 1,500-2000 words and follow this structure:
A quick, catchy intro with a viral hook – Start with a fun, relatable anecdote or an attention-grabbing statement. Make the reader instantly care about this recipe.
Why this recipe is awesome – Convince the reader why they need to make this. Mention flavor, ease of cooking, or how it impresses guests.
Ingredients – Keep it clean, use bullet points, and note any key substitutions.
Tools & kitchen gadgets used: list down tools,equipment & kitchen gadgets used in total process so that i can put amazon affiliate link on it and send the visitor to amazon.
Step-by-step instructions – Make this super easy to follow. Use short, clear steps and throw in some humor where it fits.
Calories & Nutritional Info – Include estimated calories per serving and any relevant nutritional notes. Ideally as bullet points, make it informative.
Common Mistakes to Avoid – List the most common slip-ups and how to avoid them. Be cheeky but helpful.
Variations & Customizations – Give at least three fun ways to tweak the recipe (e.g., keto-friendly, spicy version, vegetarian swap).
FAQ Section – Answer at least Seven common questions picked from people also ask section from google search results for the given keyword about this recipe.
Final Thoughts – Wrap it up with a fun closing statement, maybe an invitation to share their version or a joke about how they’ll never buy store-bought again.
Tone & Style Guidelines:
Style & Tone Requirements:
– **Conversational and Informal:** Write as if you’re talking to a friend. The tone should be relaxed, engaging, and approachable. Use everyday language; avoid overly formal or academic language. Ensure the narrative flows naturally and doesn’t sound scri
– **Occasional Sarcasm & Humor:** Inject light sarcasm and humor to keep the reader engaged. Use these elements sparingly—only enough to maintain a playful tone without overwhelming the content. The humor should be witty and subtle; ensure it does not det
– **Personal Touch and Experience:** Include personal opinions or anecdotes where relevant. This adds authenticity and builds trust with the reader. When describing features or comparing products, mention personal experiences to make the content more rela
– **Active Voice Only:** Write every sentence in the active voice. Double-check your sentences to avoid any passive constructions.
– **Engagement Through Rhetorical Questions:** Insert rhetorical questions throughout the article to engage the reader and provoke thought. These questions should serve as conversation starters and not be overused.
– **Use of Slang & Abbreviations:** Occasionally incorporate common internet slang such as “FYI”, “IMO”, etc., as well as a few emoticons (e.g., “:)” or “:/”). Limit these to 2–3 instances per article to keep the content playful yet professional.
Formatting & Structural Requirements:
– **Introduction:** Begin with a short, punchy introduction that immediately hooks the reader. The introduction should quickly address the reader’s needs and set the tone for the rest of the article.
– **Headings and Subheadings:** Organize the article using H2 headings for each major section or point. Use H3 headings to break down subtopics within each H2 section when necessary. Ensure the headings are clear and descriptive to guide the reader throug
– **Paragraph Structure:** Keep paragraphs short and punchy—ideally 3–4 sentences per paragraph. Avoid long blocks of text to ensure readability on both desktop and mobile devices. Each paragraph should be focused and convey a single idea clearly.
– **Bullet Points & Lists:** When presenting technical details, features, or comparisons, use bullet points or numbered lists. These lists should break down information in an easy-to-digest format.
– **Bold Key Information:** Throughout the article, bold the most important points, features, or pieces of information. This helps draw the reader’s attention to the essential parts of your message.
Write like you’re chatting with a friend who loves good food.
Use bold text to highlight key info (especially important ingredients, steps, and mistakes to avoid).
Short, engaging paragraphs (no big walls of text).
Add a few sarcastic or humorous moments (but don’t overdo it).
Throw in rhetorical questions to keep it engaging.
Use internet slang sparingly (e.g., “FYI,” “IMO,” “TBH”)—max 2–3 times per article.
Keep it energetic, fun, and easy to read.
Use H2, H3 headings.
do not put any line separator among headings or after completing any section
SEO Optimization:
put exact keyphrase in the first paragraph
`
Now, generate a recipe article following this exact structure and style!
once recipe is done, write 3 pinterest friendly image generation prompts that will generate click worthy ,great photo quality image.one will be test overlay image of the main keyword, one will be collage image of ingredients used for this recipe,other will be two separate variant of cooked recipe image,one is close look.
create a 160 characters length seo optimized meta description including main keyword.
Also include the following SEO and Pinterest elements at the end of the article:
cookie monster cake
– **SEO Optimized Blog Title:** Write a SEO-optimized, keyword-enriched blog title.
– **Pinterest Title (70 characters):** Must be exactly 70 characters. Must include the main keyword naturally without awkward repetition. Add 1-2 different long-tail keywords from the provided list without repeating any major word. Make it catchy, readabl
– **Pinterest Description (490–500 characters):** Include the main keyword naturally in the first sentence. Use 4-6 different long-tail keywords from the provided list. Do not repeat any word more than twice (except common words like “the,” “and,” “with”)
– **Image Generation Provide 3 specific image generation prompts for the article’s images with apropriate image file name and alttext.
*Create a text overlay canva image generation prompt within 160 character for a viral, indulgent, and highly clickable . The Main Keyword will be the text overlay, with a relevant background image.
Main Keyword : How to make chicken nuggets
Long Tail Keywords: ( generate them based on the main keyword and context,NLP keywords algorythm from google directly)
Here are some example topics:
10-Minute Full-Body Workouts for Busy Schedules (keywords: quick home workouts, full-body exercises, time-efficient fitness)
High-Protein Breakfast Ideas for Muscle Building (keywords: protein-packed meals, healthy breakfast recipes, muscle gain nutrition)
The Ultimate Beginner’s Guide to Strength Training (keywords: beginner strength training, gym workout plan, weightlifting for beginners)
and also relevent pinterest tag topic
Ensure the writing is engaging, concise, and Pinterest SEO-friendly.
➡️ Example Pinterest Title & Description:
Title: 🏋️♂️ Beginner Strength Training Guide: Build Muscle & Confidence 💪 0
Description: Ready to start lifting? This beginner strength training guide covers everything from weightlifting for beginners to effective workout plans. 🏋️♂️ Learn how to build muscle, improve endurance, and avoid common gym mistakes. Whether at home or in the gym, these strength-building tips will help you achieve your fitness goals! #NAME? 0
Show thinking
How to Make Chicken Nuggets at Home (Way Better Than Fast Food!)
Let’s be honest for a second. There’s a little kid inside every single one of us that still gets weirdly, deeply excited about the prospect of chicken nuggets. It’s a core food memory, a throwback to simpler times. But let’s also be honest about the adult reality: those drive-thru nuggets are a greasy mystery wrapped in an enigma, and the ones in the freezer aisle often have the texture and flavor of a sad, seasoned sponge.
What if you could have a chicken nugget that was unbelievably juicy and tender on the inside, shatteringly crispy on the outside, and made from 100% actual, identifiable chicken? What if you could create a nugget so good, it would make you look at all other nuggets with pity? Today, my friends, you’re going to learn how to make chicken nuggets from scratch, and your inner child is about to throw a party.
Why This Recipe Is a Life-Changer
So, why should you go to the “effort” of making something you can get in a cardboard box for a few bucks? Oh, the reasons are plentiful and delicious.
First, you are the master of your ingredients. You know exactly what’s going into these nuggets. We’re talking real, solid pieces of chicken breast or thigh, seasoned with actual spices from your cabinet. There are no weird fillers, no mysterious “rib meat,” no ingredients you need a chemistry degree to pronounce. It’s just good, honest food.
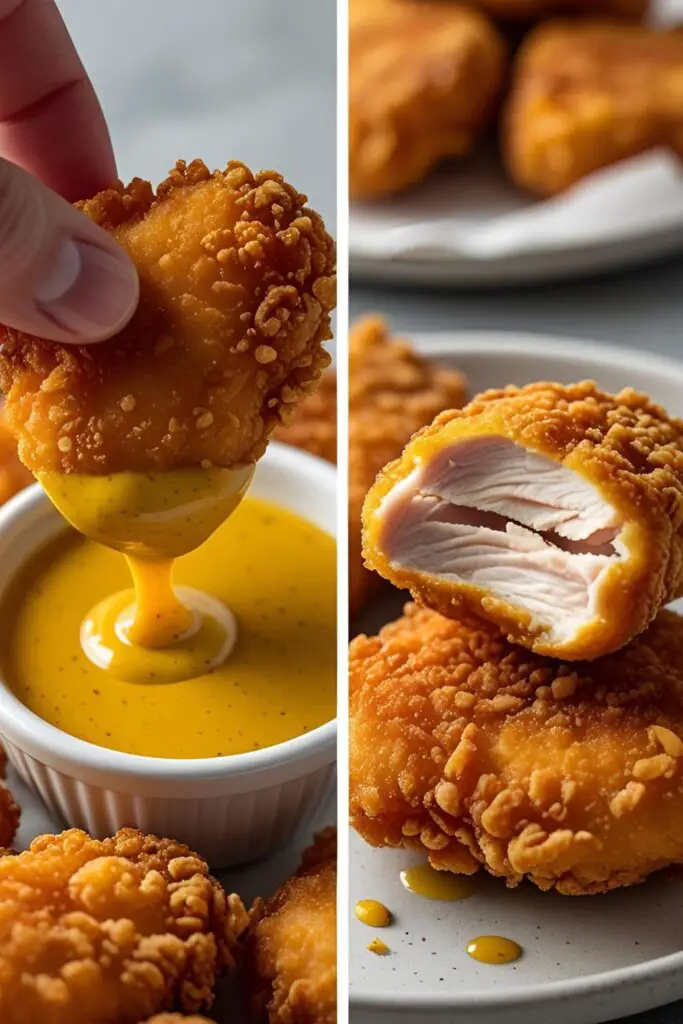
Second, the crispy-to-juicy ratio is off the charts. The secret lies in the breading technique, which creates a super crunchy, golden-brown crust that acts like a delicious little jacket, locking in all the juices and keeping the chicken unbelievably tender. The textural contrast is pure magic.
Finally, this is a recipe that is universally adored. Kids love them. Adults love them. They work as a fun weeknight dinner, a crowd-pleasing appetizer for game day, or a slightly-more-sophisticated-than-usual late-night snack. They are the great unifier of the dinner table.
The A-List Ingredients
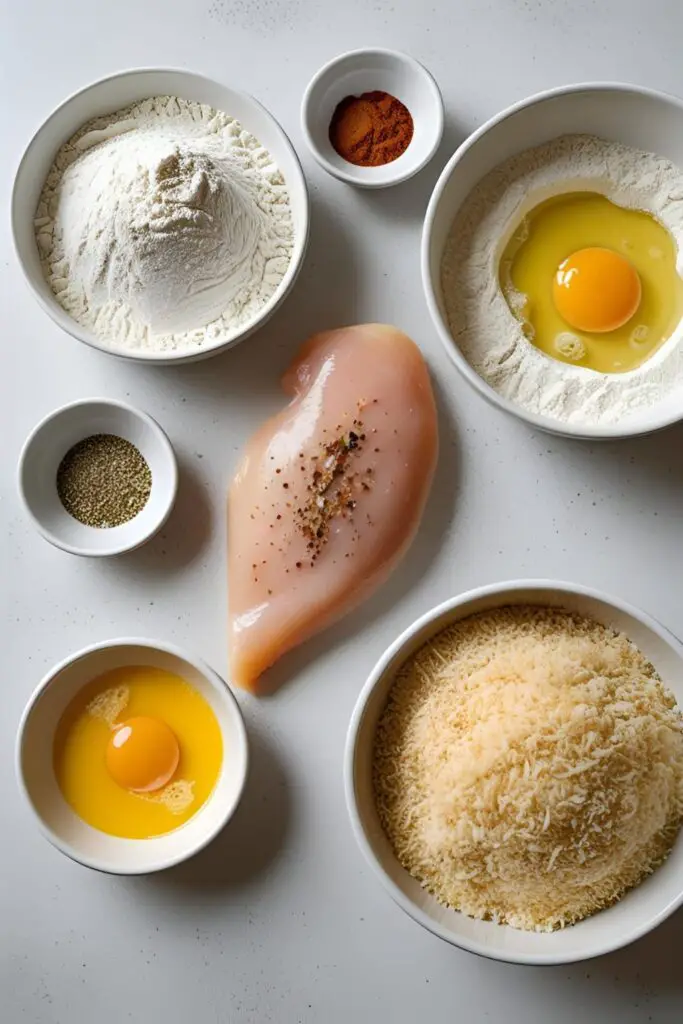
The beauty of homemade nuggets is the simple, high-quality ingredient list. You probably have most of this on hand already.
- Chicken: 1 ½ pounds of boneless, skinless chicken breasts or thighs. Breasts are leaner, while thighs are a bit more flavorful and forgiving.
- All-Purpose Flour: ½ cup, for the first dredging station.
- Spices for the Flour:
- 1 teaspoon salt
- ½ teaspoon black pepper
- 1 teaspoon garlic powder
- 1 teaspoon smoked paprika
- Eggs: 2 large ones, for the egg wash.
- Panko Breadcrumbs: 2 cups. This is a key ingredient! Panko breadcrumbs are lighter and flakier than regular breadcrumbs and will give you a much crispier, crunchier coating.
- Oil for Frying: About 2-3 cups of a neutral oil with a high smoke point, like canola, vegetable, or peanut oil. (Or just a few tablespoons if you’re baking/air frying).
The Nugget-Making Toolkit
You don’t need a deep fryer to make amazing nuggets, but a few key tools will make the process a whole lot smoother.
- A Sharp Chef’s Knife: For cubing your chicken.
- A Food Processor (Optional): If you want to go for that classic, uniform “formed” nugget shape by making your own ground chicken.
- Shallow Dishes or Pie Plates: You’ll need three of these for your breading station.
- A Large, Heavy-Bottomed Skillet or Dutch Oven: Essential for maintaining a steady oil temperature if you’re frying.
- A Deep-Fry/Candy Thermometer: This takes all the guesswork out of frying and is the #1 tool for preventing soggy nuggets.
- Tongs: For safely flipping and retrieving your golden nuggets.
- A Wire Rack set over a Baking Sheet: The absolute best way to drain your fried nuggets to keep them crispy all around.
- An Air Fryer (Optional): A fantastic alternative for a healthier, less messy cooking method.
Step-by-Step: Your Guide to Nugget Nirvana
The secret to a smooth operation is setting up your station before you start. Let’s get to it.
Phase 1: Prep the Chicken
- Choose Your Nugget Style:
- The Rustic Cut: For the easiest method, simply cut your chicken into uniform, 1-inch to 1 ½-inch cubes.
- The Classic Formed Nugget: For that authentic shape, cut your chicken into chunks and pulse it in a food processor 8-10 times until it’s coarsely ground. Be careful not to turn it into a paste! Then, wet your hands and form the ground chicken into your desired nugget shapes.
- Pat your chicken pieces completely dry with a paper towel. This helps the breading stick.
Phase 2: The Breading Station
- Set Up Your Assembly Line: Grab your three shallow dishes.
- Dish #1: Whisk together the flour, salt, pepper, garlic powder, and paprika.
- Dish #2: In the second dish, whisk the two eggs with a tablespoon of water or milk.
- Dish #3: Fill the third dish with your panko breadcrumbs.
- The Breading Dance (Dry Hand, Wet Hand): This is the pro-move to avoid getting “club hand” (where one hand gets encased in a thick glove of breading). Use your left hand to take a piece of chicken and toss it in the seasoned flour. Use that same dry hand to drop it into the egg wash. Now, switch to your right hand (your “wet hand”) to toss the chicken in the egg, letting any excess drip off. Finally, drop the egg-coated chicken into the panko and use your dry left hand again to press the panko firmly onto the nugget.
- Place the breaded nugget on a clean plate or baking sheet and repeat with the remaining chicken.
Phase 3: Choose Your Cooking Method
- Method A: Frying (For Maximum Crunch)
- Pour about 1-2 inches of oil into your heavy-bottomed skillet. Heat it over medium-high heat until it reaches 350°F (175°C) on your thermometer.
- Carefully place a single layer of nuggets into the hot oil. Do not overcrowd the pan! Fry in batches.
- Fry for 3-4 minutes per side, until the crust is a deep golden brown and the chicken is cooked through.
- Use your tongs to remove the nuggets and place them on your prepared wire rack to drain. Immediately sprinkle with a little extra salt.
- Method B: Air Frying or Baking (The Healthier Route)
- For the Air Fryer: Preheat your air fryer to 400°F (200°C). Spray the basket and the nuggets themselves liberally with cooking spray. Arrange the nuggets in a single layer in the basket and air fry for 10-12 minutes, flipping halfway through, until golden and crispy.
- For the Oven: Preheat your oven to 425°F (220°C). Place your wire rack inside a baking sheet. Arrange the nuggets on the rack and spray them generously with cooking spray. Bake for 15-20 minutes, flipping halfway through, until golden brown and crispy.
Calories & Nutritional Info (The Nugget Breakdown)
Here’s a rough idea of what you’re looking at for a standard serving (about 6 nuggets).
- Deep-Fried Nuggets:
- Estimated Calories: Around 350-450 kcal.
- Baked/Air-Fried Nuggets:
- Estimated Calories: Around 250-300 kcal.
- Protein Power: No matter how you cook them, these nuggets are packed with high-quality protein.
Common Nugget Nightmares to Avoid
Don’t let these simple mistakes ruin your crispy, golden dreams.
- The Soggy Breading Tragedy. This is the saddest of all nugget outcomes. It’s almost always caused by your oil not being hot enough or by overcrowding the pan. Both of these mistakes cause the oil temperature to drop, so the breading absorbs oil instead of crisping up in it. Use a thermometer and fry in small batches!
- The Dreaded “Club Hand.” This is what happens when you use the same hand for the wet and dry breading steps. You inevitably end up with a hand encased in a thick, gummy, batter-glove. Designate one hand for dry ingredients and one for wet ingredients. It will change your breading life.
- Skipping the Panko. Sure, you can use regular breadcrumbs, but why would you? Panko breadcrumbs are lighter and flakier, and they will give you a far superior, shatteringly crispy coating. It’s an easy upgrade that makes a huge difference.
- Draining on Paper Towels. When you place hot, fried food directly on paper towels, the bottom traps steam and can become soggy. Draining your nuggets on a wire rack allows air to circulate all around, keeping every single surface perfectly crispy.
Variations & Customizations (The Nugget-verse Is Vast)
The basic nugget is a perfect canvas. Let’s get creative.
- Spicy Buffalo Nuggets: Add a tablespoon or two of your favorite hot sauce to the egg wash and a pinch of cayenne pepper to the seasoned flour. Serve with blue cheese or ranch dressing.
- Parmesan Herb Nuggets: Add ¼ cup of grated Parmesan cheese and a teaspoon of Italian seasoning to the panko breadcrumbs. These are fantastic with a side of marinara for dipping.
- The “Chick-fil-A” Style Pickle Brine: This is a game-changer. Cut your chicken breast into chunks and let them marinate in pickle juice for at least 30 minutes (or up to a few hours) in the fridge before you pat them dry and bread them. The brine tenderizes the chicken and gives it that signature, subtle tang.
Your Burning Nugget Questions, Answered
Let’s tackle some of the most common questions.
Can I use chicken thighs instead of breasts?
Absolutely! Chicken thighs are naturally juicier and more flavorful, making them a fantastic choice for nuggets. The cooking time will be about the same.
How do I know when the chicken nuggets are cooked through?
The most reliable way is to use a meat thermometer; the internal temperature should be 165°F (74°C). Visually, the juices should run clear if you cut one open.
Can I make these ahead of time?
Yes. The best way to reheat them and bring back the crispiness is in an oven or air fryer at 375°F (190°C) for about 5-8 minutes. Microwaving will make them soggy.
How do I get the breading to really stick to the chicken?
The three-step breading process (flour, then egg, then panko) is the key. The flour gives the egg something to cling to, and the egg gives the panko something to cling to. Also, make sure to pat your chicken dry before you start.
Can I freeze homemade chicken nuggets?
Yes! Cook them completely, let them cool, then arrange them on a baking sheet in a single layer and freeze until solid. Once frozen, you can transfer them to a freezer bag. They’ll last for up to 3 months.
What are the best dipping sauces for these?
The world is your oyster! Honey mustard, BBQ sauce, ranch, sweet and sour, or a simple ketchup are all classic choices.
Are the baked or air-fried nuggets really as crispy as the fried ones?
Let’s be honest: nothing is quite as shatteringly crispy as a deep-fried nugget. However, the air-fried and baked versions get incredibly close—very crispy and golden brown, with the huge advantage of being much healthier and less messy.
Final Thoughts
You’ve done it. You have created the pinnacle of comfort food from scratch. You have rescued the chicken nugget from the freezer aisle and restored its honor with real ingredients and a truly magnificent crunch. You are now the master of your own nugget destiny.
So go on. Line up your favorite dipping sauces. Grab a warm, golden-brown nugget and dunk it with wild abandon. Take a bite of that pure, crispy, juicy victory. You’ll never look at a drive-thru the same way again.